Instruction Manual BUILD IN GAS OVEN Model:EMPV-24WOD03 EMPV-24WOD04 -1-
General Instruction These instructions are only valid if the country symbol appears on the appliance. If the symbol does not appear on the appliance, it is necessary to refer to the technical instructions which will provide the necessary instructions concerning modification of the appliance to the conditions of us of the country.
Warning: a) The use of a gas cooking appliance results in the production of heat and moisture in the room in which it is installed. Ensure that the kitchen is well ventilated: keep natural ventilation holes open or install a mechanical ventilation device (mechanical extractor hood) b) During use the appliances becomes hot. Care should be taken to avoid touching heating elements inside the oven c) Accessible parts may become hot during use. Young children should be kept away.
i) This appliance can be used by children aged from 8 years and above and persons with reduced physical, sensory or mental capabilities or lack of experience and knowledge if they have been given supervision or instruction concerning use of the appliance in a safe way and understand the hazards involved. Children shall not play with the appliance.
Close-Up View -5-
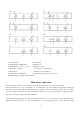
A. Control Panel B. Oven Rack C. Dripping Pan or Baking Sheet D. Flame cover E. Timer Knob(only available on some models) F. Valve knob(gas) G. Valve knob(gas/gas) H. Valve knob(gas/electrical) I. Switch Knob J. Electric cooker clock Knob K. Temperature controller Knob L. Indicator light(gas-electric conversion) M. Indicator light(heating element working) How to use your oven The various features of this oven are controlled via the knobs and buttons located on the control panels.
models). For all other types of cooking, never use the bottom shelf and never place anything on the bottom of the oven when it is in operation because this could damage the enamel. Always place your cookware (dishes, aluminum foil, etc) on the grid provided with the appliances inserted especially along the oven guides.
In the event of a brief power failure, the oven burner can be lit by hand: a) open the oven door b) hold a match or lighter near the burner hold as shown in the figure, press knob “H”, in fully and turn it anticlockwise, setting it to the Max position. Since the oven is equipped with a safety device, after lighting the burner keep knob “H” pressed in for about 6 seconds to allow the gas to pass until the safety thermocouple is heated. c) Once the burner is lit, shut the oven door.
Notice: the oven door gets hot during cooking. Please keep children well away. The valve lgnition(G)、The valve lgnition(F) This knob is used not only to select the different oven modes, but also to choose the right cooking temperature from among the temperatures shown on the knob itself.(from 130 to 250) for the food to be cooked in the oven. The electronic ignition device of the oven is build into the control knob itself.
IMPORTANT: (only available on some models)If you have the oven or grill in use whilst the timer is counting down. When the countdown ends, the oven will continue to heat. You must turn off the oven/grill using the oven function and temperature control knob. (only available on some models)If you have the oven or grill in use whilst the timer is counting down. When the countdown ends, the oven or grill will stop to work(just controlling one: oven or grill), another will continue to heat.
The indicator light(gas-electric conversion) (L) (only available on some models) Turning the knob from gas to electrical model, it lighting. The heating element(electrical grill)indicator light (M) (only available on some models) When heating element working, it lighting. How to remove the oven door For a more thorough clean, you can remove the oven door.
Practical Cooking Advice The oven offers a wide range of alternahves which allow you to cook any type of food m the best possible way With time you will learn to make the best use of this versatile cooking appliance and the following dlrechons are only a guideline which may be varied according to your own personal experience Baking Cakes When baking cakes1 always place them in the oven after it has been preheated (about 15 minutes)The temperature is normally around 160'C.
on the top. Pastry is too dark on top Place it on a lower rack, lower increase the cooking time. Using the Grill Important: always use the grill with the oven door shuL This will allow you both to obtain excellent results and 10 save on energy (approx,mately 10%) Use the R "grill" mode. placing the food under the centre of the grill.
Chops Hamburgers Sausages Toasted sandwiches Grill With rotisserie present) Veal on the spit Chicken on the spit Lamb on the spit 1,5 1 1,7 n.04 4 4 4 4 5 3 5 3 - 20-25 10-15 20-25 2-3 1,0 1,5 1,0 - - - 80-90 80-90 80-90 (where N.B.:cooking times are approximate and may vary according to personal taste When cooking using the grill, the dripping pan must always be placed on the 1st oven rack from the bottom.
Details A Adjacent Room Room to be ventilated Fig A Examples of Ventilation Opening Increasing opening For comburent Air between door and floor Fig B c) Liquefied petroleum gas is heavier than air and, therefore, settles downwards. Thus, rooms containing LPG cylinders must also be equipped with apertures to the outside for ventilation of gas in the event of leaks. LPG cylinders must not, therefore, be installed or stored in rooms or storage areas that are below ground level(cellars, etc.
m mm 5mm 58 2mm 5 95mm 563 600 mm 13. 5mm 50m 59 5 m m 22m 558 mm m 600mm m 5 85- 590mm 563m m 5 0 mMi n 5mm 582mm 595mm 13.5mm 50m m M in 595 mm 22m 558 mm m In order to ensure adequate ventilation, the back panel of the cabinet unit must be removed. Installing the oven so that it rests on two strips of wood is preferable. If the oven rests on a continuous, flat surface, there must an aperture of at least 50*563mm.
Electrical Connection Those ovens equipped with a three-pole cable are designed to operate with alternating current with the voltage and frequency indicated on the data plate (located on the appliance) and in the instruction manual. The wire for earthing the appliance is yellow-green in color. Only connecting the power supply complying to the mark on the rating label, the oven could be used.
appliance). The gas supply pipe fitting is a threaded 1/2 gas cylindrical male attachment. Connecting a flexible jointless stainless steel pipe to a threaded attachment The gas supply pipe fitting is a threaded 1/2 gas cylindrical male attachment. Only use pipe and seals that comply with the current National Norms. These pipes must be installed so that their length is never any longer than 2000mm when fully extended.
Minimum regulation of the oven knob c) Regulate the oven burner minimum: Turn the knob first to the Max setting for about 10 minutes and then to Min; Remove the knob Remove the disk fastened to the control panel Adjust the screw located outside the thermostat cock pin until the flame is small but steady ( the flame can be seen through the slots on the oven bottom) N.B.: In this case of liquid gas, the regulation screw must be screwed in all the way.
Burner and Nozzle Characteristics Product Name Built In Gas Oven Model Number JK-G2P58D03 Appliances Category Gas Category Supply Pressure (mbar) I3+(28~30/37) I3B/P(30) I3B/P(37) I3B/P(50) I2H I2E I2L I2E+(20~25) G30/G31 G30 G30 G30 G20 G20 G25 G20/G25 (28~30/37) 29 37 50 20 20 25 20/25 AT, CH, CZ, DE, AT,CH,CY,CZ, SK DK,EE,ES,FI, BE, CH, CY, BE, BG, CY, CZ, PL CZ,ES, FR,GB, DK, EE, FI, FR, Countries Of GR, IE, IT, LT, GB, GR, HR, HU, FR,GB,GR,IE, Destination PT,
Common troubles and troubleshooting Troubleshooting Troubles Baking effect is not well The oven lighting does not work Timer does not work Cause Handling Setting is not right Grilling rack setting position is not right Bulb is loose or damaged tighten up or replace the blown Break in power supply check if power cut Setting is not right Referring “timer setting method” The automatic regulating device of Grilling temperature is abnormal temperature is broken Gas pressure or voltage is not right Coo