
Installation Guide


INSTALLATION AND CARE GUIDE
4
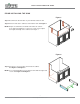
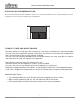
Figure 3.
Step 4: Attach the beams into place with wood glue.
Allow enough time for the glue to dry (follow product
recommendation).
Step 5: Fasten the 2 x 4 beams with wood screws into the cabinet.
See figure 3.
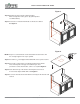
NOTE: Step 6 is recommended to ensure that that the bottom of the sink
has enough support. This step is optional.
Step 6: Cut and fit a
3
/
4
" thick plywood board that will sit on top of the beams.
Step 7: Cut-out the sections where your drain and faucet lines will be.
These will depend on the type of installation you chose
(Under-the-counter, flush-mount, semi-recessed). See Figure 4.
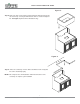
Step 8: fit the board on top of the beams and verify that it is leveled.
If not leveled, adjusted with shims. See Figure 4.
Step 9: Secure the board to the beams with wood. Verify the the board is still
leveled.
Figure 4.
www.empire-industries.com
INSTALLATION AND CARE GUIDE