USB 2.
CLASS 1 LASER PRODUCT APPAREIL A LASER DE CLASSE 1 LASER KLASSE 1 LUOKAN 1 LASERLAITE PRODUIT LASER CATEGORIE 1 CAUTION CLASS 3B VISIBLE AND INVISIBLE LASER RADIATION WHEN OPEN. AVOID DIRECT EXPOSURE TO BEAM. VORSICHT KLASSE 3B SICHTBARE UND UNSICHTBARE LASERSTRAHLUNG WENN GEOFFNET. NICHT IN DEN STRAHL SEHEN. ATTENTION RADIATION DU FAISCEAU LASER VISIBLES ET INVISIBLES DE CLASSE 3B EN CAS D'OUVERTURE. EVITER TOUTE EXPOSITION AUX RAYONS.
reasonable protection against harmful interference in a residential installation. This equipment generates, uses and can radiate radio frequency energy and, if not installed and used in accordance with the instructions, may cause harmful interference to radio communications. However, there is no guarantee that interference will not occur in a particular installation.
Table of Contents INTRODUCTION ABOUT USB SYSTEM REQUIREMENTS PACKAGE CONTENTS INSTALLATION HARDWARE INSTALLATION DRIVER INSTALLATION SOFTWARE PACKAGE DVD REGIONAL CODE OPERATION & CONNECTION FRONT PANEL TECHNICAL DATA 1 2 3 3 4 4 5 5 6 8 8 10
INTRODUCTION Accompanying the new DVD storage technology, we are honored to present you a compact and multiformat external drive with USB 2.0 interface: DVD Writer supporting DVD±R/RW and DVD-RAM writing. This USB 2.0 DVD Writer frees up precious bay space and offers more backup choices other than acting as a CD-R/RW drive and as a DVD-ROM reader.
Serves as RPC-2 DVD-ROM Drive Smooth DVD playback Compatible with most existing DVD-ROM drives and DVD video players Bundled with an extensive application software package About USB USB (Universal Serial Bus), a means of attaching devices to your computer, is basically a standardized intelligent serial connection which provides an expandable, hot-pluggable*1 interface.
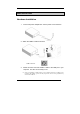
System Requirements For IBM compatible PCs, the system requirements recommended are as follows: Pentium III, 800MHz or above with at least 256MB of memory Minimum 2GB free Hard Disk space Operating system: Microsoft Windows 98SE/ME/2000/XP USB 2.0 PCI host card (If there’s no USB 2.0 built-in port in the PC system.) Package Contents USB 2.0 DVD Writer Power adapter with power cord. USB 2.
INSTALLATION Hardware Installation 1. Connect the power adapter with the AC power cord to the drive. 2. Attach the USB 2.0 cable to the drive. USB Connector 3. Attach the other end of the USB 2.0 cable to the USB port in your computer. The drive is now ready to use. ♦ If you are installing a USB 2.0 drive, your computer must have a USB 2.0 port to achieve the highest speed. You may experience slower drive performance if connected to USB 1.1.
Note: ♦ Be sure to use the USB 2.0 cable bundled with the drive. ♦ Never plug or unplug in any other USB device while the drive is transferring data. It’s likely to lose data. ♦ It’s advisable not to disconnect the drive or unplug the power to the drive while a CD is inserted. ♦ Do not connect more than two rewritable optical drives to USB port of the computer.
DVD Regional Code Region Playback Control Management All DVD Video Playback systems have “Region Playback Control” management (RPC) which is required by Hollywood movie industry and defined by DVD Forum. This includes DVD-Video players and PC systems with DVD-Video capability. You can only play DVD-Video discs with the same regional code as your DVD-Video Playback system.
About This Drive This DVD Writer is also a RPC2 DVD-ROM drive and according to DVD-Forum, PC chip must be designed into DVD-ROM drives to record how many times a user has changed the regional code. The first regional code will depend on the DVD title you play and you are allowed to modify the regional code 5 times (including the initial one). After the fifth alteration, the regional code will be locked and only those DVD titles of the same regional code could be played afterwards, so set the code carefully.
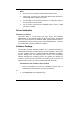
OPERATION & CONNECTION Front Panel 1. LED Indicator (Green color) Flashes “green” while verifying, reading or Writing discs. 2. Disc Tray Place the disc in the tray, and then press the Close/Eject button or lightly push the tray to close it. 3. Emergency Eject Hole If the Close/Eject button doesn’t work properly and the disc tray can’t be opened, you can insert a paper clip or a small rod into this hole for manual ejection. Please make sure to power off the system before you do that. 4.
Rear View 1. USB Connector 2. D.C.
TECHNICAL DATA Interface USB 2.0 Disc Capacity DVD+/-R, DVD+/-RW: Single layer 4.7GB Double layer 8.5GB DVD-RAM: 4.
Reading Speed DVD+/- R: DVD-RAM: DVD+/-RW: max. 12X, max. 5X max. 8X DVD+R/-R DL: max. 8X CD-R: max. 48X CD-RW: max. 32X CD-ROM: max. 48X DVD-ROM: max.
Drive with holder (Optional) Width 160.0 mm Depth 193.0 mm Height 77.5 mm Width 193.5 mm Depth 193.0 mm Mounting Method RMS output Voltage Horizontal Line out = 0.6 ± 10%Vrms Power Requirement input: AC 100~240V, 50/60Hz output: 5V 1.5A, 12V 1.
3100553181 Version 1.0 Dec.