Empyre Pro Series Models 200 and 400 Installation and Operation Instructions Phase II Wood Gasifier
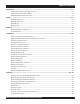
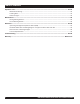
TABLE OF CONTENTS Introduction.......................................................................................................................................................... 3–4 The Empyre Pro Series Hot Water Furnace.....................................................................................................3 How The Empyre Pro Series Works..................................................................................................................3 Model & Serial Number Information.
TABLE OF CONTENTS Operation con’t............................................................................................................................................... 16–19 Blower Draft Setting....................................................................................................................................... 19 Loading Door..................................................................................................................................................
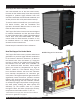
INTRODUCTION The Empyre Pro Series Hot Water Furnace You have selected one of the best wood stoves/ furnaces on the market today! It has been specially designed to produce highly efficient heat with emissions well below environmental standards, and we are proud to offer a 10 year limited warranty! To ensure maximum benefit from your new Empyre Pro Series furnace, read the Installation and Operation Instruction Manual cover to cover and follow all instructions carefully.
INTRODUCTION Model & Serial Number Information Locate and record the model number and serial number in the space provided. See page 7 (item #2) for location of decal on furnace. Have this information available when contacting the dealer for service, warranty or other information. 817547R00 EMPYRE PRO SERIES HYDRONIC FURNACE Solid Fuel Fired Furnace FOURNAISE À EAU CHAUDE SÉRIE EMPYRE PRO Fournaise à combustible solide Model No./Modèle □ 200 □ 400 Certified Heating Appliance Serial No.
SAFETY Safety Precautions • The Empyre Pro Series furnace is designed to work in conjunction with another heat source. We recommend this furnace not to be used as a stand alone unit. Should the system fail or run out of wood, a backup system should be in place. • For best efficiency and cleanest burn use only seasoned fire wood.
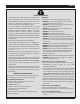
SAFETY Safety Alert Symbol Safety Decals The Safety Alert symbol identifies important safety messages in the manual and on the furnace. When this symbol is present, be alert to the possibility of injury or death. Follow all instructions in the safety message given. This symbol means attention, be alert, and your safety is involved. Please read and follow directions to ensure safe practices when using the Empyre Pro Series furnace. Why is SAFETY important to you? Three very important reasons: 3) 1.
SAFETY 1. 3. DANGER ! Risk of fire or explosion. DO NOT start or fuel the fire using garbage, gasoline, drain oil or other flammable liquids or chemicals. ! For use with aluminum or copper conductors. EMPYREPRO PROSERIES SERIES HYDRONIC EMPYRE HYDRONICFURNACE FURNACE Solid Fuel Fired Furnace FOURNAISE À EAU CHAUDE SÉRIE EMPYRE PRO Fournaise à combustible solide □ 100 □ 200 □ 400 Serial No./ N° De Série ___________________________ Model ed No./Modèle 200 □ 400CSA Standard B366-1-M91 Serial No.
FEATURES Identifying Main Components (see item list on page 9) Unit Dimensions 1 2 3 4 5 9 6 10 7 11 12 8 27 13 14 15 26 25 24 23 T op 16 22 28 17 21 29 20 19 30 8 18 PRO SERIES 200/400 EMPYRE PRO SERIES INSTALLATION AND OPERATION MANUAL
INSTALLATION Identifying Main Components (see drawings on page 8) Nº 1 2 3 4 5 6 7 8 9 10 11 12 13 Description Light Smoke Curtain Light & Blower Switch Aquastat Control Panel Door Loading Door Ash Clean Out Door Secondary Burn Chamber Automatic Smoke Exit Lid Vent Cap & Water Level Indicator Top Lifting Hook Flue Area Baffle 14 Flue/Fly Ash Clean Out Cover 15 16 17 18 19 Return Ports* Door Latch/Locking Bolt Rear Access Door Supply Ports/Low Water Cut Off - Shared Port* Fork Lift Lifting Guides 20 A
INSTALLATION Typical Installation Shop House Insulated Lines Water Lines Foundation Dimensions Trench for Underground Pipes The specifications below provide a stable concrete pad for the Empyre Pro Series furnace. The open area indicated by ‘E’ in the drawing provides a channel for plumbing and electrical conduit. 1. The water lines must be properly insulated to minimize heat loss. Ask your dealer for the right underground water line insulation.
INSTALLATION Outdoor Furnace Installation We recommend that the furnace be installed by a qualified installer. 1. Position furnace on pad. Note: Lift only by top lifting hook or bottom forklift guides. Use caution! Furnace is heavy. 2. Identify and remove components shipped in the furnace: light, ash rake, flue clean out tool (in firebox or rear of furnace). Outdoor Chimney Installation Install a 1 inch (2.54cm) insulated chimney that is listed to ULC-S610 and ULC- S604 standards.
INSTALLATION 4. For an ‘unconfined’ space in a conventionally constructed building, the fresh air infiltration through cracks around windows and doors NORMALLY provides adequate air for combustion and ventilation, and therefore no additional make up air is required. when the boiler water rises in temperature. 5. For a ‘confined’ space or an ‘unconfined’ space in a building with unusually tight construction, an additional source of make up air is required.
INSTALLATION Figure 1 Connect to Existing Boiler Pump ESO Pump Closely Spaced Tees (See Note) Empyre Elite XT Empyre Pro Series Supply Existing Boiler Pump Return Pump Plate Exchanger Figure 2 Connect to Existing Furnace Pump Side Arm or Plate Heat Exchanger ESO Domestic Hot Water Tank Empyre XT Empyre ProElite Series Pump Pump Closely Spaced Tees (See Note) Figure 3 Connect to Existing Boiler Pump Boiler Supply Pump ESO Existing Boiler Empyre Elite XT Empyre Pro Series Boiler Return R
INSTALLATION Auxiliary Heat (Water to Water) Figure 1 Existing hot water furnace Water to water heat exchanger Pump Return Pro Series Pump To baseboard, in-floor radiator, etc. Supply A regular furnace system is left intact and automatically cuts in when the Empyre Pro Series Outdoor Furnace runs out of wood, Figure 1. Note: The existing furnace functions as a standby. The aquastat on an in-house furnace should be turned lower than the aquastat at the Empyre Pro Series.
INSTALLATION Side Arm Installation COLD WATER SYMBOL INDEX Figure 2 MIXED WATER PUMP BALL VALVE TEMPERING VALVE THERMOMETER Used for bleeding air Hot water BOILER DRAIN CAUTION Do not eliminate the existing temperature relief valve.
INSTALLATION Figure 1 Vent opening and water level indicator 7. Turn off pumps. 8. Heat furnace to operating temperature (see ‘Starting the Fire’ below). 9. When water temperature rises above 180°F (82°C) turn on pumps. 10. Add Pro-Fab approved water treatment through vent opening, Figure 1. 11. Add water until level indicator shows full. Maintaining Proper Water Level When the water level is low, the Empyre Pro Series may be filled or topped up through the vent opening, Figure 1.
OPERATION Understanding the Gasification Process of the Empyre Pro Series Wood Furnace Wood gasification is an amazing clean burning and efficient process! It is a process where much of the solid fuel is converted to gases. These gases ignite and burn along with the solid fuel. A large percentage of wood is converted into gases. In order for these gases to burn up there must be the right amount of air, as well as temperatures of well over 1000ºF (538ºC).
OPERATION Correct: Night Loading: Rake the coal and ash from the perimeter of the firebox and especially from the back wall of the chamber where ash tends to build up. With the ask rake, pull the ash and charcoal away from the walls. The force of the fan will blow the ash into the lower chamber on its own. If this is done every day the ash should fall through the slots easily. Load wood into the unit as described above. The firebox should be loaded with wood of proper length.
OPERATION 5. When cleaning flues, also check for fly ash build up at the opening (located in firebox above loading door) and clean out any fly ash buildup. 6. After cleaning, install back flue/fly ash clean out cover and tighten securely with wing nuts. 7. Switch blower on. Disposal of Ash Ashes should be placed in a metal container with a tight fitting lid.
MAINTENANCE During Heating Season 1. Establish a daily routine for storage of fuel and care of the furnace. Check frequently for crusted ash buildup until experience shows how often cleaning is necessary. Be aware that the hotter the fire, the less ash/tar is deposited in the firebox, and that weekly cleanings may be necessary in mild weather, even though monthly cleanings may be enough in the coldest months. Have a clearly understood plan in place in the event of a chimney fire. 2.
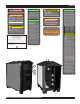
REFERENCE Operating the Digital Temperature Switch (DTS) DTS Technical Data Accuracy: ±1° Output: 16 Amp 1HP 240 Vac SPDT relay Supply voltage: 115 Vac ± 10% Display: 3-digit, red. Figure 1 DTS Description The digital temperature switch is designed for many heating and cooling applications. The probe temperature (Figure 1) is displayed on the bright 3-digit, red light emitting diode (LED). The user is able to adjust the damper on-off temperature set points using the front keypad.
REFERENCE Hot Water Wood Furnace Wiring Diagram - Empyre Pro Series 200 and 400
REFERENCE How to Remove and Reinstall How to Correct a Sticking Flapper How to Check if the Flapper is Sticking 1. If the fire burns well when loading door is open but dies out when door is closed. 2. If little or no exhaust is present at the chimney when blower is running. (Open rear door to ensure blower is running.) How to Correct a Sticking Flapper 1. Check information to determine if the furnace is being operated properly. 2. Shut off furnace. 3.
REFERENCE Furnace Specifications FURNACE MODEL Heating Area* Pro Series 200 Pro Series 400 2,000 - 4,000 186 - 372 6,000 - 8,000 557 - 743 Sq. Feet Sq. Metre Units in cm in cm Log Length +/- 2” (5 cm) Log Diameter Furnace Dimensions Furnace Width Furnace Length Furnace Height Chimney Size 26 6 66 15 34 7 86 18 48 73 81 6 122 185 206 15 49 81 96 8 124 206 244 20 Log Size Loading Door Size in cm Firebox Volume in cm 18 x 18 46 x 46 9.
TROUBLESHOOTING PROBLEM Blower will not come on. Blower is on but no air in firebox. POSSIBLE CAUSE High limit switches may be shut off because the water temperature is higher than aquastat setting permits. No electricity. Blower overheated. Flapper unit flap stuck shut. Check power supply. Wait for blower to cool down. Force flap open. Clean and oil flap. To remove flapper unscrew blower bolts. Use only seasoned wood.
TROUBLESHOOTING PROBLEM Low heat output. It is difficult to get a fire started. POSSIBLE CAUSE The brick slots/air passages in the firebox floor are blocked by ash. SOLUTION Using the ash rake, always stir the firebox ash into the lower ash chamber before adding wood. Limit the charcoal buildup and let the charcoal burn down before adding wood. Brick slots on the floor of the firebox Place small pieces of wood so air can are blocked. flow through.
Empyre Pro Series Models 200 and 400 10 Year Limited Warranty Warranty service may only be performed by Pro-Fab Industries or a Pro-Fab Authorized Empyre Pro Series Furnace Dealer or a ProFab Authorized Empyre Pro Series Furnace Service Centre. PRO-FAB INDUSTRIES INC. WARRANTY Pro-Fab Industries Inc.