
Installation Guide
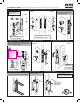

1. Install Mortise Lock 3. Install Key Cylinder
Installation Guide - UL Listed Mortise Knob By Knob, Lever By Lever
4. Tighten Key Cylinder
2. Mount Outside and Inside Trim to Door
Tighten knob
with 3/32
hex wrench
(provided).
REV 03-15-2013IN4-ULMORTLEVKNB
See template for door
prep specications.
Outside
Outside
Inside
Inside
Inside
5. Install Trim Plate
6. Tighten Inside Lever or Knob
Install key cylinder by
threading it clockwise
on to trim plate.
Trims and knobs/levers will
vary depending on style.
After key cylinder is installed, secure
cylinder by tightening screw with 9/64
hex wrench (provided).
See template for door
jamb prep specications.
Fasten security strike to door jamb
with #10 x 3 wood screws (provided).
2. Install Dust Box 1. Install Security Strike 3. Install Strike Plate
Face plate can be
adjusted for door
bevel up to 3-1/2 deg.
TIGHTEN
SCREW
CLOSEST TO
OUTSIDE EDGE
OF DOOR.
DO NOT OVER
TIGHTEN.
Outside edge
of door.
Dust box slips into
security strike.
#12-24 self
taping screws
(provided).
!