
User's Manual


Document # E.0015.16.06 396251
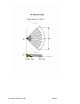
First, attach the mounting plate by means of four screws in an upper corner of the room,
near the ceiling. (Allow 2-3 cm space to enable changing the battery.)
When the mounting plate is in place, insert the sensor PCB and battery into the inner
cover and attach the inner cover to the mounting plate (taking care to insert the anti-
tamper stud of the mounting plate through the slot in the inner cover).
When the sensor PCB and inner cover are in place, assemble the translucent insert and
lens into the outer cover and attach the outer cover.
Insert the battery.
2.3.3 Testing
When the PIR sensor has been registered and installed, test it by first neutralizing the time
delay with a magnet and then moving about in the secured space several times. Each
time, ensure that the LED first flashes red (indicating transmission to the Control Panel)
and then green (indicating receipt of ACK response from the Control Panel).