
User's Manual


Document # E.0015.16.06 396251
2.3 Installation
Installation of each PIR sensor is a three-stage process. The sensor should first be
registered via the IntegrAlarm Control Panel. It should then be mounted on the wall of the
space to be secured, and then tested to confirm that it operates properly.
2.3.1 Registration
From Installer Menu on Control Panel, select ENROLL. Screen will show:
ENTER ZONE #
Use numeric keypad at right of Control Panel to enter the desired zone number. The
description of the zone number (e.g. MASTER BEDROOM) will appear at bottom of
screen. If zone description is correct, press OK at left of Control Panel. Screen will show:
PLEASE POWER UP
THE ZONE
Insert battery. Sensor will begin to transmit. If Control Panel does not identify sensor,
screen will show:
ZONE NOT FOUND
If Control Panel identifies sensor, Control Panel will emit an audible beep and screen will
show:
S/N: XXXXXX
TYPE: YYYY
where XXXXX is the sensor serial number and YYYY is PIR. Ensure that the serial number
displayed corresponds to the serial number of the sensor and press OK at left of Control
Panel. Screen will show:
ACCEPT ZONE DATA
NO YES
Press OK at left of Control Panel.
System will update zone enable parameters, sensor serial number and type, and mode of
operation (A, B or C).
2.3.2 Mounting
Remove the PIR sensor from its package. Ensure that all of the components listed in
Section 2.1 above are present.
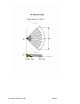
Normally, the PIR sensor will be already assembled and will only require attachment by
means of four screws in an upper corner of the room, near the ceiling, as shown in Figure
1 above. (Allow 2-3 cm space to enable changing the battery.)
If the PIR sensor is not already assembled: