
User Manual


Document # E.0015.16.07 396333
Note: Ensure that the part of the door / window frame intended for the installation is flush
with the door / window itself, so that the magnet is opposite the row of raised dots on the
sensor assembly outer cover. This positioning ensures that the magnet will activate the
sensor when the door / window is opened or closed. If the door / window frame protrudes
outward beyond the door / window, it may be necessary to remove part of the protrusion in
order to accommodate the door / window sensor. If it is not possible to remove the
protrusion, the sensor may be mounted next to the door / window frame, and an external
reed switch may be installed in parallel to the reed switch.
Before mounting the door / window sensor, it is necessary to ensure that all of the
components listed in Section 2.1 above are present and in good order. Insert a small flat
screwdriver into the rectangular holes in the mounting frame and the sensor base in order
to disassemble the sensor assembly, and perform a visual inspection.
Write down the serial number from sensor base on a piece of paper for use in the
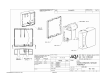
registration process. Now, using two screws, attach the mounting plate to the door /
window frame in the marked location as shown in Figure 1 below.
When the mounting plate is in place, take the sensor PCB and battery to the Control Panel
and perform the registration process as set forth in Section 2.3.1 above.
Now return to the site where the sensor is to be installed. Insert the sensor PCB and
battery into the sensor base and attach the sensor base to the mounting plate (taking care
to insert the anti-tamper stud of the mounting plate through the slot in the inner cover).
When the sensor base is in place, attach the cover. Ensure that the LED can be seen
through the hole in the cover.
Using two screws, attach the magnet block to the door / window in the marked location.
Ensure that the distance between the magnet block and the sensor assembly is no more
than 5 mm as shown in Figure 1 below.
2.3.3 Testing
When the door / window sensor has been registered and installed, test it by opening and
closing the door / window several times. Each time, ensure that the LED first flashes red
(indicating transmission to the Control Panel) and then green (indicating receipt of ACK
response from the Control Panel).