
Operating instructions

INTRODUCTION
© 1985, 1986, 1987 E-mu Systems, Inc. Page 15
INSTANT GRATIFICATION!
If you just can’t wait another second before hearing the Emulator II, we understand. Follow the
directions below EXACTLY as given and get ready to hear some great sounds. (Incidentally, in
case you make a mistake or run into problems, don’t worry. This process is described in greater
detail in Guided Tour #1.)
1. Making sure that the Emulator II is unplugged; patch the rear panel MIX OUT jack to the
input of a high quality amplification system.
2. Turn the front panel MIX OUT volume control (located near the Emulator II logo) fully
counter-clockwise.
3. Check that the rear panel voltage selector is set for the correct voltage in your part of the
world.
4. Plug the Emulator II line cord into an AC outlet.
5. If you are not familiar with how to handle computer disks, you will have to delay your Instant
Gratification somewhat. Please turn to the GENERAL INSTRUCTIONS section and read the
part labeled GENERAL INSTRUCTIONS 5 on proper disk handling. If you know how to treat
disks with the proper loving care, then proceed.
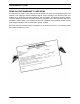
6. Check that there are no disks currently in the disk drive(s). If there are, or if the disk drives
contain cardboard packing materials, turn the drive latches to their counter-clockwise
positions (see Fig. GENINS-3 in the GENERAL INSTRUCTIONS section), remove the disks
or packing materials, and put them in a safe place.
7. Turn on power. All LED’s will flash for a moment, except for the disk drive LED’s which will
continue to flash. The display will say Insert Diskette.
8. Select one of the factory disks supplied with the Emulator II, and insert it label side ~ with
the label going in last into the top disk drive (or the only disk drive with a single-drive
Emulator). Fig. GENINS-4 in the GENERAL INSTRUCTIONS section shows how to insert a
disk. When the disk is seated in the drive, turn the disk drive latch clockwise until it is
pointing straight down. The drive LED will turn on steadily, and the display will start
communicating with you.
9. When the drive LED turns off, turn up the MIX OUT control and start playing the keyboard.
All right!! The display will show you the number (P followed by two digits) and name of the
sound you are playing. These sounds are called Presets, for reasons that will become clear
later.
10. Use the calculator-type keypad underneath the display to call up different Presets. Press a
two-digit number; start with 01 and play the keyboard for a while, then press 02 and play,
03, 04, etc. At some point you will run out of factory Presets, and the display will say NOT
FOUND.
If you want, vary the modulation wheels towards the left hand side of the keyboard. They
perform different functions with different Presets.