WorkForce ® 840 Series Quick Guide Basic Copying, Printing, Scanning, and Faxing Maintenance Network Setup Solving Problems
Contents Using the Control Panel . . . . . . . . . . . . . . . . . . . . . . . . . . . . . . . . 4 Using the Touch Screen . . . . . . . . . . . . . . . . . . . . . . . . . . . . . . . . . . . . . 4 Loading Paper . . . . . . . . . . . . . . . . . . . . . . . . . . . . . . . . . . . . . . . . . 6 Using Special Papers . . . . . . . . . . . . . . . . . . . . . . . . . . . . . . . . . . . . . . . . 9 Placing Originals for Copying, Scanning, or Faxing . . . . . . . 11 Using the Scanner Glass . . . . . . . . . .
Scanning a Document or Photo . . . . . . . . . . . . . . . . . . . . . . . . 26 Quick Scanning With the Control Panel . . . . . . . . . . . . . . . . . . . . . . . . . 26 Scanning With Epson Scan Software . . . . . . . . . . . . . . . . . . . . . . . . . . . . 27 Scanning With Mac OS X 10.6 . . . . . . . . . . . . . . . . . . . . . . . . . . . . . . . 28 Maintaining Your Product . . . . . . . . . . . . . . . . . . . . . . . . . . . . . 29 Checking the Print Head Nozzles . . . . . . . . . . . . . . . . . .
Using the Control Panel The control panel is adjustable. Press the release bar underneath to raise or lower it as shown. Using the Touch Screen The touch screen makes it easy to use all the features of your product. To save energy, the screen goes dark after several minutes of inactivity. Touch the screen to wake it up. Caution: Press the touch screen gently with the tip of your finger; don’t press too hard or use sharp objects.
The touch screen displays only the buttons that are available for the task you are working on. Button Description Display multiple photos at the same time, or crop the current photo (when a memory card is inserted). Return to the Home screen. Turn Auto Answer on or off. The light indicates that Auto Answer is on. y Cancel current operation and return to previous screen. x Display a menu for special settings. The touch screen retains the settings from the last time it was used.
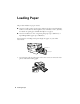
Loading Paper The product includes two paper cassettes. ■ Cassette 1 holds a variety of paper types and sizes for photos and documents, from 4 × 6-inch (10 × 15 cm) to legal-size (8.5 × 14 inches or 216 × 356 mm). For details on special paper available from Epson, see page 9. ■ Cassette 2 holds letter-, A4-, or legal-size plain paper (up to 250 sheets) or Epson Bright White paper (up to 200 sheets). For instructions on loading envelopes and legal-size paper, see your online User’s Guide.
2. Slide the edge guides outward. 3. Position the guide shown below for the size of paper you’re using. 4 × 6-inch (10 × 15 cm) in cassette 1 only Letter- or A4-size LTR 4. Load the paper against the edge guide with the glossy or printable side face down. (Load letterhead or pre-printed paper with the top edge at the back of the paper cassette.
Fan the paper and align its edges before loading. Do not use transparencies or paper with binder holes For automatic two-sided printing, use plain paper or Epson Bright White Paper. You can load up to 250 sheets of plain paper or 20 sheets of photo paper in cassette 1. See your online User’s Guide for details. 5. Slide the edge guides against the paper, but not too tight. Make sure the paper is under the tabs on the edge guides. 4 × 6-inch (10 × 15 cm) in cassette 1 only Letter- or A4-size 6.
Using Special Papers Epson offers a wide array of high quality papers, making it easy to maximize the impact of your documents, photos, presentations, and other projects. You can purchase genuine Epson ink and paper at Epson Supplies CentralSM at www.epson.com/ink3 (U.S. sales) or www.epson.ca (Canadian sales). You can also purchase supplies from an Epson authorized reseller. To find the nearest one, call 800-GO-EPSON (800-463-7766). Part number Sheet count Letter (8.
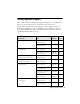
Paper name Size Part number Sheet count Epson Premium Photo Paper Glossy Borderless 4 × 6 inches (102 × 152 mm) S041808 S041727 40 100 Borderless 5 × 7 inches (127 × 178 mm) S041464 20 Borderless 8 × 10 inches (203 × 254 mm) S041465 20 Letter (8.5 × 11 inches [216 × 279 mm]) S042183 S041667 25 50 Borderless 4 × 6 inches (102 × 152 mm) S041809 S042038 50 100 Letter (8.5 × 11 inches [216 × 279 mm]) S041141 S041649 S041271 20 50 100 Epson Bright White Paper Letter (8.
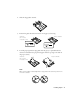
Placing Originals for Copying, Scanning, or Faxing Before you copy, scan, or fax, place your documents or photos on the scanner glass or in the Automatic Document Feeder. Using the Scanner Glass You can place a photo or a document up to letter-size (or A4-size) on the scanner glass. 1. Open the document cover. 2. Place your original face down on the scanner glass, with the top against the back left corner. 3. Close the cover gently to keep your original in place.
2. Fan the originals, then tap them on a flat surface to even the edges. 3. Insert the originals face up, top edge first. The ADF icon appears on the screen. Note: If you’re using the 2-up Copy layout, make sure the originals are loaded as shown below. 4. Slide the edge guide against the originals, but not too tight.
Copying Follow the steps in this section to copy black-and-white or color documents. You can copy documents onto letter- or A4-size plain paper, Epson Bright White Paper, or Epson Presentation Paper Matte, just like on a copy machine. If you use the Automatic Document Feeder, you can copy up to 30 sheets at a time.
6. Adjust the density (make the copies lighter or darker) if necessary. 7. To change copy settings, press x and select Paper and Copy Settings. The Layout setting should be With Border and the Paper Size should be Letter. ■ To print on both sides of the page, select 2-Sided Printing, then select On.
Printing From a Memory Card Your product lets you print photos directly from your digital camera’s memory card; just insert it into the memory card slot and you’re ready to print. See the online User’s Guide for instructions on copying memory card files between your Epson printer and a computer, and printing photos directly from your camera. Inserting the Card 1. Make sure your printer is turned on. 2. Insert your card as shown. Note: Do not force the card into the slot; it won’t go in all the way.
Printing Photos From the LCD Screen You can select individual photos for printing as you view them on the LCD screen. See the online User’s Guide for instructions on printing photo greeting cards, layout sheets, and proof sheets. 1. Load several sheets of Epson photo paper in cassette 1 (various types available; see page 9). 2. Press if necessary and select Print Photos. 3. Select View and Print Photos. 4. Press l or r to scroll through your photos and display one that you want to print. 5.
Printing From Your Computer This section describes the basic steps for printing from a Windows® or Macintosh computer. For detailed instructions on printing, see the online User’s Guide. Tip: It’s a good idea to check for updates to your Epson product software; see page 47. Printing in Windows 1. Open a photo or document in a printing program, and select the print option. 2. Select your product, then click the Preferences or Properties button. 3. On the Main tab, select basic print settings.
6. For more printing options, click the Advanced tab. 7. Click OK to save your settings. 8. Click OK or Print to start printing. This window appears and shows the progress of your print job. Cancel printing Printing With a Macintosh Follow the steps below to print from Mac OS® X 10.5 to 10.6. Note: If you’re printing from Mac OS X 10.4, see your online User’s Guide for instructions. 1. Open a photo or document in a printing program, open the File menu, and select Print. 2.
4. Select basic copy and page settings. For borderless photos, choose a Paper Size setting with a Borderless option. Note: If the setting you want isn’t shown (for example, Scale), check for it in your application before printing or check for it at the bottom of this window. Copy and page settings Application settings 5.
8. Click Print. 9. To monitor your print job, click the printer icon in the Dock. Cancel printing Pause or resume printing Select the print job Selecting the Correct Paper Type Select the correct Type (see page 17) or Media Type (see page 19) setting in your printer software so the ink coverage can be adjusted accordingly.
Faxing a Document Your product lets you send faxes by entering fax numbers or selecting entries from a speed dial list. Using the Automatic Document Feeder, you can fax up to 30 pages at a time. Note: You can also send a fax from your computer using the Epson FAX Utility. For more information, see the online User’s Guide. Breakdown or repair of this product may cause loss of fax data and settings. Epson is not responsible for backing up or recovering data and settings during or after the warranty period.
In Auto Answer mode, if the incoming call is a fax and you pick up the phone or the answering machine answers, the product automatically begins receiving the fax. If the other party is a caller, the phone can be used as normal or a message can be left on the answering machine. Note: Any phone or answering machine must be connected to the EXT. port for your product to detect an incoming fax call when the phone is picked up.
Entering Your Phone Number 1. Select Your Phone Number from the Header menu. 2. Use the keypad to enter your phone number, up to 20 digits (see below). You don’t need to use dashes. Use the # button to type the + symbol for an international number. 3. Press OK to return to the Header menu. Using the Keypad to Enter Numbers and Characters ■ To enter a fax number, use the numeric keypad. ■ To enter text, press a keypad number repeatedly to switch between uppercase, lowercase, or numbers. ■ Press 1 Symb.
Sending a Fax From the Control Panel You can send a fax by manually entering a fax number, as described below. Note: To set up and use a speed dial list or send a fax from your computer using the Epson FAX Utility, see your online User’s Guide. 1. Place your original(s) for faxing (see page 11). 2. Press if necessary and select Fax. To fax a two-sided document, place your document in the Automatic Document Feeder. Press x Menu and select Fax Send Settings. Then press 2-Sided Scanning and select On. 3.
Receiving Faxes Before receiving faxes, make sure you load plain paper and select the correct settings for the paper you’ve loaded. 1. Press if necessary and select Setup. 2. Press l or r and select Fax Settings. 3. Select Scan & Print Setup. 4. Select the Paper Size and Paper Source you want to use for printing faxes, then press OK. Note: If the incoming fax is larger than the paper you loaded, it is reduced to fit or printed on multiple pages, depending on the Auto Reduction setting you select. 5.
Scanning a Document or Photo You can use your product to scan original documents and photos and save them on your computer. Quick Scanning With the Control Panel Use the control panel to quickly scan a photo or document and save it on your computer. You can even scan a photo and have it automatically included in an email message. Note: For Mac OS X 10.6, see “Scanning With Mac OS X 10.6” on page 28. 1. Place your original document or photo as shown on page 11. 2. Press if necessary and select Scan. 3.
Scanning With Epson Scan Software You can scan from any TWAIN-compliant application using Epson Scan. Or you can start Epson Scan directly from your computer and save your image to a file. Note: For Mac OS X 10.6, see “Scanning With Mac OS X 10.6” on page 28. For detailed scanning instructions, see the online User’s Guide. 1. Place your original document or photo as shown on page 11. 2. Do one of the following to start Epson Scan: ■ Windows: Double-click the EPSON Scan icon on your desktop.
4. Click Scan. The image is scanned and you see its icon in Windows Explorer or Macintosh Finder. Scanning With Mac OS X 10.6 You can scan original documents and photos and save them as files on your computer. 1. Open an image editing application such as Preview and select Import From Scanner from the File menu, then select your product. For network scanning, select Import From Scanner > Include Networked Devices. Then select Import From Scanner again and select your product. 2.
Maintaining Your Product Follow the instructions in this chapter to check and clean the print head nozzles, check ink levels, and replace ink cartridges. If you need to align the print head, see the online User’s Guide. Checking the Print Head Nozzles If your printouts are faint or have gaps in them, some of the nozzles in the print head may be clogged or ink may be running low in one or more of the ink cartridges. Follow the steps below to check the print head nozzles. 1.
Cleaning the Print Head If print quality has declined and the nozzle check indicates clogged nozzles, you can clean the print head. Print head cleaning uses ink, so clean it only if necessary. Note: You cannot clean the print head if an ink cartridge is expended, and may not be able to clean it when a cartridge is low. You must replace the cartridge first (see page 32). 1. Press if necessary and select Setup. 2. Select Maintenance, then Head Cleaning. 3.
Checking Ink Levels You can check the ink levels anytime right on the LCD screen. To check the ink levels with your Windows or Macintosh software, see the instructions in your online User’s Guide. Note: Printing stops when an ink cartridge is expended. If a color cartridge is expended, you may be able to continue printing temporarily with black ink; see the online User’s Guide for more information. If the black cartridge is expended, you must replace it to continue printing. 1.
Use the following list when you order or purchase new ink cartridges: Ink color High-capacity Extra High-capacity Black 126 127 Cyan 126 127 Magenta 126 127 Yellow 126 127 Note: We recommend that you use genuine Epson cartridges and do not refill them. The use of other products may affect your print quality and could result in product damage. Yields vary considerably based on images printed, print settings, paper type, frequency of use, and temperature.
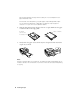
If you’re replacing a cartridge before you see a message on the LCD screen, press Setup, select Maintenance, then select Ink Cartridge Replacement. 3. Raise the scanner. 4. Open the cartridge cover. Then squeeze the tab on the cartridge and lift it up. Dispose of it carefully. Do not take the used cartridge apart or try to refill it. Warning: If ink gets on your hands, wash them thoroughly with soap and water. If ink gets into your eyes, flush them immediately with water.
7. Insert the new ink cartridge into the holder and push it down until it clicks into place. Once you replace all the cartridges that need replacing, close the cartridge cover and push it down until it clicks into place. 8. Lower the scanner to begin charging the ink. This takes a few minutes. When you see a completion message on the LCD screen, ink charging is finished. Caution: Never turn off the product while ink is charging or you’ll waste ink.
Network Setup Make sure you follow the instructions on the Start Here sheet to set up your product, choose your connection, and install the software. The on-screen instructions during the installation process help you set up your network connection. Follow the instructions in this chapter only if you need additional help: ■ For wireless network setup, see below. ■ For wired network (Ethernet®) setup, see page 43.
Installing for the First Time Before you begin, make sure that you have the following information ready and write it in the space provided below: ■ Network name (SSID): _________________________________________ ■ Network password: ____________________________________________ Note: If your network password contains uppercase (ABC) or lowercase (abc) letters, be sure to note them correctly. If you don’t know your network name (SSID) or network password, contact the person who set up your wireless network.
5. When you see this screen, select Wireless connection and click Next. 6. When you see this screen, select Set up printer for the first time, then click Next. 7. Mac OS X 10.6: At the next screen, click Next. Then skip to “Setting Up With the Touch Screen” on page 39.
8. When you see this screen, select a wireless network setup method, then click Next. Click for more information on setup methods If you selected Using Temporary USB cable connection, do not connect the USB cable yet. (The cable is not included.) 9. At the next screen, click Next. 10. Do one of the following: ■ If you selected Using Temporary USB cable connection, continue following the instructions on the screen.
Setting Up With the Touch Screen If you are using Mac OS X 10.6, or you don’t have a USB cable to set up the product on your wireless network, follow these steps to set it up using the product’s touch screen: 1. Follow the instructions on the screen to start the product’s wireless Setup Wizard. 2. When you see this screen, use the product’s touch screen to select the name of your wireless network, then press OK. When you’re finished, click Next.
3. When you see this screen, do one of the following: ■ If your wireless network has security enabled, use the product’s touch screen to enter your network password. Follow the instructions on the screen. If your password has uppercase (ABC) or lowercase (abc) letters, be sure to enter them correctly. Then click Next and go to step 4. ■ If your wireless network doesn’t have security enabled, click Next and continue with step 4.
Entering Your SSID Manually If your network doesn’t broadcast its name (SSID), follow these steps to enter it: if necessary and select Setup. Select Network Settings, then Wireless LAN Setup, then Setup Wizard. 1. Press 2. From the Select SSID screen on the touch panel, press l or r to select Other SSIDs. Important: Network names are case-sensitive. Be sure to enter uppercase letters (ABC) or lowercase letters (abc) correctly.
4. When you see this screen, click Install. Windows Mac OS X 5. When you see this screen, select Wireless connection and click Next. 6. When you see this screen, select The printer is already on my wireless network, then click Next.
7. Wait while the software is installed, then follow the instructions on the screen to install the rest of your software. When installation is complete, remove the CD and restart your computer. Wired (Ethernet) Network Setup Follow these steps to set up your product for the first time or, if your product is already on your wired network, to set up additional computers to print to the product. Note: If you’re having trouble setting up your product, see “Network Problems” on page 47. 1.
5. When you see this screen, select Wired network connection and click Next. 6. When you see the Network Setup screen, do one of the following: ■ For a first-time installation, choose Set up printer for the first time, then click Next. ■ If the printer has already been set up for network printing and you want to be able to print from an additional computer, choose The printer is already on my Ethernet network, then click Next.
7. For first-time installation only: Connect the product to your router, access point, or hub with an Ethernet network cable, then click Next. 8. Mac OS X 10.6: Skip to step 14 on page 46. 9. Wait while the software is installed, then click Next to start network installation. 10. When you see the Firewall Warning screen, click Next. Note: If you see a firewall alert message, click Unblock or Allow to let EpsonNet Setup continue. Do not select Ask Me Later, Keep Blocking, or Block. 11.
13. If you see an Installation Complete screen that includes a Print Test Page button, click it to print a test page. 14. Click Finish, then follow the instructions on the screen to install the rest of your software. When installation is complete, remove the CD and restart your computer.
Solving Problems Check the messages on the display screen to diagnose the cause of most problems. Press if necessary, then press l or r and select Problem Solver. Press l or r to see all the help topics. You can also check the basic troubleshooting suggestions below, or your online User’s Guide. Checking for Software Updates Periodically, it’s a good idea to check Epson’s support website for free updates to your product software.
Network setup failed ■ Try moving the product to a different location. ■ If your wireless router doesn’t broadcast its network name (SSID), see page 41 for instructions on manually entering your wireless network name. ■ Make sure there aren’t any access restrictions (such as MAC address filtering) set on the wireless router. If access restrictions are set, register the product’s MAC address on the router. Print a Network Status Sheet (see page 49) to obtain the MAC address.
Print a Network Status Sheet 1. Press if necessary and select Setup. 2. Press l or r and select Network Settings. 3. Press l or r and select Confirm Network Settings. 4. Press x to print the status sheet. Printing and Copying Problems ■ Make sure the size of paper you loaded matches the paper size and source selected on the control panel or in your printer software. ■ Letter-size paper is automatically selected for copying.
Paper Feeding Problems If paper doesn’t feed correctly, remove the paper and fan the sheets, then reload them as shown on page 6. Don’t load paper above the tabs on the edge guides. If paper has jammed, follow the steps on the LCD screen. If necessary, check the following areas: 1. Lift the scanner and carefully remove any paper trapped inside. 2. Remove the duplexer from the back of the printer and check for jammed paper. 3. Remove any paper stuck in the duplexer.
4. If the error message is not cleared, remove the paper cassettes, then check for jammed paper inside the printer. 5. If the error message is still not cleared, turn off the printer. Remove the power cord and disconnect the printer. Make sure both paper cassettes are removed. Carefully stand the printer on its side, then remove any paper. ADF Document Feeding Problems If documents don’t feed correctly in the Automatic Document Feeder (ADF), make sure the paper is not bent, folded, or curled.
Faxing Problems ■ Make sure the recipient’s fax machine is turned on and working. ■ Make sure the LINE port on the product is connected to a telephone wall jack. Verify that the telephone wall jack works by connecting a phone to it. ■ Make sure the ■ If you use a voicemail service, you should turn off Auto Answer. Otherwise, calls or faxes may be inadvertently received by your voicemail. ■ If the line has static, press and select Setup, then select Fax Settings, and then Communication.
Where to Get Help Epson Technical Support Internet Support Visit Epson’s support website at epson.com/support (U.S.) or epson.ca/support (Canada) and select your product for solutions to common problems. You can download drivers and documentation, get FAQs and troubleshooting advice, or e-mail Epson with your questions.
Notices Important Safety Instructions Before using your Epson product, read and follow these safety instructions: ■ Be sure to follow all warnings and instructions marked on the product. ■ Use only the type of power source indicated on the product label. ■ Use only the power cord that comes with the product. Use of another cord may cause fires or shock. Do not use the cord with any other equipment. Make sure the power cord meets all relevant local safety standards.
■ Keep the product away from potential sources of electromagnetic interference, such as loudspeakers or the base units of cordless phones. ■ Allow space behind the printer for the cables, and space above the printer so that you can fully raise the document cover. ■ Leave enough room around the product for sufficient ventilation. Make sure the product is at least 4 inches (10 cm) away from the wall. ■ Do not block or cover openings in the product case or insert objects through the slots.
Wireless Network Safety ■ Do not use this product inside medical facilities or near medical equipment. Radio waves from the product may adversely affect the operation of medical equipment. ■ Keep this product at least 9 inches (22 cm) away from cardiac pacemakers. Radio waves from this product may adversely affect their operation. ■ Do not use this product near automatically controlled devices such as automatic doors or fire alarms. Radio waves from this product may adversely affect these devices.
Declaration of Conformity According to 47CFR, Part 2 and 15 for: Class B Personal Computers and Peripherals; and/or CPU Boards and Power Supplies used with Class B Personal Computers: We: Located at: Epson America, Inc. MS 3-13 3840 Kilroy Airport Way Long Beach, CA 90806 Telephone: (562) 290-5254 Declare under sole responsibility that the product identified herein, complies with 47CFR Part 2 and 15 of the FCC rules as a Class B digital device.
for this product is part of the product identifier that has the format US: BKMFA01BC423A. The digits represented by 01 are the REN without a decimal point (e.g., 01 is a REN of 0.1). For earlier products, the REN is separately shown on the label. This equipment may not be used on coin service provided by the telephone company. Connection to party lines is subject to state tariffs. Should this equipment cause harm to the telephone network, the telephone company may discontinue your service temporarily.
If your home has specially wired alarm equipment connected to the telephone line, ensure the installation of this equipment Model C422A does not disable your alarm equipment. If you have questions about what will disable alarm equipment, consult your telephone company or a qualified installer. This equipment has been tested and found to comply with the limits for a Class B digital device, pursuant to Part 15 of the FCC Rules.
L’indice d’équivalence de la sonnerie (IES) sert à indiquer le nombre maximal de terminaux qui peuvent être raccordés à une interface téléphonique. La terminaison d’une interface peut consister en une combinaison quelconque de dispositifs, à la seule condition que la somme d’indices d’équivalence de la sonnerie de tous les dispositifs n’excède pas 5. Cet appareil numérique de la classe B est conforme à la norme NMB-003 du Canada. Epson America, Inc., Limited Warranty What Is Covered: Epson America, Inc.
Epson. This warranty does not cover ribbons, ink cartridges or third party parts, components, or peripheral devices added to the Epson product after its shipment from Epson, e.g., dealer or user-added boards or components.
Copyright Notice All rights reserved. No part of this publication may be reproduced, stored in a retrieval system, or transmitted in any form or by any means, electronic, mechanical, photocopying, recording, or otherwise, without the prior written permission of Seiko Epson Corporation. The information contained herein is designed only for use with this Epson product. Epson is not responsible for any use of this information as applied to other equipment.
Notices 63
CPD-28101 Printed in XXXXXX