
Assembly Instructions

Assembly Instruction
Item # 2775238
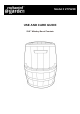
23.5"Whiskey Barrel Fountain
* * WARNING * *
Read these instructions carefully and keep the fountain power off until the following
assembly process is completed.
Notes:
• Choose an appropriate location for the fountain.
• Excessive weight or pressure on any of the fountain sections may cause it to fall. Keep pets, children, or anyone from
sitting, leaning, or climbing on any of the fountain components.
• While fountain is designed to operate as splash free as possible, some water splashing out of the fountain is
inevitable. Place the fountain in a location where any splashing will not cause damage. Always keep the fountain
working with sufficient water and clean of debris and dirt to ensure proper functioning of the pump.
• If necessary, clean the fountain with a soft cloth and change the water frequently. Due to water evaporation, you
may see a buildup of white residue on the fountain surface from mineral content in the water supply. To prevent
such buildup, regularly clean the fountain with soap and water, do not use any abrasive, which may damage the
applied finish.
• See the pump instructions for pump safety, maintenance, and warranty information. Keep this manual for future
reference.
Use of water clarifier, or algaecide of any kind will damage the paint on the fountain and will not be covered under the
manufactures warranty.
Installation & Assembly
• Take out all the package parts from the carton
• Assemble the fountain as outlined in the below steps
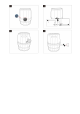
Step (1). Place the fountain on a level surface away from areas where it is likely to get clogged with leaves
and make sure that the cable will reach the socket and open the back door (anticlockwise), Showed as in
diagram 1
Step (2). Connect the LED light wire to end of adapter, Showed as 2a in diagram 2
Step (3). Connect the pump to water pipe ,Showed as 2b in diagram 2
Step (4). Fill the fountain with clean water carefully ,Showed as in diagram 3
Step (5). Plug the pump and adapter to the socket ,Showed as in diagram 4, The water will start to flow in
minutes.
Attention: Always make sure the water can submerge the pump completely to work properly and prevent
the pump damage.
• Adjust the pump flow rate to achieve the desired effect and to minimize any splashing. Splashing can occur if the
flow rate is too high or the reservoir is too full. The flow rate can be increased or decreased by moving the flow rate
control dial on the pump body. Moving the switch towards ‘+/ Max .’ will increase the flow rate and moving it
towards ‘-/Min’ will decrease it.