
Assembly Instructions


Assembly Instructions
I
tem#: Y95857
* * WARNING * *
Read these instructions carefully and keep the fountain power off until the following
assembly process is strictly completed.
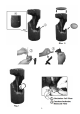
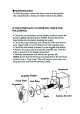
Step (1) Pull out the flexible hose from the inside of the fo untain, t hen connect it to p ump outlet,
shown in
②.
Step (2) Find the cable line of the light from the inside of the fountain and pull it out from the
back hole, shown in
④
, then connect it with the adaptor, shown in
③.
Step (3) Place the strainer mesh in to the fountain, and put the cover on the top of the fou ntain,
shown in Figure ‘1’.
Figure
’2’
Fill the reservoir with clean water carefully. Always make sure the water is high enough to submerge the
pump completely. This en sures the pump can work properly and prevents damage to the pump.
Plug the pump and adaptor then switch on, the wat er will start to flow in minutes, and lights w i ll be
shining instan tly.
Adjust the pump flow rate to achieve the desired effect an d to mi nimize any splashing, shown in (F).
Splashing can occur if the flow rate is too high or the reservoir is too full. The flow rate can be
increased or decreased by moving the flow rate con trol slider on the pump b ody. Moving the slider
towards ‘+/Max.’ will increase the flow rate and moving it towards ‘-/Min’ will decrease it.
On some types of pumps, th e flow regul ator may be turned clockwise or counterclockwise to adjust .
1