
Installation Guide

ASSEMBLY AND INSTALLATION INSTRUCTIONS
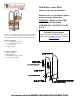
Rack Assembly
1) Slip the soft plastic floor glides over the ends of the arched uprights.
2) Position each rectangular newspaper holder so the threaded hole in the center of one long side is on the bottom,
next to the floor. Using the Allen wrench and the four 3/8” x 3/4” button head screws, attach the holders inside
the arched uprights.
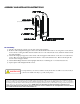
3) Attach the newspaper support bar to the inside of the newspaper holder with two of the 3/8” x ½” button head
screws. The screws should be inserted from the interior of the rack toward the floor. The bar should span the
bottom of the newspaper holder.
4) Attach the kindling holders the arched uprights with the two remaining 3/8” x ½” button head screws.
5) Square up the rack and tighten all the screws.
It is important that your rack is assembled correctly. If the unit is assembled or used incorrectly, it
could become unstable and collapse, possibly causing injury.
WARNING
3/8" x 3/4" BUTTONHEAD SCREW
Limited Warranty: This product is warranted to be free of material defects for a period of five years from the date of purchase. Customer's exclusive remedy shall
be the repair or replacement of the defective product and shall be subject to the following conditions: (1) notice of any defect is received by Enclume within the
warranty period and (2) customer returns the defective product to Enclume Design Products, 24 Colwell St., Port Hadlock, WA 98339, postage prepaid within 20
days following a return authorization number (which may be obtained by telephoning the number at the top of this instructions) being provided to the customer by
Enclume. There are no other warranties, expressed or implied. THERE ARE NO WARRANTIES OF MERCHANTABILITY OR FITNESS FOR A
PARTICULAR PURPOSE. ENCLUME SPECIFICALLY DISCLAIMS ANY AND ALL INCIDENTAL OR CONSEQUENTIAL DAMAGES ARISING
OUT OF THE PURCHASE OR USE OF ENCLUME'S PRODUCTS.