
Installation Guide

TIP! SAVE TIME AND HASSLE. PLEASE READ ENTIRE INSTRUCTIONS BEFORE BEGINNING ASSEMBLY.
PAINTABLE - Want a different color? The finish on this pot rack can be spray painted any color. We
recommend Rustoleum “Hammered” colors for their metal-like finishes, however any quality spray-can paint may be
used. See a paint retailer for guidance
TOOLS NEEDED -
Hex wrench, Toggles, fastener hardware (nuts, bolts) are provided.
TOOLS NEEDED:
Provided: Installation wall anchors, bolts and hex wrench.
You will need: level, tape measure, pencil, drill and ½” drill bit, hammer and nail
STEP 1: LOCATION
Decide where you want to place your utensil bar. We suggest a location near your stove, sink or food preparation area.
Also consider the height of the wall where the bar will hang, keeping in mind how far below the bar your pot and utensils
will hang.
On the wall (use a level to ensure that the bar is horizontal) mark the two points where the bar will attach. Then tap a
small nail through each mark to be certain a stud is not in the way. (NOTE: because your utensil bar includes super-
strong new-technology anchors that can hold 100s of pounds, you DO NOT need to locate and bolt to studs.)
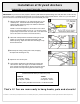
STEP 2: INSTALL DRYWALL ANCHORS
Follow instructions on following page.
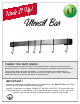
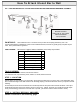
How To Attach Utensil Bar to Wall
Item No. Description Qty.
33 Utensil Bar 1
Installation hardware
19C Button head screw - 2” 2
25A Pot hook straight 4
25B Pot hook angled 4
26A Hex wrench 1
27A Toggle 2
MISSING A PART?
Please call our TOLL FREE
SERVICE CENTER
1 (877) 362-5863