
Operating instructions


26
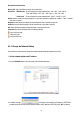
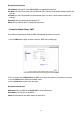
3. The accessible networks here are the „FTP”, the „SMTP”, the „SNTP”, the „DDNS”, the „PPPoE” and the
„IP Filter”.
4. Fill in the „IP Address”, „Netmask”, „Default gateway”, „Primary nameserver”, and „HTTP Port” if necessary.
5. Click the
Submit button to submit the new network setting.
6. Click the
Home button to return to the home page.
Description of function keys
IP Address: Enter the 4Byte IP Address in the appropriate blank space (the value in each box may be anywhere
between 0 and 255). Every Video Server has to own an IP address to be identified on the network.
Netmask: Fill in the 4Byte Subnet Mask in the required blank spaces (usually any numbers between 0 and 255).
It is used to identify the subnet where the Video Server is sited.
Default gateway: Type in the 4Byte Gateway in the relevant blank spaces (each unit value must be between 0
and 255).
Primary nameserver: Enter the 4Byte DNS Server Address in the blank spaces provided (each value unit must be
between 0 and 255). The DNS Server is in charge of translating the Domain Name into the IP Address.
HTTP Port Number: Indicates the specific HTTP Port Number. The default is 80.
Submit: Click to submit the new network setting to the Video Server.
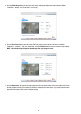
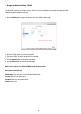
• Change the Network Setting - FTP
Please follow the steps below to change the FTP setting via the network if necessary to upload live recording data.
1. Click the
FTP button at top left to enter the „FTP Server Setting” page.
2. Type in the „FTP Server” address, the „User Name”, and the „Password” of the FTP Server; and set the
„File Upload Path” of the image files when necessary.
3. Click the
Submit button to submit the new FTP setting of the recording.
4. Click the
Home button to return to the home page.