
Operating instructions

35
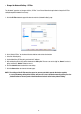
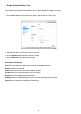
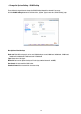
2. Click „Enable Timestamp” to checkmark the attached box and activate the function
3. Add or modify any timestamp’s data if necessary.
4. Enter the „Timestamp Color” you have chosen.
5. Enter the „Timestamp Location” you have chosen.
6. Enter the „Timestamp Format” you have chosen.
7. Click the
Submit button to submit the new user’s setting.
8. Click the
Home button to return to the home page.
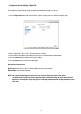
Description of function keys
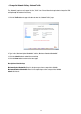
Enable Timestamp: Checkmark to activate the function.
Timestamp Color: Click to open the list of eight color modes to choose from: „BLACK”, „WHITE”, „RED”, „ORANGE”,
„YELLOW”, „GREEN”, „BLUE”, and „PURPLE”.
Timestamp Location: Click to open the list of four location modes to choose from: „UPPER LEFT”, „UPPER RIGHT”,
„BOTTOM LEFT”, and „BOTTOM RIGHT”, ”ANALOG UPPER LEFT”, „ANALOG UPPER RIGHT”, „ANALOG BOTTOM
LEFT” and „ANALOG BOTTOM RIGHT”.
Timestamp Format: Click to open the list of six format modes to choose from: „YY/MM/DD”, „MM/DD/YY”,
„DD/MM/YY”, „YY/MM/DD TITLE”, „MM/DD/YY TITLE”, and „DD/MM/YY TITLE”.
Submit: Click to set.
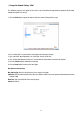
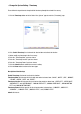
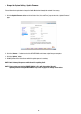
• Change the System Setting - Timestamp
Please follow the steps below to change/add the timestamp through the network if necessary.
1. Click the
Timestamp button on the left side of the „System” page to enter the „Timestamp” page.