
Instruction manual


32
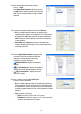
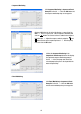
12.6. Go to the following menus: Remote Setup –>
Device –> Setup
Click
Matrix in the device list and the Scan or Add
button to register the master MMX.
12.7. Set up the registration information and click the OK button.
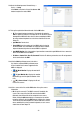
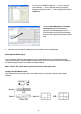
•
ID: The network keyboard assigns the ID automatically when the
MMX is registered, and you can change the ID. The ID will be used to
distinguish the MMX from other devices when controlling the MMX
by using a network keyboard, so each device should have its own
unique ID.
• Spot Monitor: Do not select.
•
Slave MMX: Select the number of slave MMXs daisy-chained to
the master MMX. The slave MMXs are registered on the network
keyboard automatically when the master MMX is registered.
•
Spot MMX Monitor: Select the number of spot monitors connected to spot MMXs which are connected
to the master MMX and slave MMXs.
•
IP Address, Control Port, User ID, Password: Enter the IP address, port number, user ID and password
for the connection to the MMX.
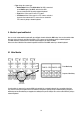
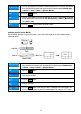
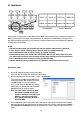
12.8. Click the
Matrix pull-down menu in the device
list, then the registered MMX’s pull-down menu.
A list of monitors and cameras supported in the
MMXs is displayed.
• [ID] Main Monitor: Displays the monitor ID
and type.
• [ID] Spot Monitor No.: Displays the monitor
ID, monitor type and the Spot Out number of the
DVR.
• [ID] „Camera Name”: Displays the ID and
name of the camera.
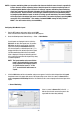
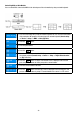
12.9. Click a camera in the list and the Edit button. Set up the camera
information.
• ID: Set up the camera ID. The MMX’s camera ID should be the
same as the camera ID of the DVR connected to the MMX.
Otherwise, two different IDs will be assigned to one camera.
When clicking the OK button displays a message box to confirm
using the existing ID. Click the OK button to complete the changes.
The ID will be used to distinguish the camera from other cameras
when controlling it by using a network keyboard, so each camera
should have its own unique ID.