HEA-21545 HANGING & MURAL INFRARED PATIO HEATER with Remote Control RADIATEUR À INFRAROUGE SUSPENDU ET MURAL POUR TERRASSE avec télécommande Instruction Manual Guide d’utilisation
1 Please read instructions carefully before assembly Veuillez lire attentivement les instructions avant l'assemblage Retain this manual for reference Conservez ce manuel pour référence CONTENT 1. Assembly 2. Operation 3. For your safety 4. Cleaning and storage 5. Specifications 6. Grounding instructions 7. Warranty FRANÇAIS 1-3 3-4 4 5 5 5 5 6 Please empty the packing box thoroughly, and make sure that there are no missing parts. MAKE SURE THERE IS NO DAMAGE TO THE UNIT AND POWER CORD.
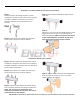
2 Step 5: Put the radiator on the bracket, fix it with the three M6*10 screws and M6*4 nuts, then tighten them. Once installed, you can tilt the radiator by loosening the two side mounting screws and then retighten them. Wall mounted for other surfaces (screws not supplied): Step 1: Using the wall mount bracket as a template Step 3: Put the radiator on the bracket, fix it with the mark the four screw holes where you plan to install the three provided M6*10 screws and M6*4 nuts, then radiator.
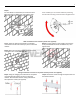
3 Step 3: Insert the two end caps on each side of the square tube and the two caps under the square tube. the radiator. NOTE: It may be that you have to cut the excess wire inside the square tube. You must remove the two end caps to do so. Step 4: Press on the locking crown around the support wire and push or pull on the wire to adjust the height of IMPORTANT: The ceiling material must be 2 cm (0.8 in.) thick or more to support the heater. 3.
4 Activation From the panel control Press the power On/Off switch on the side of the radiator to activate it. Press on the radiator activation button on the control panel to activate or deactivate the heat. From the remote control Press the power On/Off switch on the side of the radiator to activate it. Press the remote control On/Off button to activate or deactivate the heat. IMPORTANT: To operate properly, the remote must be pointed toward the remote control sensor. 4.
5 5. CLEANING AND STORAGE 1. Turn the unit OFF and unplug the unit before cleaning. 2. Use only a soft cloth to clean the exterior. An air compressor or a vacuum cleaner can be used to clean the interior. 3. Do not use gasoline, paint thinner or other chemicals to clean the heater 4. Store the heater in its original box and keep in a cool, dry place. 6. SPECIFICATIONS Power supply: Wattage: 120 V/60 Hz 1500 W 7.
6 TABLE DES MATIÈRES 1. Assemblage 2. Fonctionnement 3. Pour votre sécurité 4. Nettoyage et rangement 5. Spécifications 6. Instructions de mise à la terre 7. Garantie 6-9 9 9-10 10 10 11 11 1. Videz complètement la boîte d’emballage et assurez-vous qu’il ne manque aucune pièce. 2. NE BRANCHEZ PAS L'APPAREIL AVANT QU’IL NE SOIT COMPLÈTEMENT ASSEMBLÉ. ASSUREZ-VOUS QUE L’APPAREIL ET LE CORDON D’ALIMENTATION NE SONT PAS ENDOMMAGÉS.
7 Étape 3: Fixer le support de fixation du radiateur sur les quatre boulons d'expansion. Étape 4: Serrer les quatre écrous, rondelles à ressort et rondelles plates avec la clé M6 fournie. Étape 5 : Mettez le radiateur sur le support, le fixer avec les trois vis M6 * 10 et écrous M6 * 4, puis serrez-les. Une fois installé, vous pouvez incliner le radiateur en desserrant les deux vis de montage côté, puis les resserrer.
8 Suspendue sur surfaces en béton ou très durs (vis non fournies) Étape 1 : Utilisez le support de montage suspendu comme modèle pour marquer les deux trous où vous prévoyez d'installer le radiateur. Percez deux trous dans le plafond et martelez deux vis d'expansion (non fournies). Étape 2: Vissez deux vis et rondelles (non fournies) à travers le tube carré pour le fixer au plafond. Étape 3: Insérez les deux embouts de chaque côté du tube carré.
9 3. FONCTIONNEMENT Vous pouvez mettre en marche ce radiateur avec la télécommande fournie ou en appuyant sur le bouton de mise en marche situé sur le radiateur. Assurez-vous que le radiateur NE FONCTIONNE PAS AVANT de l'accrocher. REMARQUE: Attendez que l'élément de chauffage du radiateur ait refroidi avant de le déplacer. RAPPEL: Les radiateurs électriques sont conçus pour le chauffage complémentaire ou comme une source de chaleur supplémentaire.
10 3. Cet appareil est destiné à un usage domestique seulement. N’UTILISEZ PAS l'appareil dans des endroits tels que des chantiers de construction, des serres, des granges, des étables ou tout autre endroit contenant des matériaux inflammables. 4. N’UTILISEZ PAS l'appareil dans une zone non aérée. 5. Les radiateurs contiennent des pièces chaudes qui produisent des arcs électriques et des étincelles.
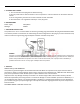
11 7. INSTRUCTIONS DE MISE À LA TERRE Ce produit est destiné à une utilisation sur une tension de circuit nominale de 120 V et à une fiche de terre semblable à celle illustrée ci-dessous. Assurez-vous que l'appareil est branché à une prise ayant la même configuration que la fiche. Si vous utilisez une rallonge, veillez à ce que celle-ci ait aussi une fiche de terre. Aucun adaptateur ne doit être utilisé avec cet appareil.