
Use and Care Manual


2
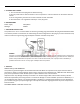
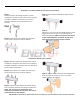
Step 5:
Put the radiator on the bracket, fix it with the three
M6*10 screws and M6*4 nuts, then tighten them.
Once installed, you can tilt the radiator by loosening
the two side mounting screws and then retighten them.
Wall mounted for other surfaces (screws not supplied):
Step 1: Using the wall mount bracket as a template
mark the four screw holes where you plan to install the
radiator.
Step 2: Place the mounting bracket on the four marks
and tighten four screws (not included).
Step 3: Put the radiator on the bracket, fix it with the
three provided M6*10 screws and M6*4 nuts, then
tighten them.
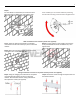
Ceiling mounted for concrete or very hard surfaces (screws not supplied):
Step 1: Using the hanging mount bracket as a template
mark the two holes where you plan to install the
radiator. Drill two holes into the ceiling and hammer
two expansion screws (not supplied).
Step 2: Screw two screws through the square tube into
the wall and tighten.