
Use and Care Manual


3
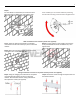
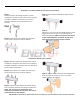
Step 3: Insert the two end caps on each side of the
square tube and the two caps under the square tube.
Step 4: Press on the locking crown around the support
wire and push or pull on the wire to adjust the height of
the radiator. NOTE: It may be that you have to cut the
excess wire inside the square tube. You must remove
the two end caps to do so.
IMPORTANT: The ceiling material must be 2 cm (0.8 in.) thick or more to support the heater.
3. OPERATION
MAKE SURE THE HEATER IS NOT FUNCTIONING BEFORE YOU HANG IT ON A GAZEBO, UNDERNEATH A BALCONY OR A
ROOF.
NOTE: Wait until the heater’s heating element has cooled down before moving it.
REMEMBER: Portable electric heaters are designed for spot heating or as a supplementary heat source. They are not
intended to be the main source of heat during cold months.
Caution: If you must use an extension cord, the cord should be at least No. 14 AWG and rated for no less
than 1875 W. It must also be electrically certified (cETL or UL or CSA).
You must always make sure that there is at least 50 cm (1’ 6”) of empty space above the heater,
25 cm (9’’) from the side and 1.8 m (5’) below the heater.
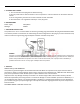
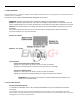
Control Panel
Radiator side view