SAFETY AND OPERATING MANUAL Original Instructions 9.
Read all safety warnings and all instructions before use. Failure to follow the warnings and instructions may result in electric shock, fire and/or serious injury. Save all warnings and instructions for future reference.
GENERAL SAFETY INSTRUCTIONS WARNING. Read all safety warnings and instructions. Failing to follow the warnings and instructions can result in an electric shock, a fire and/or a serious injury. Keep all warnings and all instructions to be able to refer to them later on. The term “tool” in the warnings refers to your electrical mains powered tool (with power cord) or your battery operated tool (without power cord). 1 Safety of the work area a) Keep the work area clean and well lit.
b) Do not use the tool if the switch does not make it possible to change from the operating condition to stop and vice versa. Any tool which cannot be controlled by the switch is dangerous and should be repaired. c) Disconnect the power cord before any adjustment, changing an accessory or before storing the tool. Such preventive safety measures reduce the risk of starting the tool accidentally.
NOISE INFORMATION Wear hearing protection! Measured sound values determined according to EN 60745. The noise figures quoted are emission levels and are not necessarily safe working levels. Whilst there is a correlation between the emission and exposure levels, this cannot be used reliably to determine whether or not further precautions are required. Factors that influence the actual level of exposure of work-force include the characteristics of the work room, the other sources of noise, etc. i.e.
WARNING! Identify safety measures to protect the operator that are based on an estimation of exposure in the actual conditions of use (taking account of all parts of the operating cycle such as the times when the tool is switched off and when it is running idle in addition to the trigger time). Vibration and noise reduction To reduce the impact of noise and vibration emission, limit the time of operation, use low-vibration and low-noise operating modes as well as wear personal protective equipment.
Double insulation The tool is double insulated. This means that all the external metal parts are electrically insulated from the mains power supply. This is done by placing insulation barriers between the electrical and mechanical components making it unnecessary for the tool to be earthed. m Important note Be sure the supply is the same as the voltage given on the rating plate. The tool is fitted with a two-core cable and plug.
SYMBOLS The symbols shown on the product has great significance for the safe use of the product. WARNING - To reduce the risk of injury, user must read the instruction manual Wear eye protection Wear ear protection Wear respiratory protection Wear safety gloves Double insulation Class II Conforms to all relevant safety standards.
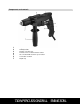
Components and controls 1 2 3 4 5 6 7 Keyless chuck 13mm Auxiliary handle Function selection lever Forward, reverse rotation and lock control On / off switch with electronic speed control Lock button of switch Depth stop 710W PERCUSSION DRILL ENB463DRL
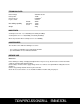
TECHNICAL DATA Rated voltage Rated power No load speed Keyless chuck Max drilling capability Weight Wood: Masonry: Steel: 230-240V~50 Hz 710W 0-2900min-1 2-13mm 30mm 13mm 10mm 2.
Operating instructions 1. INSTALLING AND REMOVING THE DRILL BITS 1. Open the drill chuck by holding the rear section of the chuck and turn the front section in an anti-clockwise direction, until the jaws are open enough. 2. Insert the bit firmly into the chuck. To tighten, turn the front section of the chuck (while holding the rear section) in a clockwise direction until the bit is fully installed and maintained.(Fig.1) Fig.1 3. To remove the bit, just open the chuck and then remove it by hand. 2.
5. SWITCH LOCK The On/Off switch trigger can be locked in OFF position. This helps to reduce the possibility of accidental starting when not in use. To lock the switch, place the forward/reverse rotation control in the center position. 6. REVERSIBLE Use the reverse-rotation lever to switch between clockwise and anticlockwise rotation. Fig.5 For drilling use forward rotation, slide the rotation lever to the right. To use reverse rotation, slide the rotation lever to the left to release a jammed drill bit.
Drilling operation Drilling wood 1. 2. 3. 4. 5. 6. For drilling into wood, ensure the selection switch is set to the regular drilling position (to the right). When drilling into soft wood, the drill should be operated at high speed. When drilling into hard wood, the drill should be operated at low speed. Ensure you are using a twist drill bit. Ensure the workpiece is clamped or anchored firmly before operation.
CARE AND MAINTENANCE Keep the ventilation openings clear and clean the product regularly. This machine requires no special mechanical maintenance such as greasing the bearings. If something unusual occurs during use, switch off the supply and disconnect the plug. Inspect and repair the tool before using it again. The repairs must be carried out by a qualified technician. Repair of the tool must only be carried out by a qualified repair technician.
ENVIRONMENTAL PROTECTION This product is marked with the selective sorting symbol on waste electrical and electronic equipment. This means that this product should not be disposed of with household waste but must be supported by a collection system in accordance with Directive 2002/96/EC. It will then be recycled or dismantled to minimize impacts on the environment, electrical and electronic products are potentially hazardous to the environment and human health due to the presence of hazardous substances.
PLUG REPLACEMENT (UK & IRELAND ONLY) If you need to replace the fitted plug then follow the instructions below. IMPORTANT The wires in the mains lead are colored in accordance with the following code: BLUE =NEUTRAL Brown = Live As the colors of the wires in the mains lead of this appliance may not correspond with the colored markings identifying the terminals in your plug, proceed as follows. The wire which is colored blue must be connected to the terminal which is marked with N.
Declaration of Conformity We, Importer Powersmith (UK) LTD.