User Manual
PRECAUTIONS We strongly recommend reading the points below before operating this product. ≥≥ Back up the data periodically to another safe media. Under no circumstances there is any liability regarding to data damage or loss in a HDD. ≥≥ Do not place the player near devices that emit strong magnetic fields. It may cause data damage or loss on the HDD. ≥≥ Do not disassemble or remodel the device. It may cause damage and/or data loss to the player. ≥≥ Do not power off the device while a file is playing.
1. 2. 3. 4. 5. 6. 7. 8. Media................................................................................................................................................................ 4 1.1. Internal hard disk................................................................................................................................... 4 1.1.1. Drive Installation 4 1.1.2. Connection with computer 5 1.1.3. Device detection 5 Windows 98SE 5 Windows Me/2000/XP/Vista, Mac OS X, Linux 5 1.1.4.
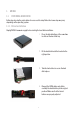
1. MEDIA 1.1. INTERNAL HARD DISK Follow step-by-step the points below for a successful setup. Notice that some steps may vary depending on the operating system. 1.1.1. Drive Installation Unplug P4350 from mains supply before starting the hard disk installation. 1. Press the lateral buttons at the same time to slide out the hard disk tray. 2. Fit the hard disk inside the bracket in the right position. 3. Turn the two latches to secure the hard disk in place. 4.
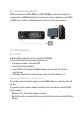
1.1.2. Connection with computer P4350 can cummunicate at USB1.1 (12Mbps) or USB2.0 (480Mbps) speed with the computer. It is recommended to use USB2.0 which allows faster transfer rates. If your computer has a mix of USB1.1 and USB2.0 ports read the corresponding manual to be able to select the appropriate port. 1.1.3. Device detection Windows 98SE In Windows 98SE, install the device driver included in the CD-ROM. You can also download the driver at www.energysistem.com. 1. Run setup.
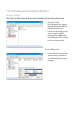
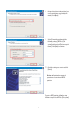
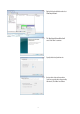
1.1.4. Partitioning and Formatting Hard Disk Drive Windows 2000/XP Note: There are slight changes in this procedure depending on the operating system version. 1. Select [Start>Control Panel>Management Tools>Computer Management] and then [Disk Management] under [Storage] section. 2. In the list of connected disks locate the one that corresponds to P4350. 3. Activate the disk using MBR partition table (GUID partition table is not supported) if it is not already activated.. To create a FAT32 partition: 4.
5. ‘New Partition Wizard’ will show. Click [Next] to continue. 6. Select [Primary Partition] and click [Next] to continue. 7. Enter the desired partition size and click [Next] to continue.
. Assign a drive letter to the partition (you can accept the letter suggested by the wizard), click [Next]. 9. Select [Format this partition with the following settings]; FAT32 as [File system] and then check [Perform a quick format]. Click [Next] to continue. 10. Check the settings are correct and click [Finish]. Windows will perform the requested operations to create the new FAT32 partition. To create a NTFS partition, follow the steps 4-10 but at step 9 select NTFS as [File system].
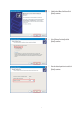
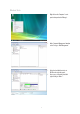
Windows Vista 1. Right click on the ‘Computer’ icon in your desktop and select ’Manage’. 2. At the ‘Computer Management’ window select ‘Storage > Disk Management’. 3. Select the hard disk that refers to P4350 on the right side panel. 4. If necessary, activate the hard disk right-clicking on ‘Disk n *’.
5. Right click the hard disk bar and select ‘New Simple Volume’. 6. The ‘New Simple Volume Wizard’ will start. Click ‘Next’ to continue. 7. Specify the desired partition size. 8. Assign a drive letter to the partition (you can accept the letter suggested by the wizard). Click ‘Next’ to continue.
9. In this step leave all the default values unchanged and click ‘Next’ to continue. 10. Click ‘Finish’ to start the actual formatting. 11. When the formatting is over the text ‘Healthy (Primary Partition)’ will be shown confirming that the disk is ready to use.
1.2. USB DEVICES Connect USB devices to the USB2.0 host port. Caution Some USB devices (particularly USB-powered 2.5” hard disks) require more electric power than the 500mA specified in the USB standard. In this case, use the separate power adapter which should accompany the power-demanding device. 1.3. NETWORK Directly play your network-stored multimedia files (streaming).
Wi-Fi Connection If the wireless connection drops frequently then try to minimize the obstacles or distance between P4350 and computer or wireless Access Point. 1.3.2. File sharing Windows XP At the PC select the folder you want to share, right click and choose ‘Sharing and security’. Mark ‘Share this folder on the network’ and click ‘Apply’ The icon shared. will inform that the folder is Note: disabling Windows Firewall may be required to allow the P4350 to connect to the PC.
Windows Vista Click on ‘Start’ > ‘Control Panel’ Click on ‘Network and Internet’ > ‘Network and Sharing Center’ Configure the following options in ‘Sharing and Discovery’. Network discovery: Enabled File sharing: Enabled Public folder sharing: Enabled (read only) Password protected sharing: Disabled Once configured, place the files you want to play in the public folder so P4350 can have access to them.
2. FRONT AND BACK VIEWS 1 1. LCD Screen. Displays status information, menus, etc. 7 8 1 2 9 10 3 4 11 1. Exhaust Fan. 2. S/PDIF Digital Audio Out RCA. 3. CVBS Video Out RCA. 4. Stereo (Left / Right) Analog Audio Out RCA. 5. Ethernet LAN RJ45. 6. Wi-Fi antenna connector. 7. DC Power. 8. USB device port. 9. HDMI Type A connector. 10. S-Video Out. 11. YPbPr Component Video Out 3xRCA. 12. 2x USB host port. 13. S/PDIF Digital Audio Out TOSLINK.
3. CONNECTIONS P4350 offers multiple ways to transmit video and audio to the TV set. 3.1. VIDEO - COMPOSITE The widest used mode to connect P4350 and TV despite its inferior resolution and quality compared with the other connection types. 3.2. VIDEO - S-VIDEO 3.3.
3.4. AUDIO - STEREO ANALOG 3.5. AUDIO - DIGITAL OPTICAL / COAXIAL Two alternatives for connecting P4350 to an A/V receiver or other devices with a digital audio input. 3.6. AUDIO/VIDEO - HDMI High-Definition Multimedia Interface. Transmit both digital audio and video with a single cable.
4. REMOTE CONTROL 1. 2. 3. 4. 1 2 3 17 18 19 4 5 20 6 21 7 22 8 9 23 10 24 11 12 25 26 13 14 27 28 15 16 29 30 5. 6. 7. 8. 9. 10. 11. 12. 13. 14. 15. 16. 17. 18. 19. 20. 21. 22. 23. 24. 25. 26. 27. 28. 29. 30. Power. Power On/Off. HDD. Hard disk contents access. PC. Browse the network-stored multimedia files. Number keys. Enter numbers and characters for various menu items and options. Mute. Mute sound on/off. Play/Pause. Start of pause the playback. OK.
5. MAIN MENU 5.1. HARD DISK Press OK button in the remote control to access the internal hard disk contents. After selecting the desired partition you can browse and play your files. 5.2. NETWORK This option allows you to search and play your multimedia files through your network. The player will show you a list of the shared computers available in the network. Press OK in the remote control to confirm your selection and browse the shared files and folders. 5.3.
5.4.1. A/V (Audio/video Settings) ≥≥ TV Standard Your can choose PAL or NTSC TV output systems when choosing this items. ≥≥ A/V Output You can choose proper TV output among HDMI, C/S Video, HD YPbPr When change one TV output, there would be a window for changing confirmation comes out, choose ‘Yes’ to continue output changing, choose ‘No’ to cancel output changing.
5.4.2. Etc ≥≥ Language You can choose proper user interface language with this option. ≥≥ Subtitle Size Big or small. ≥≥ Subtitle Color You can set different subtitle colors. ≥≥ Slide show timeout You can setting picture slide show space time by using this function, when choose ‘slide show’, there would be a time window comes out, after input the time space you want, press ‘down arrow’ to confirm or cancel the setting.
5.4.3. Network If you choose ‘Wired’ make sure that P4350 is properly connected to an Ethernet LAN. If you choose ‘Wireless’ make sure that a Wi-Fi network is available. ≥≥ Wired You can configure the parameters manually or automatically. Auto: the IP configuration is automatically provided by a DHCP server. Manual: the IP configuration must be provided by user. ≥≥ Wi-Fi Select an Access Point from the available networks list and press Ok to confirm.
7. TROUBLESHOOTING Problem What to do When the unit is on, nothing appears on the screen or the screen is shaking. When the video output mode is not properly set, nothing may appear on the screen, the screen may be in monochrome, or the screen may be shaking. Press “TV OUT” button of the remote controller slowly and change the output mode until the video output mode is properly set.
8. SPECIFICATIONS Supported formats Video MKV (H.264, VC-1) IFO, VOB, ISO, DAT, MPG, TS, MP4 (MPEG1/2/4) AVI (DivX, Xvid) ASF, WMV Audio AAC, M4A, MP3, WMA, WAV, PCM, OGG, AC3, FLAC Pictures JPEG, BMP, GIF, PNG Subtitles SMI, SUB, SRT Audio outputs HDMI, stereo analog (RCA) and digital S/PDIF (coaxial and optical) Video outputs HDMI (up to 1080p), Components YPbPr (up to 1080i), S-Video, Composite (RCA) Connections 2 USB2.0 host ports 1 USB2.0 device port Ethernet LAN (10/100 Mbps) WLAN 802.
WARRANTY Energy Sistem Soyntec S.A. warrants its products to be free from defects in materials and workmanship at the time of purchase. The warranty period is 36 months from the date of purchase. WARRANTY PROCEDURE ≥≥ Visit the Support section at http://support.energysistem.com and select your product to view the FAQ (Frequently Asked Questions). The solution to your problem is very likely to have been already published there.