User manual 1
1. Important Safety Instruction To ensure your safety and the safety of others, please ensure that you read all the safety information before operating this product. Keep this information in a safe place for future reference. This symbol indicates that this product incorporates double insulation between hazardous mains voltage and user accessible parts. WARNING: To reduce the risk of fire or electric shock, do not expose this apparatus to rain or moisture. Safety Considerations.
Cleaning ALWAYS unplug the set top box before you clean it. Do not use liquid or aerosol cleaners. Clean the set top box with a soft, damp (not wet) cloth. T5850 handling and care Place the product in a well-ventilated area. Don’t install it in the cold or under direct sunlight.
2. Front Panel 5 2 1 3 4 1. POWER: Used to turn on/off the main power supply 2. STANDBY INDICATOR: Used to visually show power state of the set top box, the led will turn red if the set top box enters in standby mode: Green = on Red = standby No light = off 3. REMOTE CONTROL SENSOR: Used to receive the signal from the Remote Control. 4. CHANNEL UP/DOWN: Used to change channels without using the Remote Control. 5. USB PORT: Used to attach your external USB hub/card reader/storage device. 3.
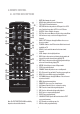
4. remote control 4.1. BuTtON descriptions 1. 2. 28 3. 4. 1 29 PVR STANDBY REC LIST MUTE 16 EPG INFO 2 TTX 17 3 4 5 DTV/VCR 18 19 20 AUDIO SUBTITLE CH+ 6 MENU EXIT OK VOL- VOL+ 21 1 2 TV/RADIO 3 25 26 27 11. 12. 13. 11 4 5 6 7 8 9 0 REV FWD PREV NEXT PLAY PAUSE STOP REPEAT GOTO 23 24 9. 10 RECALL 22 8. 10. 9 CH- FAVOURITE 7 8 5. 6. 7. 12 13 14 15 14. 15. 16. 17. 18. 19. 20. 21. 22. 23. 24. 25. 26. 27.
4.2. Installing the Batteries Remove the battery cover from the remote control and put 2xAAA size batteries inside the compartment. The following diagram shows the correct way to insert batteries. 1. Open the cover O PE 2. Install batteries 3. Close the cover N CL O SE 4.3. Using the remote control To use the remote control, point it towards to the front of the digital receiver. The remote control has a range of 7 metres from the receiver at an angle of 60 degrees.
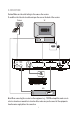
5. CONECTION Caution: Make sure the outlet voltage is the same as the receiver. To avoid the risk of electric shock do not open the cover or the back of the receiver. TV Aerial RF IN RF LOOP THROUGH TV 100-240V 60/60 Hz Digital Audio Coaxial TV VCR HDMI Coaxial VOLUME INPUT SELECTOR POWER BYPASS PRO LOGIC 3 STEREO MODE TEST CHANNEL KARAOKE MUTE UP DOWN 1 MIC 2 1 MIC VOL 2 BASS EXCITE MIC TREBLE ECHO AV receiver VCR Note: When connecting the receiver to other equipment, e.g.
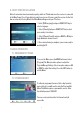
6. FIRST TIME INSTALLATION After all connections have been made properly, switch on TV and make sure the receiver is connected to the Main Power. Press Power button to switch receiver on. If you are using the receiver for the first time or restored to Factory Default, the Main Menu will appear on your TV screen. 1. Select [OSD Language] and press RIGHT/LEFT key to select a language. 2. Select [Country] and press RIGHT/LEFT key to select your country of residence. 3.
SET FAVOURITE PROGRAM: You can create a shortlist of favourite programs that you can easily access. Set Favourite TV or Radio program: 1. Select the preferred program, and then press the FAVOURITE button. A heart-shaped symbol will appear and the program is marked as a favourite. 2. Repeat the previous step to select more Favourite programs. 3. To confirm and exit the Menu, press the EXIT key.
Lock Program You can lock selected programs for restricted view. Lock a TV or Radio Program: 1. Select the preferred program then press the YELLOW button. A lock shaped symbol is displayed. The program is now marked as locked. 2. Repeat the previous step to select more programs. 3. To confirm and exit the menu, press the EXIT button. 4. Press the YELLOW button to disable the locked program. 5.
7.6. VIDEO SETTINGs To access the video menu, press the menu button and select the icon PICTURE. The menu provides options to adjust the video settings. Click up/down to select an option and press the right/left to adjust the settings. Click EXIT to exit the menu. Aspect Ratio The T5850 allows you to set the display format on the screen: ≥≥ 4:3 LB (LetterBox): Typically for wide screen content on convencional 4:3 TV with black bars above and below the picture.
7.7. CHANNEL SEARCH To access the channel search menu, press the menu button and select icon CHANNEL SEARCH. The menu provides options to configure the searching modes. Click the button up/down to select an option and press the right/left to adjust the settings. Click EXIT to exit the menu. 1. Auto Search: This option allows you to search for channels automatically and overwrites all preset channels. 1. Select [search] and press OK or right button to start the search channel. 2.
7.8. TIME SETTINGS To access the time settings menu, press the menu button and select the image. The menu provides options for adjust the region and GMT time zone. Click the buttons of up/down to select an option and press the right/left to adjust the settings. Click EXIT to exit the menu. 1. Time Offset Allows you to enable / disable the automatic update of the zone. If you know where you are (with respect to GMT) time zone you select "manual" and the appropriate time zone.
3. Subtitle Language Select the preferred subtitle language. Note: Audio/subtitles availability depens on channel broadcast. 7.10. SYSTEM SETTING To access the system menu, press the menu button and select the SYSTEM icon. The menu provides options to adjust advanced features of the system. Click the buttons of up/down to select an option and press the right/left to adjust the settings. Click EXIT to exit the menu. 1. Parental Guidance You can restrict access to channels that are unsuitable for children.
7.11. USB To access the USB menu, press the menu button and select the USB icon. Click up/down buttons to select an option and press the right/left to adjust the settings. Click EXIT to exit the menu. 8. MULTIMEDIA To use the multimedia menu is necessary connecting an external USB storage device and access from the MENU - USB and select MULTIMEDIA. ≥≥ Music: Listen to music in MP3 and WAV format. Use the command buttons to move forward/ back/play/stop the music. ≥≥ Photo: View photos in JPEG/BMP.
In both cases (direct/scheduled recording), it will be created a file with the name of the tuned channel, time and starting date of the recording. You can rename the file by clicking the green button. To play recorded programs press LIST in the remote control and select the file with up/down buttons, then press OK to play it. Note: made recording does not support changing values such as subtitles, languages, EPG, etc. You must have a USB data storage device connected.
No response to remote control Receiver off Plug in and turn on receiver Remote control not aimed correctly Aim the remote control at front panel Front panel obstructed Check for obstructions Remote control batteries are inserted incorrectly Check batteries direction Remote control batteries exhausted Replace remote control batteries After moving the device to The aerial feed may come another room can’t receive the through a distribution system digital signal which may reduce the digital signal Tr
Power Multimedia format Voltage 100~240V ~ 50/60Hz Power Max. 8 W Video MPEG2, Divx, Xvid, AVI, MKV, VOB* Audio MP3 & WAV Photo JPEG/BMP USB 2.0 FAT 32 - Multimedia playback and DVB-T recording Note: Specifications are subject to change whithout further notice. * Energy Sistem do not warrants the suport of all video/audio codecs formats. 11. WARRANTY Energy Sistem Soyntec S.A. warrants its products to be free from defects in materials and workmanship at the time of purchase.
DECLARATION OF CONFORMITY Manufacturer Name: Energy Sistem Soyntec S. A. Address: Pol. Ind. Finestrat C/ Calpe esq. C/ Alicante S/N, 03509 Finestrat Alicante Tel: 902 388 388 · Fax: 902 119 034 NIF: A53107488 We declare under our own exclusive responsibility that the product: Energy Sistem® Multimedia DVB-T Recorder Energy™ T5850 Is in compliance with the essential directives, norms and standards of the European Union 89/336/ EEC (EMC Directive).