
Owners manual

Installation instructions
For set # 5.3142
Dodge Ram 4WD 1500, 2500 & 3500
Front control arm bushings
17590 Page 1 of 2
22/OCT/12 BRH
1131 VIA CALLEJON, SAN CLEMENTE, CA 92673
R
Updated 8/JAN/03 BRH Updated 23/JAN/04 BRH
Updated 14/JAN/05 BRH Updated 10/JAN/06 BRH
Updated 2/JAN/07 BRH
2012 Energy Suspension. All rights reserved.
C
May not be reproduced, in any form, or by any means,
without the written consent of Energy Suspension.
It is recommended that if you are unfamiliar with this type of work that you refer to a qualified service center specializing in this type of work.
It is also recommended that if you choose to do this work yourself that a factory service manual be obtained for the proper procedures
pertaining to removal, replacement and proper torque specifications for your vehicle. This instruction set is intended as a guideline for the
safe installation of Energy Suspension’s polyurethane bushings, once you have removed the factory components from your vehicle. Wheel
alignment is almost always disturbed when suspension components are removed or replaced. It is recommended that you have the
alignment checked on your vehicle at a qualified alignment shop. Energy Suspension recommends that you read over all the installation
instructions and check all P/N’s and quantities in the parts list before you start. Call customer service at 949-361-3935 if the parts in your kit
do not match this parts list. Prior to installation, make sure that your car is in excellent mechanical condition and that there are no suspension
or steering related problems. This part has been designed to work only with a car that is in good state of repair. No matter how carefully we
design our parts, this is one area we have no control over and cannot be held responsible.
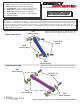
Lift the front of vehicle and support with jack stands, the wheels do not need to come off the ground but need to be blocked so
the axle will not move.
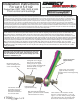
se threaded rod,
tubing, nuts & a flat washers (see diagram). S
Be sure to place match-marks on both sides of adjusting cams before you start. You will need to use
these match marks to reinstall the lower control arms back in the same position after the new polyurethane bushings are
installed. Only remove one control arm at a time. The front axle will stay close to the correct position which will make it easier
to reinstall the bolts. In order to remove the passenger side upper control arm at the frame, the exhaust pipe must be removed
for clearance to remove the O.E. bolt. The bushings in the upper and lower control arms are bonded to the inner metal sleeve,
but not to the outer eye welded to the control arm. Use a hydraulic press to remove rubber bushing. Or u
pray with WD-40 to help press out the rubber bushings. The O.E. rubber
bushings are heavily preloaded and may be tough to get out. WD-40 is your friend here, so if the old rubber gets stuck, spray
with WD-40, loosen nuts and flip control arm over to pull O.E. bushing from the other direction. Do this until the O.E. rubber
bushing is removed.
Bushing replacement isn’t easy and getting the old
bushings out is the hardest part. The parts you use don’t
have to be perfect or look pretty, they just have to work.
Look in a hardware store, junk yard or salvage yard. Use
whatever is available to you.
Factory bushing.
(representation only)
High-Strength Threaded Rod
grade 8. (use fine thread if available,
it works better than coarse).
Big washer with O.D.
same as tubing and I.D.
same as threaded rod.
Tubing with an I.D. bigger
than the O.D. of bushing
coming out (2” I.D. upper.
2-1/2” I.D. lower) and the length
should be about ½” longer
than the bushing.
Flat washers to help
spread the load. Use a
little grease between
the faces of washers &
nuts on both sides.
Thick washer. O.D. should be smaller
than I.D. of outer metal eye (1-1/4” O.D.
upper, 1-1/2” O.D. lower). Too big it might
get stuck half way thru, too small it might
suck into the outer metal eye and bind.
Nuts 2 each. Use grade 8
High Hex Nuts. The long
length makes wrench-tightening
easier.
Lower control arm
(upper similar)