
Printer User Manual
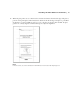


16 | Installing the Plate Guide on the Printer
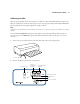
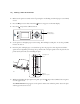
5. Use the hexagonal wrench included with the Epson Stylus Pro 7900CTP system to adjust the
alignment of the plate guide. If distance A is greater than distance B, tighten the alignment screw; if
distance B is greater than distance A, loosen the screw. Half a rotation of the screw moves the guide
approximately 1.0 mm (0.04 inch).
6. Repeat steps 3 and 4 and, if required, step 5 until the measurements are nearly equal, within 1.0 mm.
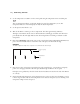
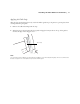
7. Once the plate guide is aligned, you need to confirm the alignment. Use a new plate to print a test
pattern (see “Loading a Plate in the Printer” on page 19), then print the test pattern again on the same
plate. The plate is correctly aligned when the line thickness at the top and bottom of the printed
pattern is no greater than 1.0 mm.
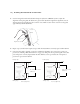
Loosen
Tighten
Alignment screw
No more than 1.0 mm
difference
Plate
More than 1.0 mm
difference
Plate
Correct alignment
Incorrect alignment
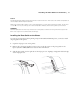
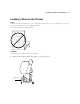
Trailing edge
Leading edge
Leading edge
Trailing edge