
User Manual


4. Configure a static IP address for the FortiAP unit and netmask
& gateway information for your network, using the following
commands:
cfg -a ADDR_MODE=STATIC
cfg –a AP_IPADDR=xxx.xxx.xxx.xx
cfg –a AP_NETMASK=255.255.255.0
cfg –a IPGW=yyy.yyy.yyy.yyy
cfg –a AC_IPADDR_1=zzz.zzz.zzz.zzz
where xxx is the IP address of the FortiAP unit, yyy is the
Gateway IP address and zzz is the IP address of the FortiGate
Wireless Controller.
5. Save the configuration by typing the following command:
cfg –c
6. Unplug the FortiAP unit and plug it back in order for the
configuration to take effect.
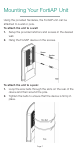
7. Move the FortiAP to the intended deployment location and
connect the Ethernet cable as described in the Connecting
chapter.
8. Log in to the FortiGate controller Web-based Manager, and
go to WiFi Controller > Managed Access Points > Managed
FortiAP. A successfully discovered unit displays an orange circle
with a question mark in the Status column.
9. Select the access point and click Edit.
10. In the State field, select Authorize.
11. In the Edit FortiAP dialog box, select Enable Wireless Radio.
Leave the remaining settings at their default values. The
configuration is downloaded from the FortiGate unit to the
FortiAP device.
For more information, see the Deploying Wireless Networks
Guide, available on Fortinet’s technical documentation website,
http://docs.fortinet.com.
Page 4
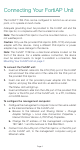
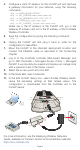
LAN
PoE
LAN
Port
ETH
Port
ETH (PoE)
Port
PoE
Port