WIRELESS OUTDOOR DUAL RADIO 802.11a/b/g/n ACCESS POINT Model: ENH700EXT User Manual Version 1.0 Edition: 1.0 Version: 1.1.
Table of Contents About This Document ........................................................................................................................4 About EnGenius Technologies, Inc. .....................................................................................................4 Product Manual Formatting ...............................................................................................................4 Before You Start ...........................................................
5.5 6 7 System ..................................................................................................................................... 25 6.1 Operation Mode .................................................................................................................... 25 6.2 IP Settings.............................................................................................................................. 26 6.3 Spanning Tree Settings ..........................................
10 EnGenius Technologies Inc.: EZ ZoneController ...................................................................... 49 10.1 ZoneController Overview ...................................................................................................... 49 10.2 Features ................................................................................................................................ 49 10.3 Benefits .......................................................................................
About This Document This document is written by EnGenius Technologies, Inc. EnGenius Technologies, Inc. reserves the right to change this document without notice and all rights are reserved. This document is written and edited for use of the configuration of the ENH700EXT by EnGenius Technologies, Inc. Please read this document carefully before setting up the ENH700EXT. Any damage which is caused by inappropriate use will not be covered under the warranty. About EnGenius Technologies, Inc.
• • • Ethernet crimping tool Screw driver set Refer to Chapter 2 for additional equipment that may be needed based on the network infrastructure. 1 Product Overview Thank you for purchasing the ENH700EXT. It is a powerful and enhanced Enterprise class Dual-Band Wireless-N Access Point product with 4 multi-functions: Access Point, Client Bridge, WDS (AP & Bridge), and Client Router. The EnGenius Technologies, Inc. ENH700EXT uses the latest IEEE802.11 standard, 802.
• • • Mounting Installation Guide ENH700EXT Quick Installation Guide ENH700EXT Product CD - includes EZ Controller Access Point Management Software and ENH700EXT User Manual in Adobe Acrobat PDF) Do not discard the packing materials in case of a return. The unit must be shipped in its original packaging for a valid return. If any of the contents are missing, please contact your reseller.
Multiple SSIDs WMM Wi-Fi Protected Access High Speed Data Rate (Up to 300 Mbps) High Output Power (Up to 27 dBm) IEEE 802.11 a/b/g/n Compliant MAC Address filtering in Access Point mode Support RSSI Indicator in Client Bridge mode Power-Over-Ethernet IP 68 The ENH700EXT supports up to 16 SSIDs (Service Set Identifiers) in Access Point mode (8 SSIDs per frequency band).
1.3 A Cost-Effective Wireless Solution to Extend and Expand an Existing Network The following list describes the solutions that the ENH700EXT offers as a flexible, robust and powerful Outdoor Access Point or Bridge: • • • • • Difficult-to-Wire Environments - In outdoor environments sometimes extending a network by laying Ethernet or fiber cabling is either cost prohibitive or physically not possible.
1.4 Hardware Overview Physical Interface Maximum Wireless Data Rate Antennas 10/100/1000 LAN Port with (48v Proprietary) PoE Support 300Mbps + 300Mbps 2.4 GHz – 5dBi Omni directional antenna x2 5 GHz – 5dBi Omni directional antenna x2 1.5 System Requirements for Installation The minimum requirements for settings up the ENH700EXT are: • A computer with an Ethernet interface and a Windows (XP, Vista, 7), Mac OSX, or Linux based Operating System. • An Internet browser the supports HTTP and JavaScript.
Only experienced installation professionals who are familiar with outdoor wireless network should attempt to install the ENH700EXT. 2.1 Installation Considerations There are many considerations on where to place the ENH700EXT. The followings are the main considerations on where to mount the device. The first consideration is available line of sight to the area or building that you wish to provide wireless network connectivity.
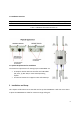
6. Insert the other end of the second Ethernet cable into the Ethernet controller of the computer system in which the ENH700EXT will be set up. 7. Plug the power cord of the power adapter into the EPE-48GR port labeled DC IN. 8. Plug the power adaptor into the power outlet. The ENH700EXT provides a proprietary PoE adapter. Please only use the supplied PoE adapter and its power adapter.
2.3 Configuring a TCP/IP connection on Windows® 7/Vista Use the following procedure to configure a computer running Microsoft® Windows 7. 1. In the Start menu search box, type: ncpa.cpl 2. When the Network Connections List appears, right-click the Local Area Connection icon and click Properties.
3. In the Networking tab, click Internet Protocol Version 4 (TCP/IPv4), and then click Properties. 4. In the properties dialog box, click Use the following IP address: to configure your computer for Static TCP/IP. Enter an IP address (i.e. 192.168.1.10), the subnet mask of the ENH700EXT, and the default gateway which is the ENH700EXT’s IP address, 192.168.1.1. Note: the subnet mask must match that of the ENH700EXT and the IP address must be on that subnet. 5.
5. In the Local Area Connection Properties dialog box, verify that Internet Protocol (TCP/IPv4) is checked. Then select Internet Protocol (TCP/IPv4) and click the Properties button. The Internet Protocol Version 4 Properties dialog box appears. 6. In the properties dialog box, click Use the following IP address: to configure your computer for Static TCP/IP. Enter an IP address (i.e. 192.168.1.10), the subnet mask of the ENH700EXT, and the default gateway which is the ENH700EXT’s IP address, 192.168.1.1.
7. 8. Click the OK button to save your changes and close the dialog box. Click the OK button again to save your changes.
2.4 Configuring a TCP/IP connection on Windows® XP Use the following procedure to configure a computer running Microsoft® Windows XP with the default Windows interface. 1. On the Windows taskbar, click Start, click Control Panel, and then click Network and Internet Connections. 2. Click the Network Connections icon. 3. Click Local Area Connection for the Ethernet adapter connected to the ENH700EXT. The Local Area Connection Status dialog box appears. 4.
8. Click the OK button again to save your changes. 2.4.1 Configuring Apple® Mac OS X The following procedure describes how to configure TCP/IP on an Apple® Macintosh running Mac OS X 10.2 or later. Note: The menu titles and placement vary in each OS X (10.x) operating system but are similar. Pull down the Apple Menu, click System Preferences, and select Network. Verify that the NIC connected to the ENH700EXT is selected in the Show field. In the Configure field on the TCP/IP tab, select Manually.
2.5 Logging onto the ENH700EXT After completing the TCP/IP settings from the beginning of the Chapter, you can now access the webbased configuration menu. 1. Open your web browser. 2. Enter IP 192.168.1.1 into your address bar. The default username of the ENH700EXT is admin. The default password of the ENH700EXT is admin. If you have changed the ENH700EXT LAN IP address, make sure to enter the correct IP Address.
3.2 Client Bridge Mode In the Client Bridge mode, the ENH700EXT functions like a wireless network adaptor. This allows the ENH700EXT to share the acquired wireless network access (via another device in Access Point mode) with wired devices connected via Ethernet to it (typically via a networked switch).
3.3 WDS Mode In WDS (Wireless Distribution System) mode, the ENH700EXT connects multiple networks wirelessly without being just an Access Point. It maximizes range of service but at a loss of throughput speeds. 1) WDS with Access Point – Expands the WDS through the use of Access Points. Clients can connect to the device as a normal Access Point. 2) WDS Station – Expands the WDS by receiving a wireless signal/service and sharing through the Ethernet port.
3) WDS with Bridge – Expands the Wireless Distribution System through the use of wireless bridges. Clients won’t connect to the device as a bridge ENH700EXT with WDSAP and WDS Bridge mode as backhaul example WDS Bridge Mode In the WDS Bridge mode, the ENH700EXT can wirelessly connect different LANs (Local Area Networks) by applying a device’s MAC address to its associated security settings as prescribed by the network administrator.
4 User Interface Once logged into the ENH700EXT, the home screen will appear. 1 3 4 5 2 1. The operation mode of the ENH700EXT will be displayed. The current 2.4GHz operation mode will be displayed first followed by the current 5GHz operation mode. 2. The main menu of the ENH700EXT will contain all the configuration options and settings. 3. The current configuration menu will be displayed in this section of the user interface. 4.
5 Status 5.1 Save/Reload When making any changes to ENH700EXT, it will be placed in the Save / Reload option of the Status section. No changes made in the proceeding chapters of this manual will take effect until Save & Apply is selected. Selecting Revert will erase any changes made. 5.2 Main (System Information) The Main option of the Status section of the user interface menu contains the information and status of the ENH700EXT.
5.3 2.4GHz Wireless Client List The 2.4GHz Wireless Client List option of the Status section of the user interface menu displays all the clients connected to the 2.4GHz operation of the ENH700EXT. 5.4 5GHz Wireless Client List The 5GHz Wireless Client List option of the Status section of the user interface menu displays all the clients connected to the 2.4GHz operation of the ENH700EXT. 5.5 System Log The System Log option of the Status section displays all actions and events taking place in the ENH700EXT.
6 System The System section of the user interface menu allows the user to change of the operation modes of both the 2.4GHz and 5GHz radios as well as set up the Spanning Tree settings between multiple ENH700EXT units. No changes made in the System section of the ENH700EXT will be in effect until Save & Apply is selected in the Save/Reload option of the Status section. Selecting Accept or Save in the System section will not reconfigure the router. 6.
6.2 IP Settings The IP Settings option of the System section allows the user to configure the IP settings. 1) IP Network Settings – The user can select whether the ENH700EXT will obtain the IP Settings automatically from the network or if the information will be inputted manually. 2) IP Address – Specify the default IP Address that the ENH700EXT will be accessed by. 3) IP Subnet Mask – Specify the Subnet Mask of the ENH700EXT. 4) Default Gateway – Specify the default gateway of the ENH700EXT.
Spanning Tree Status Bridge Hello Time Bridge Max Age Bridge Forward Delay Priority Enable the use of Spanning Tree on the ENH700EXT. The amount of time before the connections times out. The maximum amount of time the connection between nodes will last. The amount of time to elapse before data is forwarded. The priority of the device in the spanning tree. 7 2.4GHz Wireless and 5GHz Wireless In both the 2.
7.1 Access Point Mode When Access Point is the selected mode of operation for either the 2.4GHz or 5GHz bands, three options will be available to configure. The three options that can be configured are Wireless Network, Wireless MAC Filter, and Wireless Advanced Settings. Access Point configuration Step 1 Login to the web-based configuration interface with default IP 192.168.1.1 Step 2 Select your country or region’s regulation. Step 3 Use site survey to scan channels of the nearby area.
7.1.1 Wireless Network Wireless Mode Channel HT Mode Extension Channel Channel / Frequency AP Detection Current Profiles Select the wireless mode that the current band of operation will use. The options are: 1) 802.11 b/g/n Mixed 2) 802.11 b 3) 802.11 b/g Mixed 4) 802.11 g 5) 802.11 n only Select the channel bandwidth of the antennas. The larger the channel used, the throughput will be much better. Using a lower channel, will increase the distance and stability of the signal.
concurrently in Access Point mode (8 SSIDs per Radio). Each SSID will have associated settings that can be edited by pressing the Edit button. For an SSID to be active and discoverable, the checkbox associated to the SSID must be marked. 7.1.2 SSID Profile SSID Suppressed SSID Station Separation Security Mode The SSID is the identifier (name) of the Access Point.
MAC Address The MAC Address of the client.
7.1.4 Wireless Advanced Settings Data Rate Transmit Power RTS / CTS Threshold (1-2346) Distance (1-30km) Aggregation The Data Rate of the ENH700EXT affects the throughput of data transfer. A higher data rate selected will have a faster throughput. Lower will increase the distance in which the signal will reach. The transmit power will allow the ENH700EXT to extend the area of coverage. However, when increasing it too much, the wireless connection may be unstable.
7.2 Client Bridge When Client Bridge is the selected mode of operation for either the 2.4GHz or 5GHz bands, two options will be available to configure. The two options that can be configured are Wireless Network and Wireless Advanced Settings. 7.2.1 Wireless Network Wireless Mode SSID Preferred BSSID Security Mode Select the wireless mode that the current band of operation will use. The options are: 1) 802.11 b/g/n Mixed 2) 802.11 b 3) 802.11 b/g Mixed 4) 802.11 g 5) 802.
7.2.2 Wireless Advanced Settings Data Rate Transmit Power RTS / CTS Threshold (1-2346) Distance (1-30km) Aggregation The Data Rate of the ENH700EXT affects the throughput of data transfer. A higher data rate selected will have a faster throughput. Lower will increase the distance in which the signal will reach. The transmit power will allow the ENH700EXT to extend the area of coverage. However, when increasing it too much, the wireless connection may be unstable.
Client Bridge Configuration Step 1 Login to the web-based configuration interface with the default IP: 192.168.1.1 Step 2 Select your country or region’s regulation. Step 3 Select Operation Mode to Client Bridge from System Properties. Step 4 Use site survey to scan channels of the nearby area. Step 5 Select the AP that you would like to associate with. Step 6 Setup the authentication settings that match to the Access Point’s settings. Step 7 Select Apply to process all of the configurations.
7.3 WDS Mode When a WDS mode is selected, WDS Access Point is set up the same as Access Point mode and WDS Bridge is set up the same as Client Bridge mode. The only difference is WDS Link Settings. The WDS Link Settings is used to setup a connection between access points without limiting or removing functionality. Wireless Distributed Systems are used to greatly increase coverage and allow different LANs to communicate with each other. 7.3.
WDS Bridge Configuration Step 1 Login to the web-based configuration interface with default IP 192.168.1.1 Step 2 Select your country or region’s regulation. Step 3 Change Operation Mode to WDS Bridge under System Properties. Step 4 Set the device’s IP settings under System -> IP Settings Step 5 Set the WLAN settings under Wireless Network. Step 6 Configure WDS Link Settings under Wireless. Step 7 Specify the MAC address of the bridge(s) which you would like to connect with.
8 Wireless Security Settings Wirelessly securing the Wireless network is essential to ensuring a safe and secure network for all the clients. The recommended security setting for wireless LANs is WPA2-PSK, however, the ENH700EXT allows the usage of WEP, WPA-PSK, WPA-PSK Mixed, WPA, WPA2, and WPA Mixed. No changes made in the System section of the ENH700EXT be in effect until Save & Apply is selected in the Save/Reload option of the Status section.
When using TKIP, 802.11g will be selected by default. 8.2 WPA, WPA2, or WPA Mixed When selecting one of the various modes of WPA encryption without a Pre-Shared Key, authentication can be determined through RADIUS (Remote Authentication Dial in User Service). Security Mode Encryption RADIUS Server RADIUS Port RADIUS Secret Group Key Update Interval Select WPA, WPA2, or WPA Mixed. Select whether TKIP, AES, or both encryptions will be used. Enter the IP Address of the RADIUS server.
RADIUS Accounting Server RADIUS Accounting Port RADIUS Accounting Secret Interim Accounting Interval update. Enter the IP address of the Accounting server. Enter the accounting port that will be used (Port 1813 is default). Enter the password in which the RADIUS Accounting will use. The interval in which the accounting will change. Example diagram of ENH700EXT supports 802.1x with RADIUS server (sample encryption: WPA2 AES) 8.
Security Mode Auth Type Input Type Key Length Default Key Key[1-4] Select WEP. Select the type of authentication to be used in the WEP mode of encryption. Select the character type to be used in the WEP key. Select the length of the WEP key based on bit length. Select which of the 4 keys to use as the WEP key. Enter the WEP key to be used. Hexadecimal characters are 0-9 and A-F.
9 Management The Management portion of the ENH700EXT allows the user to change some generic system settings. No changes made in the Management section of the ENH700EXT be in effect until Save & Apply is selected in the Save/Reload option of the Status section. Selecting Accept or Save in the Management section will not reconfigure the device. 9.1 Administration In the Administration option of the Management section of the user interface, users change the username and password of the ENH700EXT.
9.2 Management VLAN In the Management VLAN option in the Management section allows users to assign a VLAN tag to packets being transmitted in the ENH700EXT. Clients on a VLAN normally act if they were on a separate LAN. 2.4GHz Current Profiles 5GHz Current Profiles Management VLAN ID The user can change the VID of the 2.4GHz Access Points that have been set up as well as enable or disable them. The user can change the VID of the 2.4GHz Access Points that have been set up as well as enable or disable them.
9.3 Wireless Traffic Shaping Enable Traffic Shaping Incoming Traffic Limit Outgoing Traffic Limit The user can select whether or traffic shaping is enabled or not. Specify the maximum rate of incoming traffic speed. Specify the maximum rate of outgoing traffic speed. 9.4 SNMP Settings The SNMP Settings controls the how data is sent to the SNMP-compatible clients.
9.5 Backup / Restore Settings In the Backup / Restore Settings option of the Management section allows the users to save the configurations of the ENH700EXT into a file as backup to later restore. Save a Copy of Current Settings Restore Saved Settings from A File Revert to Factory Default Settings The user can save the configuration settings of the ENH700EXT into a file. The user can browse the computer file system for a previously saved settings file of the ENH700EXT to restore to.
9.7 Firmware Upgrade In the Firmware Upgrade option of the Management section, users can view the current firmware version of the ENH700EXT. Also, if there is a new firmware upgrade, the user may download it from www.EnGeniusTech.com and upload it to the ENH700EXT. Current Firmware Version Choose File Displays the current firmware version of the ENH700EXT. Selecting Choose File will bring up a prompt to locate the .bin file associated to the firmware upgrade.
9.8 Time Settings In the Time Settings option of the Management section, users can change the system time of the ENH700EXT. Manually Set Date and Time Automatically Get Date and Time Enable Daylight Saving The user can manually set the date and time of the ENH700EXT. Date Format: // Time Format: : Allow the ENH700EXT to obtain the time automatically from either online or a NTP server specified by the user. Selecting the Time Zone will increase accuracy.
9.9 Log Syslog Log Server IP Address Local Log 9.10 The user can select to enable the Syslog function of the ENH700EXT. The user can enter the IP address of the Log Server. The user can select to enable the Local Log service. Diagnostics The Diagnostics option in the Management section of the user interface allows users to test connection quality between the ENH700EXT and the specified client.
10 EnGenius Technologies Inc.: EZ Controller The EnGenius Technologies Inc.’s EZ Controller Access Point Management software provides a robust suite of tools for IT managers, installers and network administrators who deploy, manage and maintain wireless networks. With EZ Controller, EnGenius Wireless Indoor and Outdoor Access Points and Client Bridges can be configured, controlled, and monitored from one central location.
Users will have a visual representation of the coverage area in which all EnGenius Technology access point products (if they are compatible with the EZ Controller). The EZ Controller has the ability to provide real time information of all the monitored devices. The EZ Controller conveniently lists all the Access Points with some generic information such as MAC Address or number of connected clients. 10.
10.4 Compatible Devices Currently, not all EnGenius Technologies Inc. products are compatible with the EZ Controller. The current products compatible with EZ Controller are: • • • • • • • • • • • • • EAP150 [v. 1.2.3] EAP300 [v. 1.2.3] EAP350 [v. 1.1.0] ECB150 [v. 1.0.3] ECB300 [v. 1.0.3] ECB350 [v. 1.1.3] ENH200 [v. 1.0.8] ENH200EXT [v. 1.0.8] ENH700EXT [v. 1.1.6] ENH202 [v. 1.1.0] ENH500 [v. 1.1.0] ENH210 [v. 1.1.0] ENH700EXT [v. 1.1.0] Note: As EnGenius continues to improve the products.
Appendix A – Troubleshooting If there are problems with the ENH700EXT, refer to the Troubleshooting section before contacting EnGenius Technologies Inc. How do I reset the ENH700EXT back to factory defaults? There are two ways to reset the ENH700EXT. There is both a hardware method and a software method. Hardware Method: Press and hold the reset button behind the hole of the PoE projector for 10 seconds.
Appendix B – Specification Hardware Specification Standard IEEE 802.11 a/b/g/n MCU Atheros AR7161 RF 2 x AR9220 Memory 64MB Flash 8MB Physical Interface 1 x RJ-45 for 10/100/1000 Gigabit Ethernet Reset Button in PoE Injector Power Requirements - Active Ethernet (Power over Ethernet) - Proprietary PoE design - Power Adapter 48V / 0.8A RF Specification Frequency Band 802.11a 5.15 ~ 5.35GHz, 5.47 ~ 5.725GHz, 5.725~5.825GHz 802.11b/g U.S., Europe and Japan product covering 2.400 to 2.
-70dBm @ MCS15 Available transmit power Antenna -76dBm @ MCS15 802.11a 802.11g 802.11b -90dBm @ 6Mbps -96dBm @ 6Mbps -99dBm @ 1Mbps -72dBm @ 54Mbps -82dBm @ 54Mbps -93dBm @ 11Mbps 802.11n (5GHz) 802.11n (2.4GHz) 26dBm @ MCS0~2/MCS8~10 26dBm @ MCS0~2/MCS8~10 25dBm @ MCS3/MCS11 26dBm @ MCS3/MCS11 24dBm @ MCS4/MCS12 25dBm @ MCS4/MCS12 23dBm @ MCS5/MCS13 24dBm @ MCS5/MCS13 23dBm @ MCS6/MCS14 22dBm @ MCS6/MCS14 21dBm @ MCS7/MCS15 21dBm @ MCS7/MCS15 802.11a 802.11g 802.
WDS AP / WDS Bridge BSSID Security - WEP Encryption-64/128/152 bit - WPA/WPA2 Personal (WPA-PSK using TKIP or AES) - WPA/WPA2 Enterprise (WPA-EAP using TKIP) - 802.
Dimensions 245mm (L) x 200mm (W) x 75mm (H) Weight 1450g Note: As we continue to improve our products, the specification is subject to change without notice 56
Appendix C – Contacting Technical Support If the problem could not be resolved using the ENH700EXT product manual, please contact the vendor who provided the ENH700EXT. If you cannot contact your vendor, or they were unable to resolve the issue, contact the EnGenius Customer Service department.
Appendix D – Glossary Here is a selection of terms and definitions that may help reader to be more familiar with WLAN technologies and understand the user manual better. Ad Hoc Network A short-term WLAN framework created between two or more WLAN adapters, without going through an Access Point. An ad hoc network lets computers send data directly to and from one another. For an ad hoc network to work, each computer on the network needs a WLAN card installed configured for Ad Hoc mode.
Challenge Handshake Authentication Protocol. An alternative protocol that uses a challenge/response technique instead of sending passwords over the wire. Collision Interference resulting from two network devices sending data at the same time. The network detects the collision of the two transmitted packets and discards both of them. Coverage The region within which a paging receiver can reliably receive the transmission of paging signals.
ESS ID The unique identifier for an ESS. All Access Points and their associated wireless stations in the same group must have the same ESSID. Footprint Geographical areas where an entity is licensed to broadcast its signal. Gateway A computer system or other device that acts as a translator between two systems that use different communication protocols, data formatting structures, languages, and/or architecture. HT mode In the 802.
Preamble Synchronizes transmissions in a WLAN. The preamble type defines the length of the Cyclic Redundancy Check block for communication between a device and roaming wireless stations. Protected Extensible Authentication Protocol (PEAP) Authentication protocol of IEEE 802.1x used to send authentication data and passwords over 802.11 WLANs. Quality of Service (QoS) A network’s ability to deliver data with minimum delay.
WLANs use RF technology to send and receive data wirelessly in a certain area. This lets users in a small zone send data and share resources such as printers without using cables to physically connect each computer. Wi-Fi Protected Access (WPA ) A subset of the IEEE 802.11i standard. WPA applies IEEE 802.1x and Extensible Authentication Protocol (EAP) to authenticate wireless clients using an external RADIUS database.
Appendix E – Statements of Conformity D.1 Federal Communication Commission Interference Statement This equipment has been tested and found to comply with the limits for a Class B digital device, pursuant to Part 15 of the FCC Rules. These limits are designed to provide reasonable protection against harmful interference in a residential installation.
device must accept any interference received, including interference that may cause undesired operation. Ce dispositif est conforme à la norme CNR-210 d'Industrie Canada applicable aux appareils radio exempts de licence. Son fonctionnement est sujet aux deux conditions suivantes: (1) le dispositif ne doit pas produire de brouillage préjudiciable, et (2) ce dispositif doit accepter tout brouillage reçu, y compris un brouillage susceptible de provoquer un fonctionnement indésirable.
Electromagnetic compatibility and Radio Spectrum Matters (ERM); Electromagnetic Compatibility (EMC) standard for radio equipment and services; Part 1: Common technical requirements. EN 301 489-17 V2.1.1 2009-05 Electromagnetic compatibility and Radio spectrum Matters (ERM); Electromagnetic Compatibility (EMC) standard for radio equipment and services; Part 17: Specific conditions for 2.4 GHz wideband transmission systems and 5 GHz high performance RLAN equipment This device is a 2.