
Use and Care Manual


9
FLOOR AND WALL PROTECTION
Floor Protection
If your floor is constructed of a non-combustible material such as brick or concrete, there is no
need for floor protection. If the floor is constructed of a combustible material such as hardwood,
linoleum, or carpet, then you will be required to use floor protection between the unit and the
combustible. The protection should be U.L. approved or equivalent and must be large enough to
provide a minimum of one inch (1.0”) behind, four inches (4.0”) on both sides of the stove and at
least six inches (6.0”) in the front of the unit. This floor protection is intended as spark and ember
protection only, therefore it need only be non-combustible (there is no required R value).
Wall Protection
From the rear and the sides of this stove only six inches (6”) of clearance is required to
paneling, wallpaper or drywall. The pellet vent pipe would require the standard three inches (3”)
clearance, or as recommended by the manufacturer. Normally additional wall protection is not
required with this type unit.
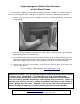
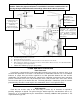
1. If 3” flue pipe exceeds 15’ in length, increase to 4” flue pipe for remaining flue connections.
2. Total flue length should not exceed 35’.
3. Horizontal run not to exceed 4’.
4. Floor protector must extend 6” from front of unit, 4” from sides and 1” from rear.
5. If the total run of outside air connection exceeds 6’, if more than 2 elbows are used, or if a basement install,
use 3” metal pipe (and coupler) instead.
6. Outside Air is mandatory for proper safe operation.
Masonr
y
Connection
Our Part AC-3000 is
acceptable for
through-the-wall
installation.
(AC-3100 for 4000+
ft. installations.)
Must have minimum
3” adapter before tee
for longer run.
For shorter run (such
as Masonry
Connection below),
tee alone is acceptable.
Basement Installation should be
performed by professional
installer. Use 3” metal pipe and
coupler for Outside Combustion
Air. Minimum 3’ clearance
from ground to the Pellet Vent
Exhaust Pipe.
Illustration 1
Freestanding Pellet Installation
Caution: Follow the pipe manufacturer’s installation instructions and directions for
passin
g
throu
g
h combustible walls and ceilin
g
s. Check local codes in
y
our area.
INSTALL VENT AT CLEARANCES SPECIFIED BY THE VENT MANUFACTURE
R