Amigo TM Slim. Light.
About Your Amigo Congratulations on your purchase of Amigo from Enhanced Vision. Like all Enhanced Vision products, Amigo is designed to give you the highest quality and convenience available. Amigo enables people with low vision to see objects on the go. This battery-operated system incorporates a 6.5” viewing screen with tilting capabilities for optimal viewing.
Table of Contents About Your Amigo Important Safety Precautions System Warnings & Precautions . . . . . . . . . . . .2-3 Caring For Amigo . . . . . . . . . . . . . . . . . . . . . . . .3 Package Controls & Contents Amigo Controls . . . . . . . . . . . . . . . . . . . . . . . .4-5 Amigo Contents . . . . . . . . . . . . . . . . . . . . . . .6-7 Quick Start . . . . . . . . . . . . . . . . . . . . . . . . . . . . . . . .8 Using Amigo Charging the Battery . . . . . . . . . . . . . . . . . . . . . .
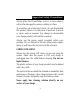
Important Safety Precautions To obtain the maximum benefits from your Amigo, please read these safety precautions carefully. SYSTEM WARNINGS The Amigo is designed to help people with low vision read and write. The extent to which Amigo can improve the ability to see images depends on an individual’s condition and level of vision. These products are not designed to restore vision, correct eye conditions or halt degenerative vision loss.
Important Safety Precautions Always place the Power/Video cord in an area where it will not be damaged by persons walking on them. To avoid the risk of electrical shock, do not disassemble this product. Return it to the place of purchase if service or repair work is required. Any attempt to disassemble your Amigo product will void the warranty. Always use the power supply provided within your package. Do not attempt to use any other power supply; doing so will harm the unit and void the warranty.
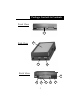
Package Controls & Contents Your Amigo is packaged in a convenient soft case for storage and transport. All required accessories for operation are included in the box. AMIGO IS COMPRISED OF: 1. Power Button: turns unit ON and OFF. 2. 6.5” LCD screen: displays images. 3. Size Wheel: rotates between 5 magnification sizes. 4. Mode Wheel: rotates between 6 different viewing modes. 5. Battery: powers Amigo for approx. 1.5 hours. 6.
Package Controls & Contents Front View 1 Side View 2 3 4 Back View 5 9 10 5 8 7 6
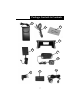
Package Controls & Contents Accessories include: 11. Carrying Case with Shoulder Strap 12.Amigo 12 Volt Power Supply 13.Amigo Right Angle Power Supply Plug (Varies per country) 14. Video Out Cable 15. Lens Cloth 16.Writing Stand 17. External Battery Charger 18.Power Supply for External Battery Charger (Varies per country) 19.Extra Battery Additional Accessory (Sold separately) 20.
Package Controls & Contents 11 15 14 16 12 17 18 13 19 7 20
Quick Start Here are some of the things you can do with Amigo. • Read • Write • Freeze images The following steps will give you a quick start on using the Amigo. 1. Turn the Power ON /OFF Press and hold the Power button for more than 1 second, Amigo should turn ON. (see figure 1) 2. View the Image Simply rest or set the Amigo on top of the desired object and view the magnified image. 3. Magnify the Image Rotate the Size Wheel to change the magnification size.
Using Amigo Amigo comes with one charged external battery and one charged battery inside the unit for optimum battery life. We recommend before using your Amigo to plug it into an outlet and charge the battery inside the unit for up to three hours. Charging the battery in Amigo: Follow the steps below to charge the battery: 1. Connect the Power Supply together with the Right Angle Power Supply Plug. (see page 7, item 12 and 13) 2. Connect the Power Supply into the unit where the DC IN is located.
Using Amigo Using the Amigo with the Power Supply Follow the steps below: 1. Connect the Power Supply together with the Right Angle Power Supply Plug. (see figure 1) 2. Connect the Power Supply into the Amigo where it says DC IN. (see figure 2) 3. Plug the power supply into a wall outlet or preferably a power strip. 4. Press and hold the power button for more than a second and the Amigo will turn on. Adjusting the Size To adjust the size, rotate the dial located on the side of the unit labeled “Size.
Using Amigo Amigo has the following 6 Viewing Modes: Full Color Image This mode gives a true color representation of the image that is being displayed. It is ideal looking at pictures and writing. Black & White Image Based on your preference, you can choose the B&W mode for viewing objects. High-Contrast Positive Image This mode provides a white background with black text. This mode increases the contrast to offer crisp text images for reading.
Using Amigo Using the Freeze FREEZE allows you to take a temporary picture of an image. This enables you to move the unit to better view the desired object. figure 1 1. Hold or place the unit over desired location. 2. Press and hold the “FREEZE” button for 2 seconds. (see figure 1) 3. The image will freeze on the screen until you adjust any of the control buttons on the unit. Tilting the LCD The LCD screen is designed to tilt up 90 degrees.
Using Amigo Tightening the LCD Hinge Depending on the user’s preference, the LCD hinge can be tightened or loosened. To tighten the hinge, turn the phillips screws clockwise located on the front of the unit. To loosen the hinge, turn the phillips screws counter clockwise. DO NOT OVER TIGHTEN. Writing with Amigo 1. Place the writing stand over desired material. The tallest portion of the stand should be facing you. 2. Turn the Amigo ON. Gently set the Amigo into the stand with Power Button facing you.
Tips for Using Amigo Tips for Conserving the Battery • When not using unit, remove the battery to extend battery life. The battery will slowly lose its charge while in Amigo. • To maximize total battery time, charge both batteries by using the internal and external chargers. (see page 9 or 16) Note: Never allow battery to completely drain. Tips for Using Amigo Amigo works best when placed directly on desired material. This allows you to change viewing modes and magnification with ease.
Replacing the Battery REMOVING AND INSTALLING THE BATTERY Removing the Battery from the Amigo The battery is located in the battery compartment. To remove, push down on the small tab of the battery compartment and slide the battery out. (see figure 1) figure 1 Installing the Battery on the Amigo To install the battery, set the battery directly on top of the battery compartment with the charging contacts facing towards the back of the LCD. Gently press down and forward to lock it in place.
Charging the Battery 1. Charging the Battery Remove the battery from the Amigo. (see page 15) Plug the charger (see page 7 item 17 & 18) into an outlet. 2. Installing the Battery on the External Charger To install battery, set the battery directly on top of the battery charger with the charging contacts facing the raised end of the charger. Slightly push down and slide forward into place. The red indicator light stays solid when battery needs to be charged. 3.
Connecting to TV Connecting Amigo to a TV To connect Amigo to a TV you will need the Video Cable. Plug one end of the Video Cable into the “Video Out” jack on the back of Amigo and the other end into the yellow “Video Input” jack on the front or back of your TV. Then switch your TV to Video Mode. This will allow you to view magnified images on your TV screen. (see figure 2) Note: The LCD remains OFF when using the PAL version connected to a TV.
Troubleshooting No Power: 1. Make sure the two contact pins in the battery compartment are sticking out. (see figure 1) The pins should protrude out of the housing for proper insertion into the battery holes. 2. Make sure the battery is charged and correctly inserted into the unit. (see Charging the Battery on page 9 or 16) 3. Press the power button for more than 1 second and the Amigo should turn on. 4. If the power does not turn on, try using the Amigo power supply.
Troubleshooting 2. Make sure the correct power supply is plugged into the Amigo. (see page 7 item 12 and 13) 3. Press the power button for more than 1 second and the Amigo should turn on. Image too dark: If a picture is present on the display but excessively dim in Color mode, check the lights under the unit underbody. A white light should clearly be visible. If no lights are ON call Enhanced Vision Tech Support. Blurred images: 1. Can be caused by finger prints or dirt on the glass underneath the unit.
Troubleshooting 2. Check that the FREEZE button can clearly be depressed. A distinct click feeling should be felt. Video quality is different on the TV than on the unit: Amigo is optimized for the built in LCD viewing display. TV display may differ slightly. The Battery does not charge: Make sure the Amigo Power Supply is used with the unit. Check and see if the battery is properly inserted with the contacts out of the housing. The LED should be blinking if the battery is not full.
Troubleshooting Unit is warm: AMIGO integrates a battery charger and a powerful camera processing unit, it is normal for the unit to be warm when ON. Note: When charging the battery inside the Amigo keep the unit in the open position (see page 9, figure 1). There seems to be a “delay” when moving the unit or using the writing stand: A slight delay in use is normal. When using the writing stand, proceed writing slowly on the target material. Viewing Amigo on a TV 1.
Specifications Field of view: - 4.0cm MAX horizontally on any display size. - 1.0cm MIN horizontally on any display size. Magnification levels: - 14X MAX on the 6.5” wide screen LCD - 10.5X - 7X - 5.3X - 3.5X MIN - 40X MAX on a 20” TV - 30X - 20X - 15X - 10X MIN Dimensions: Unit : 16.5cm (L) * 9.8cm (W) * 4.3cm(H) Display: 13.7cm (L) * 7.9cm (W), 15.8cm diagonally Weight: Unit only: <600g; <1.
Specifications Charging time : ~3 hours when using the unit. ~3 hours when NOT using the unit. Running time: ~1.5 hours per battery Video Output: NTSC or PAL Battery: Enhanced Vision Removable Li-Ion 7.2V L-series battery. Nominal capacity 2200mAh. Note: Do not use a Sony NPF-550 battery or any battery that is lower than 2200mAh provided. For more information call Enhanced Vision. Power: Wall adapter: Input: 100-240VAC 50/60Hz Output:12VDC, 1.7A max load Unit: Input: 12VDC, 1.
Warranty Enhanced Vision Amigo Video Magnifier Warranty Policy Enhanced Vision products are designed to give you the highest quality image, convenient features, ease of use and reliable service. Amigo has been inspected and tested prior to shipping. Enhanced Vision warrants AMIGO against defects in material and workmanship under normal use for two years from the date of original purchase. Enhanced Vision, at its option, will at no charge either repair the product or replace it during the warranty period.
Warranty • A 2-year extended warranty option is available within 12 months from the date of purchase. Please contact Enhanced Vision for detailed information. Service Process In the event that technical support or repair service is needed, please contact your local Enhanced Vision representative or the Enhanced Vision warranty service center. If warranty service is required, please contact Enhanced Vision at (800) 440-9476 Monday through Friday, between 8 a.m. and 5 p.m.
Other Enhanced Vision Products Jordy – Two Low Vision Systems in One For distance, intermediate and near viewing. Magnification: 1X – 30X Four viewing modes for optimum visibility: Color, Black/White, Enhanced Positive, Enhanced Negative Jordy Docking Stand (optional) Magnification: 4X – 40X Merlin LCD & Merlin Plus Merlin LCD is a video magnifier that pivots and swivels to the most comfortable viewing position. This product includes all the same features as the Merlin but with a sleek ergonomic design.
Other Enhanced Vision Products Flipper – The Ultimate in Flexibility Read, write, get more out of life! Our innovative camera design lets you magnify in almost any position with images in full color. Magnification: 1X – 44X* *With optional stand Available with Color and Black & White Display Modes Acrobat The Acrobat's innovative rotating camera design enables people with low vision to perform daily tasks more effectively.
Other Enhanced Vision Products Max – Powerful Magnifier A powerful magnifier for reading. Connects to any TV in seconds. Magnification: 17X – 25X on a 20" TV Available in Color or Black & White Accessories Smart Video Connects Enhanced Vision’s low vision devices to a computer monitor. Carrying Cases Convenient cases for storage and transport of all Enhanced Vision products. MaxTrak An essential accessory to keep your Max straight while rolling across a page.
Notes 29
The Amigo video magnifier is designed to enlarge and enhance images to improve the lives of people who have low vision. The extent to which Amigo can improve the ability to see images and text depends on a person's individual condition and level of visual impairment. Amigo is not designed to restore vision, correct eye conditions or halt degenerative vision loss. An Eye Care professional can best determine the suitability of Amigo for a patient's specific condition. For more information, please visit www.