Merlin LCD Plus User’s Manual TM
In order to maintain the consistency with the printed version of this manual, this page is intentionally left without manual content.
Table of Contents About Merlin LCD Plus . . . . . . . . . . . . . . . . . . . . . . . . . . . . . . . . . . . . . . . . . . . . . . . . . . . . 4 Computer System Recommended Configuration . . . . . . . . . . . . . . . . . . . . . . . . . . . . . . . . . 5 Merlin LCD Plus at a Glance . . . . . . . . . . . . . . . . . . . . . . . . . . . . . . . . . . . . . . . . . . . . . . . 6-7 Safety and Care . . . . . . . . . . . . . . . . . . . . . . . . . . . . . . . . . . . . . . . . . . . . . . . . . . . . . .
About Merlin LCD Plus Congratulations on your purchase of Merlin LCD Plus from Enhanced Vision. Merlin LCD Plus is designed to enhance the lifestyle of the visually impaired. This is Enhanced Vision’s most advanced full-color, auto-focus video magnifier system. Merlin LCD Plus is built for users who want a full-featured system.
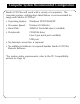
Computer System Recommended Configuration Merlin LCD Plus will work with a variety of computers. The computer system configuration listed below is recommended for usage with Merlin LCD Plus*.
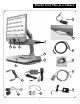
Merlin LCD Plus at a Glance Take a few moments to familiarize yourself with the components of your Merlin LCD Plus: 1. 2. 3. 4. 5. 6. 7. 8. 9. 10. 11. 12. 13. 14. 15. 16. 17.
Merlin LCD Plus at a Glance 17 16 1 4 3 2 15 5 7 14 6 13 8 9 12 10 11 7
Safety and Care To obtain the most benefit and life from Merlin LCD Plus, please read these safety precautions very carefully. Merlin LCD Plus is designed to enlarge and enhance images in order to improve the quality of life for people who are visually impaired. The extent to which Merlin LCD Plus can improve the ability to see images depends on a person’s individual condition and level of visual condition.
Safety and Care • To prevent the risk of electrical shock, do not use Merlin LCD Plus near water and do not attempt to disassemble the unit. • Use only the power supply provided with Merlin LCD Plus. Using an unauthorized power supply may cause serious damage to Merlin LCD Plus’ electronic components. To Move Merlin LCD Plus to Another Location • If you are repositioning Merlin LCD Plus a short distance across a desk or table, make sure you do not pull on any power cords or connector cables.
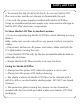
Setting Up Merlin LCD Plus a. With a Computer figure 1 figure 2 figure 3 figure 4 Note: Prior to installation, it is recommended you set your computer to one of the resolutions listed on the specification page 34. 1. Find a steady and level location, such as a table or desk, where you will be comfortable using Merlin LCD Plus. 2. Carry Merlin LCD Plus only by the two recessed handles on the sides of the base for a secured grip (see figure 1). Place it on the table or desk. 3.
Setting Up Merlin LCD Plus b. With Remote Software or Control Box Two options are available to control the Merlin LCD Plus split screen, line markers, and window size features. It is recommended that you use the Merlin LCD Plus Remote Software provided on the CD-ROM enclosed (see item 14 on page 7). Using the software enables you to work more efficiently by using hotkeys and leaving your hands on the computer keyboard at all times. 1. Merlin LCD Plus with Remote Software A.
Setting Up Merlin LCD Plus • On the Merlin LCD Plus Welcome Menu, click on the Merlin LCD Plus Software Installation icon. This will bring up an installation wizard to walk you through the set-up process. • At the end of the installation process, you may choose to run the application immediately. It is recommended you choose this option. Please note that the software will be always running as a permanent application in the background on your computer.
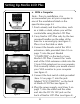
Turning on Merlin LCD Plus #2 #1 Merlin LCD Plus Power Button The Power button on Merlin LCD Plus is located on the far right side of the control panel (#1 above). • Press the Power button. A green light to the left of the Power button will illuminate, indicating the power is ON (#2 above). If Merlin LCD Plus is plugged into a power strip/surge protector, make sure its power switch is turned ON before attempting to turn on Merlin LCD Plus.
About Merlin LCD Plus Remote Software Merlin LCD Plus Remote Software Actively Running on Your Computer Upon installation as described on page 12, your computer will now display the EV Remote Software icon at the lower portion of your screen as shown on figure 1. This indicates the software is properly running as a permanent resident program on figure 1 your computer and is ready for use. The software will always be automatically running upon a new Windows session.
About Merlin LCD Plus Remote Software Using the Default HOT KEYS Default HOT KEYS have been programmed into the Remote Software application. Main Application Window Windowing Line Markers Options Width - Decrease Width - Increase Position - Decrease Position - Increase CRTL and F5 CRTL and F6 CRTL and F7 CRTL and F8 CRTL and F9 CRTL and F10 CRTL and F11 CRTL and F12 figure 3 HOT KEYS allow for a quick operation of Merlin LCD Plus without having to maximize the software application window.
About Merlin LCD Plus Remote Software Disabling HOT KEYS If you do not wish to use any HOT KEY, you may simply disable them all without having to reprogram them at a later time. To do this, open the HOT KEY panel as described above and check OFF the ENABLE HOT KEYS mark at the top left of the panel as shown on figure 3. This will keep your settings yet make all HOT KEYS inoperable. This is a way to avoid a conflict with third party software HOT KEYS.
About Merlin LCD Plus Remote Software Turning OFF Merlin LCD Plus Remote Software: If you want to completely exit from Merlin LCD Plus Remote Software, you may right click on the EV icon as shown in figure 1 figure 1 and left click on EXIT on the drop down list. You will not be able to use HOT KEYS on page 15 anymore. To run the software again, use the START MENU, PROGRAMS, MERLIN PLUS REMOTE and click on the MERLIN PLUS REMOTE icon.
Changing Viewing Mode a. Using Merlin LCD Plus Control Panel Viewing Modes You can choose a viewing option by pressing the MODE button on the control panel. Each push will change your viewing option. If you keep pressing the button you will cycle through all the default options. The default options can be used regardless of the control box settings.
Changing Viewing Mode Enhanced Positive Image This mode provides a white background with black text. This mode increases the contrast to offer crisp text images for reading. Enhanced Negative Image This mode provides a black background with white text. This mode increases the contrast to offer crisp text images for reading. Color Select 1 This mode provides a blue background with yellow text. This is one of the most commonly used color combination.
Changing Viewing Mode • Full Video Magnifier Image This is the default video magnifier mode that comes on when Merlin LCD Plus is turned on (see figure 1). • Full Computer Image This mode displays the full image coming from the computer attached to Merlin LCD Plus. If this source is not available or not valid, an On Screen Display will warn you once (see figure 2). NOTE: To reduce glare, Merlin LCD Plus’ lights can be turned OFF. You may turn OFF Merlin LCD Plus’ lights using the light control.
Changing Viewing Mode • Split Screen Between Computer Image and External Image This mode displays a split screen between a connected external video source and the computer image. If the computer source is not available, an On Screen Display will warn you once (see figure 5). figure 5 NOTE: A 20” TV monitor with S-Video will only display the full video magnifier image and full image with connected external camera. c.
Changing Magnification figure 1 You can increase or decrease the size of the image by using the SIZE dial at the center of the control panel (see figure 1). There are sixteen levels of magnification available on Merlin LCD Plus. SIZE-7 • To increase the size of the age, turn the dial clockwise, or to the right. • To decrease the size of the image, turn the dial counterclockwise, or to the left. The size you selected will be displayed in the upper left corner of your monitor (see figure 2).
Using Line Markers Line Markers are used to frame an image between two lines. These lines may be used as a reading guide for long lines of text, or as a guide to help keep your place as you move from one side of the page to the other, or just to make writing easier and neater. a. With the Control Box You can choose horizontal or vertical line markers by pressing the LINES button on the control box (see figure 1). Line Markers are available in full video magnifier mode and external video source mode.
Using Windowing Windowing is similar to Line Markers, except that it allows you to completely block out portions of the screen so that you display only the portion of the image you want to view. a. With the Control Box You can choose horizontal or vertical windowing by pressing the WINDOW button on the control box (see figure 1). Windowing is available in full video magnifier mode and external video mode source. See Viewing Mode Features figure 1 Available on page 36.
Using Split Screen A Split-Screen picture is one in which both the computer and the video magnified image are displayed simultaneously on the SVGA or VGA monitor. a. With the Control Box You can choose horizontal or vertical split screen by pressing the WINDOW button on the control box (see figure 1). Split screen is only available with a computer attached and a compatible VGA signal. See Viewing Mode Features figure 1 Available on page 36.
Using Merlin LCD Plus Color Select Options Merlin LCD Plus was designed to provide optimum viewing for people with certain visual conditions by offering an expanded range of choices in both text and background colors. Merlin LCD Plus provides up to 28 color combinations to best fit your eye condition. See page 33 for a list of color combinations. Three modes have been pre-programmed for ease of use. Up to five color select viewing modes can be programmed per your personal preferences.
Using Merlin LCD Plus Color Select Options Step 2: Step 3: Step 4: Turn the SIZE dial Clockwise to scroll through the menu options. Choose a COLOR SELECT prompt COLOR SELECT 2 (1-5) and press the MODE button. Turn the SIZE dial to choose your preferred color combination and Step 2 select one of the following: • You can reverse each color text and background set by pressing the MODE button. • Then, hold down the MODE button POSITIVE SET II to save the settings.
Using the X-Y Table Locking the X-Y Table To lock the X-Y table, slide the lever all the way to the right until it clicks and locks (A). Unlock the X-Y table by sliding the lever to the right again and release the lever (B). A B Unlock Position Lock Position Reading with the X-Y Table 1. With the X-Y table unlocked, place a book, newspaper, etc., on the table. 2. Glide the X-Y table to the left, which will make the words flow across the screen for reading. 3.
Tips for Reading and Writing Reading with Merlin LCD Plus • New users of video magnifier systems have a tendency to overmagnify their reading material. Make the type large enough to see it comfortably, but not so large that it becomes tedious to scan across a page. • Use the X-Y table to move reading materials under the camera, rather than moving the material manually, except small items such as a checkbook or a business card.
Programming Set-up Options You can program Merlin LCD Plus’ set-up options. There are three options you can select in set-up mode: Exit, Screen Messages and Color Select. Entering Set-up 1. Turn the SIZE dial all the way counterclockwise, to the lowest size. This will start you at the beginning of the menu when you enter setup. 2. Press and hold the MODE button. Merlin LCD Plus will say and display “ENTERING SETUP.” Then the screen will fade to black and the word “EXIT“ will appear. 3.
Using a Computer with Merlin LCD Plus OFF figure 1 At times, you may want to use your computer without Merlin LCD Plus. Just make sure you turn Merlin LCD Plus OFF by pressing the POWER button (see figure 1). The computer’s display signal will automatically flow through the Merlin LCD Plus even when it is turned OFF. There is no need to disconnect any cables (see figure 2).
Merlin LCD Plus Specifications General: Up to 32 basic CCTV video modes available plus split screen functionality Up to 5 split screen video modes supported Smooth movable XY table Maximum monitor weight 100lbs (45kg) External composite video input External control box module for split screen control with 5-foot coil cable Virtual control box PC software for control box emulation and split screen control Foot pedal module for quick video mode switching with 6-foot cable Auto-focus camera Large onscreen disp
Merlin LCD Plus Specifications Up to 28 Color Select Modes to Choose From (up to 5 enhanced modes storable): Color Select Black text on Green background Color Select Black text on Orange background Color Select Black text on Blue background Color Select Black text on Yellow background Color Select Black text on Purple background Color Select Black text on Red background Color Select Green text on White background Color Select Red text on White background Color Select Purple text on White background Color Se
Merlin LCD Plus Specifications Split Screen Video Modes: Full CCTV video Full computer video (if VGA connected) Split CCTV and VGA split screen (if VGA connected) Full external video (if external camera attached) Split external video and VGA split screen (if external camera and VGA attached) PC Compatibility: Connects to any computer with external VGA SUB-D15 connector outputting at least one of the following resolutions: VESA (DMT 1.0) VGA (640*480) at 60, 72, 75, 85Hz VESA (DMT 1.
Merlin LCD Plus Specifications Control Panel: Zoom: 16 preset zoom levels Mode: Switches between 7 default video modes (up to 9 modes is possible when 5 enhanced modes are stored) Color Black and White Enhanced contrast Positive Enhanced contrast Negative Color select Yellow text on Blue background Color select Green text on Black background Color select Yellow text on Black background Mode to enter interactive menu for settings adjustments: Screen messages ON/OFF 5 user defined color select modes Exter
Merlin LCD Plus Specifications Viewing Mode Features Available: The following charts illustrate the viewing mode features available on a VGA monitor and TV monitor. LCD Features Available FEATURES AVAILABLE LINE Viewing Mode 1. Full Video Magnifier 2. Full Computer Image 3. Split Screen video magnifier / computer image 4. Full External Video 5.
Merlin LCD Plus Specifications Illumination: Two user-replaceable 5-watt fluorescent bulbs (10,000-hr life) Connections: S-Video output for CCTV modes with optional TV RCA Composite video output for CCTV modes RCA Composite video input for external camera modes 12VDC Power input Computer VGA input (SUB-D15) Foot pedal jack input Control box RJ-11 input Power: 100-240V / 50-60Hz / 29W max External power supply with removable power cord Connector IEC-C13/14 Weight/Dimensions: Base unit: 23lbs (10.
Troubleshooting 1. Merlin LCD Plus Does Not Turn ON • Make sure the power supply is the proper one for Merlin LCD Plus, 12V output, 3A minimum. • Make sure the power supply cord is completely plugged into the outlet. • Make sure the two parts of the power supply cord are securely connected. • Make sure the power supply cord is completely plugged into the DC 12V IN jack in the back of Merlin LCD Plus.
Troubleshooting 5. The Remote Software Does Not Work • Check that the software cable and its adapter are properly secured into a serial port on your computer. • Check that the software cable is properly secured into the port labeled “CONTROL BOX” in the back of Merlin LCD Plus. • Maximize the application software window and make sure the communication indicator is green. A red indicator indicates a faulty computer to Merlin LCD Plus communication.
Other Enhanced Vision Products Jordy – Two Low Vision Systems in One For distance, intermediate and near viewing. Magnification: 1X – 30X Four viewing modes for optimum visibility: Color, Black/White, Enhanced Positive, Enhanced Negative Jordy Docking Stand (optional) Magnification: 4X – 40X Acrobat The Acrobat's innovative rotating camera design enables people with low vision to perform daily tasks more effectively.
Other Enhanced Vision Products Flipper Stand The Flipper Stand is compatible with both the Flipper and FlipperPort products. The Flipper Stand extends the flexibility of these products by elevating Flipper to 15 inches on a platform which allows users to view materials easily in classroom or audience settings. The Stand also converts quickly to a desktop Video Magnifier once the user points the Flipper camera down towards the table. Max – Powerful Magnifier A powerful magnifier for reading.
Other Enhanced Vision Products Accessories Smart Video Connects Enhanced Vision’s low vision devices to a computer monitor. Carrying Cases Convenient cases for storage and transport of all Enhanced Vision products. MaxTrak An essential accessory to keep your Max straight while rolling across a page. Battery Rechargeable batteries for Enhanced Vision’s low vision devices. Contact information: Toll Free: (800)440-9476 Phone: (714)465-3400 Fax: (714)374-1821 www.enhancedvision.com evinfo@enhancedvision.
Warranty Enhanced Vision Merlin LCD Plus Video Magnifier Warranty Policy Enhanced Vision products are designed to give you the highest quality image, convenient features, ease of use and reliable service. Merlin LCD Plus has been inspected and tested prior to shipping. Our company stands behind the quality materials, components and workmanship of the Merlin LCD Plus video magnifier. For these reason we are pleased to offer two warranty options.
Warranty In the case that the end-consumer / original individual resells the Merlin LCD Plus within a THREE year time period from original purchase date and the product is resold by a recognized manufacturer representative, the Merlin LCD Plus warranty will default to the balance of what remains of the standard THREE year warranty (from original purchase date). The lifetime warranty would be void.
The Merlin LCD Plus video magnifier is designed to enlarge and enhance images to improve the lives of people who have low vision. The extent to which Merlin LCD Plus can improve the ability to see images and text depends on a person’s individual condition and level of visual impairment. Merlin LCD Plus is not designed to restore vision, correct eye conditions or halt degenerative vision loss. An eyecare professional can best determine the suitability of Merlin LCD Plus for a patient’s specific condition.