I NS TA L L A TI O N A N D O P E R A TI O N MA NU A L Envoy™ Communications Gateway 141-00014, Rev 03
Envoy Installation and Operation Corporate Headquarters Contact Information Enphase Energy Inc. 1420 N. McDowell Blvd. Petaluma, CA 94954 USA Phone: +1 707-763-4784 http://www.enphase.com info@enphaseenergy.com Contact Enphase Energy SAS Hub Business 2 BP 128 69125 Lyon Aéroport Saint Exupéry – France Tel : +33 (0)4 74 98 29 56 Fax : +33 (0)4 74 98 38 15 http://www.enphase.com/fr sas@enphaseenergy.
Envoy Installation and Operation Table of Contents Important Information .................................................................................................................................... 4 Read this First ................................................................................................................................................. 4 Safety Instructions .......................................................................................................................
Envoy Installation and Operation Important Information Read this First Follow the instructions in this manual. These instructions are key to the installation and maintenance of the Enphase Envoy Communications Gateway (Envoy™). To ensure the safe installation and operation of the Envoy, note the following safety symbols that appear throughout this document to indicate dangerous conditions and important safety instructions.
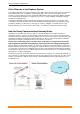
Envoy Installation and Operation The Enphase Envoy Communications Gateway The Envoy is an integral component of the Enphase Energy Microinverter system. It operates between the Enphase Microinverters and the Enphase Enlighten™ web-based monitoring and analysis software. The Envoy functions as a gateway and monitors the microinverters that are connected to the PV modules. The Envoy collects energy and performance data from the microinverters over on-site AC power lines.
Envoy Installation and Operation Other Elements in the Enphase System The Enphase Microinverter is a fully integrated device that converts the DC output of the PV module into grid-compliant AC power. In addition to performing the DC to AC conversion, it maximises the PV modules' energy production by using a sophisticated Maximum Power Point Tracking (MPPT) algorithm. This integrated system maximises energy harvest, increases system reliability, and simplifies design, installation and management.
Envoy Installation and Operation Envoy Installation Planning and Preparation Review the following preinstallation checks before you install the Envoy.
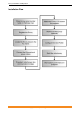
Envoy Installation and Operation Installation Flow 8 Copyright 2012 Enphase Energy 141-00014 Rev 03
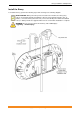
Envoy Installation and Operation Install the Envoy To install the Envoy, perform the following steps while referring to the following diagram. BEST PRACTICE: When powered up and connected for the first time, the Envoy may retrieve an automatic upgrade from Enphase. Because this upgrade may take up to 15 minutes, connect the Envoy first at the site (connect to both AC power and the broadband router) so that it performs the upgrade well before the solar module installation is complete.
Envoy Installation and Operation 1. Add Serial Number Label to Map a. Remove the Envoy’s removable serial number label as shown in the diagram. b. Attach the serial number label to the microinverter installation map, or make note of it for registration in the next step. 2. Register the Envoy Register the Envoy at the beginning of the PV installation. a. Use your previously issued username and password to log in to in Enlighten. If you haven’t registered, go to www.enphase.
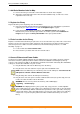
Envoy Installation and Operation 5. Connect Power Line Communication Bridges (Optional) If the Envoy needs to be located away from the router, at a distance where an Ethernet cable is not practical, use power line communication bridges or purchase a wireless Ethernet bridge. Bridges allow the Envoy to communicate with the broadband router without the need for additional Ethernet cabling. To install the bridges: WARNING! Do not remove power from the Envoy if the LCD displays: “Upgrading. . . Do Not Unplug.
Envoy Installation and Operation 7. Check the Envoy’s Progress After installing your Envoy, you can check its progress: a. Check the Internet connection. Look for the “+Web” indication. If it still shows “-Web” 15 minutes after connecting to the broadband router, see “Local Area Networking Troubleshooting” on page 30. NOTE: Power production shows as 0W and 0kWh until the microinverters are discovered and monitoring begins. 192.168.2.140 0W 0kWh +Web 25 b.
Envoy Installation and Operation 8. Wall Mount the Envoy (Optional) NOTE: Before mounting the Envoy, it is best to perform a Communications check, as described on page 23, to find the best location for your Envoy. After you have positioned your Envoy for optimal communications and it is has begun to detect devices, you can mount the Envoy on a wall. To do this: a. Use two drywall screws or wall anchors (not included) to affix the Envoy to the wall, mounted at the dimensions shown. You will need two #8 (4.
Envoy Installation and Operation 9. Configure the Grid Profile The following steps describe how to configure the grid profile. After all of the microinverters at the site are detected, you can apply the grid profile. Each Grid Profile contains a set of trip points. Trip points are input voltage or frequency values that trigger the microinverters to shut down. These trip points vary from region to region.
Envoy Installation and Operation f. The System Administration screen appears. From the Admin menu, select Device Grid Configuration. Click to select Device Grid Configuration The Grid Configuration screen appears. This screen allows a licensed solar professional to select and apply the appropriate Grid Profile for the site. g. Select a Country regulatory specification. h. Select a Grid profile.
Envoy Installation and Operation j. Click View Device Profile Report. The Grid Profile Report screen appears. Click to View Grid Profile Report k. Enter the site information in the window provided. Enter site information here. l. 16 Use your browser to send this report to your printer or to save it to a file. After printing or saving the file, you can send it to the local regulatory agency to confirm the grid profile and trip point settings.
Envoy Installation and Operation The report will look like the following example.
Envoy Installation and Operation 10. Build the Virtual Array When the system is energised and the Envoy detects at least one microinverter, the installer can begin to create the virtual array in Enlighten from the installation map they created. a. Log in to Enlighten. b. Use Array Builder to create the virtual array in Enlighten. c. Use your installation map as your reference. To see the Array Builder demo, go to http://enphase.com/support/videos/.
Envoy Installation and Operation Envoy Operation First Scan for Microinverters A newly installed Envoy automatically performs an initial scan to discover all of the microinverters that are installed and powered up at the site. This initial scan continues to search for new microinverters for eight hours from initial start up of the Envoy. This one-time scan is not repeated automatically. During the scan, you will notice some values increasing on the Envoy display.
Envoy Installation and Operation LCD Screen Display at Initial Start Up When the Envoy is started up for the first time, it goes through the initial boot sequence. During this initial boot sequence, the Envoy LCD screen display progresses as shown: [e] Enphase Energy Booting [||||||] {LANGUAGE SELECTION} Initial Communications Check The last two screens in the initial sequence alternate until the Communications Check ends, after 20 minutes.
Envoy Installation and Operation Normal Operation Once the Envoy completes a scan, it begins or resumes normal operation. At this point, the indicators in the LCD screen show current values for your system. This is the home screen: 192.168.2.140 +Web 2407W 783kWh 25 It may be a few minutes before energy data appears or increases on the home screen after starting up the Envoy or initiating a scan. Information shown during normal operation includes: Local IP address, for example: 192.168.2.
Envoy Installation and Operation 3. To select a menu item, release the Menu button when the desired menu item appears. The menu continues to cycle as long as you are pressing the Menu button. The Exit Menu option returns to the normal (default) display, usually the Home screen. See the following sections for detailed procedures.
Envoy Installation and Operation Initiating a Scan for New Microinverters If you add additional microinverters to an existing system or replace a microinverter, you will need to run a scan to detect the new devices. To initiate a scan after you add new microinverters to an existing Enphase system perform the following steps.
Envoy Installation and Operation 2. When the LCD screen displays “Enable Communication Check”, release the Menu button. Enable Communication Check The LCD screen then reads: Comm check enabled for 20min The Envoy begins a 20-minute communications check to assess the signal strength between the Envoy and the microinverters detected at the site.
Envoy Installation and Operation View Grid Configuration The LCD screen then reads: Gathering Grid Configuration Data If a grid profile has not been applied, the following screen is displayed: This indicates that the microinverters are not yet configured with a grid profile. No Grid Config. Applied 3. If needed, configure these settings as described in “Change or View the Grid Profile” on page 36. If a grid profile has been applied, the following screens are displayed.
Envoy Installation and Operation Enabling a Connection to Enphase The Enable Connection to Enphase menu item creates a secure connection to Enphase allowing Enphase personnel to troubleshoot the system remotely. To open a connection to Enphase: 1. Press and hold the Envoy Menu button. After two seconds the Envoy menu appears. 2. Continue holding the Menu button. When the LCD screen displays “Enable Connection to Enphase”, release the Menu button.
Envoy Installation and Operation Selecting a New Locale (Change Language Display) You can set the LCD to display in English, French, Italian, or German. To do this: 1. Press and hold the Envoy Menu button. After two seconds you will enter the Envoy menu. 2. Continue holding the Menu button. When the LCD screen displays “Select New Locale”, release the Menu button. Select New Locale 3. The Envoy LCD panel will scroll through the available locale settings.
Envoy Installation and Operation Networking and Firewall Info The Envoy communicates with Enlighten by initiating outbound TCP (Transmission Control Protocol) connections to Enphase over HTTPS (Hypertext Transfer Protocol over Secure Socket Layer) (TCP:443). The Envoy uses NTP (Network Time Protocol) (UDP:123) to periodically synchronise time/date with an external pool of NTP servers. You do not need to open any inbound firewall ports for normal operation.
Envoy Installation and Operation Troubleshooting The following sections describe possible problems and solutions. For information on system status and event messages, see “Event Messages” on page 43. For more extensive information, refer to Troubleshooting an Enphase Installation at http://www.enphase.com/downloads. Power Line Communication Troubleshooting At power-up, the Envoy performs a “Communications check”. After a few minutes, it will display a number of bars in the LCD screen.
Envoy Installation and Operation Issue: Envoy Displays Zero Bars The following conditions may exist. Is there a phase imbalance? Ask the electrician to measure the conductors and neutral line to verify that the phases are balanced. If the phases are not balanced, electricians must recheck the wiring. Is the system energised? PV modules power microinverters, PV modules provide power only during daylight hours, and microinverters communicate only when powered. Run another scan during daylight hours.
Envoy Installation and Operation Issue: LCD Screen Displays “Envoy Failure +Web or -Web” This message displays after the Envoy has tried unsuccessfully three times to initialise. Unplug the Envoy from the AC outlet and plug it in once again. Leave it in place for at least 15 minutes. If it continues to display Envoy Failure or if it never moves beyond the Initialization stage, contact Enphase Customer Support (support@enphaseenergy.com).
Envoy Installation and Operation Envoy Local Interface The Envoy relays data to Enlighten, and connection to the Enphase Enlighten web-based monitoring and analysis software requires an Internet connection. However, if there is no broadband router at the installation site, you can communicate directly with the Envoy using the Ethernet port and a personal computer with a web browser.
Envoy Installation and Operation Home Screen The home screen provides a system overview and shows the current status of the microinverters that have been identified by this Envoy. From this screen, you can access other screens in the interface.
Envoy Installation and Operation Production Screen To view system energy harvest statistics for your system, click Production from the Envoy home screen to navigate to the production screen. Inventory Screen To view a listing of the devices in your system, click Inventory from any screen to navigate to the inventory screen.
Envoy Installation and Operation Administration Screen The Administration screen of the Envoy local interface contains several configurable options. Click Administration to access this menu. NOTE: For Envoy performance reasons, Enphase does not recommend giving the Envoy a publicly accessible IP address. However, if you must place the Envoy on a public-facing IP address, Enphase recommends that you change the admin password to disallow unauthorised modification to your Envoy.
Envoy Installation and Operation Change or View the Grid Profile Many Enphase Microinverters have field adjustable voltage and frequency trip points. Trip points are input voltage or frequency values that trigger the microinverters to shut down when the values are exceeded. If local regulations require adjustments to these trip points, the installer can set up the system to use an alternate Grid Profile (set of trip points).
Envoy Installation and Operation 3. From the Admin menu, select Device Grid Configuration. The Device Grid Configuration screen appears. This screen allows a licensed solar professional to select and apply the appropriate trip points for the solar installation. Click to select a Country regulatory specification Click to select a Grid profile Enter your token here. Click to Apply Grid Profile 4. Select a Country regulatory specification. 5. Select a Grid profile that is applicable for your region.
Envoy Installation and Operation 8. Once logged in at the Enlighten website, locate the Grid Profile Change Token widget. If you don’t see this widget add it now: Click Add a widget. Select Grid Profile Change Token. 9. Enter the Envoy serial number. Copy this token. 10. Enter the authorization number from the Envoy Interface. 11. Click Get Token. 12. Copy the token. 13. Paste or enter the token in the Grid Profile screen. 14. Click Apply Grid Profile.
Envoy Installation and Operation The Apply Profile screen appears. This screen allows you to generate a report to confirm that the microinverters have been set with an updated grid profile. 15. Click View Device Profile Report. Click to View Grid Profile Report The Device Profile Report screen appears 16. Enter the site information in the window provided. Enter site information here. Site Name 123 Avenue Town, State/Province Country 17.
Envoy Installation and Operation The report will look like the following example.
Envoy Installation and Operation Set Up Device Scan Control The “controlled” device scan differs from other Envoy device scans in that it allows control over scan period, scanning method, and number of devices. When first installed, the Envoy initiates an eight-hour scan. This initial scan is the only scan needed for most systems. NOTE: At sites with more than 100 microinverters, we recommend using the controlled device scan presented here and specifying the total number of devices to be discovered.
Envoy Installation and Operation Set the Time Zone (optional) Ordinarily, the Envoy obtains the time zone setting from Enlighten. If you do not have an Internet connection for the Envoy, you may want to set the local time zone. This step is not necessary if the Envoy is reporting to Enlighten. To set the time zone: 1. From the Admin menu, choose Date, Time, Time Zone. 2. Under Time Zone Setting, select a time zone from the Select Time Zone drop down menu. 3.
Envoy Installation and Operation Event Messages The following table lists messages that the Envoy can produce to indicate certain conditions. These messages appear on screen when your computer is connected to the Envoy local interface. Where message is displayed: Home Screen Inventory Screen Description AC Frequency Changing Too Fast Recommended Action: No action is required unless the condition persists.
Envoy Installation and Operation Where message is displayed: Home Screen Inventory Screen Description AC Voltage Out Of Range Recommended Action: This condition should correct itself. No action is required. AC Voltage Out Of Range Description: The microinverter reports that the AC voltage coming from the utility is either too low or too high as specified by applicable regional standards.
Envoy Installation and Operation Where message is displayed: Home Screen Inventory Screen DC Voltage Too High DC Voltage Too High Description Recommended Action: Ask your installer to check that the PV module and microinverter are compatible. It may be that the PV module generates a higher voltage than is recommended for the microinverter. Your installer may refer to the Module Compatibility List for more information at http://www.enphase.com/downloads/.
Envoy Installation and Operation Where message is displayed: Home Screen Inventory Screen Description GridProfileIncompatible Recommended Action: Ask your installer to use the Envoy Interface to select a grid profile that is compatible with the installed microinverters. GridProfileIncompatible Description: This message displays when the selected grid profile is incompatible with microinverter hardware.
Envoy Installation and Operation Where message is displayed: Home Screen Inventory Screen Module added Description Description: The Envoy has detected and is now associated to a new microinverter. No action is required. Microinverter failed to report Failed to report Recommended Action: You can ignore occasional instances of this error. Communications will likely recover on the next reporting cycle.
Envoy Installation and Operation Where message is displayed: Home Screen Inventory Screen Power On Reset Power On Reset Description Description: The microinverter has powered on after having both AC and DC disconnected. Recommended Action: No action is required. Shutdown Description: The Envoy has been powered down (unplugged from AC power). Recommended Action: Restore AC power to the Envoy. Startup Description: The Envoy has been powered back up (plugged back in to AC power).
Envoy Installation and Operation Technical Data Communications Interface Power line Enphase proprietary Ethernet 10/100 auto-sensing, auto-negotiation USB (two ports) USB 2.0 interface, auto-sensing, auto-negotiation Monitoring capacity Model number (SKU) ENV-230 monitors up to 500 Enphase Microinverters. Power Requirements AC outlet 230VAC, 50Hz Power consumption 2.5 watts typical, 7 watts maximum Mechanical Data Dimensions (WxHxD) 222.5 mm x 112mm x 43.
Envoy Installation and Operation Corporate Headquarters Contact Information Enphase Energy Inc. 1420 N. McDowell Blvd. Petaluma, CA 94954 USA Phone: +1 707-763-4784 http://www.enphase.com info@enphaseenergy.com Contact Enphase Energy SAS Hub Business 2 BP 128 69125 Lyon Aéroport Saint Exupéry – France Tel : +33 (0)4 74 98 29 56 Fax : +33 (0)4 74 98 38 15 http://www.enphase.com/fr sas@enphaseenergy.