
Data Sheet

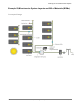

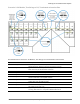
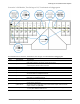
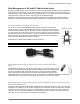
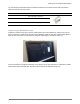
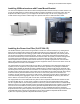
Table Of Contents
- Planning for an IQ Microinverter System
- IQ 6 and IQ 6+ Micros
- IQ 7 and IQ 7+ Micros
- IQ 7X Micros
- Q Cable and IQ Micro Accessories
- IQ System Design using the IQ Combiner
- IQ System Design using the IQ Combiner+ and IQ Combiner 3
- IQ System Design with Q Aggregator
- IQ Envoy Installation Options
- Field Wireable Q Connectors and Raw Q Cable
- Splicing Q Cable and Raw Q Cable with Junction Boxes
- Example IQ Microinverter System Layouts and Bill of Materials (BOMs)
- Wire Management of AC and DC Cables Under Array
- AC Wire Management at the Junction Box or Q Aggregator
- Installing IQ Microinverters with Frame Mount Bracket
- Installing the Power Line Filter (Q-LCF-064-1P)

Planning for an IQ Microinverter System
© 2018 Enphase Energy Inc. All rights reserved. December 13, 2018
24
AC Wire Management at the Junction Box or Q Aggregator
Wire management practices at the junction box are critical to the long-term reliability of any PV system.
Installers often install the roof-mounted junction box on the side of a rail. If using the Q Aggregator, it must be
installed underneath the modules.
For Junction Box Applications
Follow these recommendations to prevent moisture from accumulating in the junction box. This helps to
improve system reliability while ensuring that the wiring connections last for the life of the system.
• Make sure that cables enter the junction box from the side or from the bottom, never from the top
where water can enter the enclosure.
• Install cables with a drip loop. Secure the cable so that water drains away from the cable entry.
• Use properly sized strain reliefs and cord grips. Note that the Q Cable is elliptical, so the cable gland
securing the Q Cable must contain an inner gland designed for elliptical cable. These cable glands
are commonly available from electrical distributors or home improvement stores and are often
available under the following names:
– ½” Service Entrance (SE) Watertight Connectors
– UF Cable Glands
– Heyco® -Tite Liquid Tight Cordgrips for Enphase Q Cables
- M3231GCZ (1/2˝ NPT) and M3234GDA-SM (3/4˝ NPT).
- The 1/2˝ version provides liquid tight entry for one Enphase Q Cable – .24 x .38˝ (6,1 x
9,7 mm).
- The 3/4˝ version provides liquid tight entry for up to two Enphase Q Cables – .24 x .38”
(6,1 x 9,7 mm) and an additional .130” (3,3 mm) dia. hole for a #8 solid grounding cable.
- The 3/4” version uses our skinned-over technology, so any unused holes will retain a
liquid tight seal.
• Properly tighten the strain reliefs to prevent cable movement and to prevent water ingress.
• Install the junction box to meet the manufacturer’s recommended mounting and orientation
requirements. Use NEMA 4 enclosures. (NEMA 3 enclosures have a limited mounting orientation
range and may not accommodate typical rooftop installations.)
• Consider drilling a small drain hole in the bottom, lowermost corners of the junction box, so that
moisture or condensate can drain out of the junction box.
For Q Aggregator Applications
• Install the Q Aggregator underneath the solar modules.
• Be sure to seal any unused connectors on the Q Aggregator with the male sealing caps (Q-BA-CAP).
• Always install the Q Aggregator with the removable cover facing upward, and at angles below 45º
from horizontal, to ensure the NEMA 3 rating. The Q Aggregator ships with drain holes in the bottom,
so must be installed with the cover facing up, even on ground mounted installations.
• The mounting bracket is reversible in the event a bottom mounting position is needed.