
User Manual


7
1. Unscrew the BATTERY COMPARTMENT COVER (17) and remove, exposing the
BATTERY HOLDER (18). Insert 2 fresh AA ALKALINE BATTERIES (19), observing the
correct polarity as marked, and screw the cover back on to the microphone. Make
sure the cover is screwed on completely. Fresh alkaline batteries can last up to 10
hours in use, but in order to ensure optimum performance, it is recommended that
you replace the batteries after every 7-8 hours of use.
2. Channel Selection
Turn the frequency agile rotary DIP switch (20) to one of the sixteen channels. The
knock on the shaft should match a number of the dial, which indicates the selected
channel. This step must be repeated any time for selecting a new channel.
3. Turn on the HT-16U by sliding the AUDIO switch (21) to the OFF position first.
Then slide the POWER switch (22) to the ON position. The TX LED indicator (23) will
stay on. The BATTERY indicator LED (24) will give a single quick flash, indicating
usable battery strength. In the case of a dead or low battery, the LED will either not
go on at all or will stay on continuously, indicating that the batteries should be
replaced with fresh ones. To preserve battery life, turn the transmitter off when not in
use.
4. For optimum performance, an INPUT LEVEL CONTROL (23) is provided. Adjust the
gain by turning the control with a small screwdriver. It is recommended that the level
be set at about 1/2 maximum. Experiment and set for maximum possible gain
without audible distortion on the high level peaks.
(Note: Turning down the gain too
much can compromise the signal-to-noise and is not recommended.)
5. The microphone is now ready to use. The A and/or B DIVERSITY LED INDICATORS
(13) on the WS-16U receiver should now be lit, indicating a received signal from the
transmitter. When ready to speak, slide the AUDIO switch (21) to the ON position.
Adjust the volume of the receiver
as per the Audio Output Micro-
phone Connection section of the
above WS-16U receiver instruc-
tions.
[Note: Observe care in
selecting P.A. volume, transmitter
location and speaker placement so
that acoustic feedback (howling or
screeching) will be avoided. Note:
The windscreen of the HT-16U
functions as a built-in antenna. For
proper operation, never remove
the windscreen during use, or
exchange with another type. For
optimum range maintain line-of-
sight between the transmitter and
the receiver whenever possible.
Holding the microphone tightly, bridging across the windscreen and mic tube, will
also lessen range. Hold by the mic tube housing only for optimum operation.]
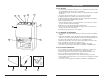
HT-16U HANDHELD MICROPHONE TRANSMITTER
17
6
12
11
15
13
14
15
10
98 6
5
7
2
1
2
4
3
1
4
19
21
24
23
20
18
25
22
16