User Guide – HT6 Serie v10/10 Professional submersible marine handheld transceiver Common Information HT649 LCD GMDSS
Certification We Entel UK Limited of: 320 Centennial Avenue Centennial Park Elstree Borehamwood Hertfordshire WD6 3TJ United Kingdom Declares under our sole responsibility that the product range: HT600 Series Handheld Radio Transceiver Conforms to the following standards or other nominative documents: • EN 301 178-2 V1.2.2: 2007-02, EN 60945:2002, EN60950-1: 2006, in accordance with Directive 1999/5/EC. • EN 300 225 V1.4.
Radio care Common Warranty Cleaning your Radio The HT6XX comes with a 24 month warranty, for details see our full terms & conditions. After exposure to any potentially corrosive substance including salt water it is recommended to thoroughly wash the transceiver in fresh water. If washing with the battery removed from the radio, ensure that the battery is not immersed in water and clean only with a damp cloth.
Battery care / information Introduction If liquids from the battery get into your eyes, immediately: • These batteries: avoid rubbing them • Extend talk time • Reduce the battery’s size and weight • Do not suffer from ‘memory effect’ that reduces the • life of Ni-Cad and NiMH batteries • Have a low toxicity, therefore reducing the impact on the environment • Switch the transceiver OFF before charging • Charge the battery pack before use • Do not recharge the battery pack if it is already fu
Packing List Common • HT64x Transceiver • CNB750E Rechargeable 1800mAh Li-Ion battery (May not be included with GMDSS) • CLB750x Non rechargeable Lithium battery (GMDSS only) • CBH750 Spring loaded belt clip • CATxx Antenna (CLB750L, CLB750G or CLB750M depending on which cells have been used in the battery pack) CCA trickle charger included with certain models Optional Accessories Battery & Charger Options CNB750E CLB750x CSAHT CSBHT CCAHT-230 CCAHT-110 CCAHT-12 Spare 1800mAh Lithium-Ion b
Optional Accessories cont...
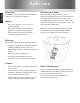
Preparing Your Radio For Use cont... Common Attaching / Removing the Belt Clip 1 To attach, locate the clip into the slot on the back of the battery and slide up until you hear a “click”. 1 a 2 To remove, pull the tab (a) towards the belt clip. Then slide the belt clip downwards (b). 1 2 b 2 Attaching / Removing the Aerial 1 To attach, carefully align the aerial with the socket.
Using Your HT649 Common On / Off button Press the on / off button to turn your radio on. A short turn on beep will be heard. To turn off, press and hold the on / off button until the display extinguishes. Using your radio Before using your radio you may need to adjust the volume on the radio to take in to account background noise. Adjust the volume using the rotary control on the top of the radio. Transmitting on your radio Before transmitting, ensure that the channel is not in use.
HT649 Standard Features: • Environmentally protected to IP68 i.e.
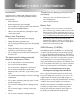
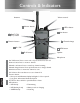
Controls & Indicators Antenna Volume control 2 Monitor button 9 3 8 7 LED indicator Scan button Push To Talk (PTT) switch 4 Function button 1 On / Off 5 6 Ch16 button Channel change MEM button Speaker Microphone 1 2 3 4 5 6 7 HT649 8 9 On / Off button. Press to turn radio on, press and hold to turn off. Monitor button. Press to monitor channel Channel scan button. Press to start/stop channel scanning. Channel change buttons. Press up/down buttons to change channel. Mem button.
LCD Indicators • Keypad lock • Battery State • Channel Monitor • Memorise channel for scanning HT649