User Guide – HT950 Series v10/10 Professional submersible PMR446 handheld transceivers ATEX approved Intrinsically Safe Common Information (all models) II 2 G Ex ib IIC T4 Ex ib IIC T4 HT952 Entry HT953 LCD
Introduction Common This guide covers the ‘basics’ of your radio’s operation. To meet your exact requirements the radio may have been customised by your Entel authorised dealer. These features will be explained in a separate guide issued by the dealer.
Certification We Entel UK Limited of: Entel UK Ltd 320 Centennial Avenue Centennial Park Elstree Borehamwood Hertfordshire WD6 3TJ United Kingdom Declares under our sole responsibility that the product range: HT95X Series Handheld Radio Transceiver Conforms to the following standards or other nominative documents: • EN 300 086-2 V1.2.1, EN 301 489-1 V1.8.1:2008, EN 301 489-5 V1.3.1:2002, EN 60950-1:2006, in accordance with Directive 99/5/EC.
Radio Care Common Warranty • The HT95X comes with a 24 month warranty, for details see our full terms & conditions.
Battery Care / Information • • Use only the specified charger and observe charging requirements • Do not pierce the battery with any object or strike it with an instrument • Do not use the battery pack if it is damaged in any way • Do not reverse-charge or reverse-connect the battery • Do not touch a ruptured or leaking battery switch on (If not de-activated by your dealer).
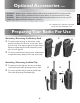
Packing List Common • HT95X Radio • CNB950E Rechargeable 1800mAh Li-Ion battery • CBH750 Spring loaded belt clip • CSAHT Intelligent rapid charger • User guide CD Optional Accessories Battery & Charger Options CNB950E CSAHT CSBHT CCAHT-230 CCAHT-110 CCAHT-12 Spare ATEX approved 1800mAh Lithium-Ion battery pack with rear clip 1-way intelligent rapid charger, 110-230v 6-way intelligent, rapid charger, 110-230v 1-way trickle charger with 230V mains adapter 1-way trickle charger with 110V mains adap
Optional Accessories cont... Bluetooth option board in radio is required to use Bluetooth audio accessories. For complete up to date list of optional accessories visit www.entel.co.uk Preparing Your Radio For Use 1 Attaching / Removing the Battery Pack 2 1 To attach, locate the pegs on the bottom of the battery and place into the slots on the radio. Then press the top of the battery against the radio. Secure battery by tightening the screw clockwise by hand.
Preparing Your Radio For Use cont... Common Attaching / Removing Audio Accessories 1 To attach / remove the accessory cover by unscrewing the locking screw anti-clockwise (leave cover attached or store in a safe place). Attach accessory plug by locating over the socket. Carefully tighten the locking screw clockwise until finger tight (do not tighten with a screwdriver etc). 2 To remove, unscrew the locking screw by hand in an anti-clockwise direction (carefully use a coin or screwdriver if too tight).
Using Your Radio Making a Call Before transmitting on your radio, first ensure that the channel is not in use (yellow or green busy LED will be illuminated and audio may be heard from speaker). To transmit press and hold the PTT button on the side of the radio and speak clearly 25-50mm from the microphone. Release the button to receive. Transmit Time Out Timer (T.O.T.) A transmit time out timer is enabled on your radio. This will prevent the radio from transmitting continuously.
Using Your Radio cont... Common Voice Scrambler (Option) With the optional voice scrambler you can prevent potential eavesdropping on your radio calls by others. This will make your voice transmission difficult to understand by anyone monitoring the same channel that you are using. If your dealer has made this a selectable feature, follow the instructions provided by the dealer.
HT952 Standard Features: Up to 16 programmable channel positions • Transmit power output 0.5 Watts • CTCSS & DCS (Analogue & Digital squelch) with squelch tail elimination (removes the ‘shh’ noise) • Exceptionally loud and clear audio • Robust design, exceeds MIL-STD-810C/D/E/F • Environmentally protected to IP68 i.e.
Controls & Indicators Antenna 7 Dealer programmable button 3 3 Channel / Scan control 5 Dealer programmable button 1 8 LED indicator HT952 4 Push To Talk (PTT) button 2 Volume control 6 Dealer programmable button 2 Speaker 1 On / Off Microphone 1 On / Off button. Press to turn radio on, press and hold to turn off. 2 Press up / down buttons to increase / reduce volume. 3 Channel / Scan control. Rotate to select the desired channel or scan setting. 4 Push To Talk (PTT) button.
Programming your HT952 radio The radio’s frequency and tone configuration can be changed in user programming mode. This will allow you to put any of the standard frequencies or tones in to any channel position. When a radio has been configured this information can be quickly and easily cloned into other units using an optional cloning cable. The programming process is confirmed using a series of audible beep tone patterns.
Check / Modify CTCSS/DCS Tone Checking the current configuration • HT952 A momentary press of the bottom side function button will cause the radio to beep the CTCSS/DCS tone programmed into the channel (see CTCSS/DCS beep codes below). If no tone is programmed in to a channel position a tone will sound. Press and hold the PTT button and the bottom side button together until the radio emits a “warble” sound and illuminates the LED GREEN, confirming the radio is in CTCSS/DCS programming mode.
Radio Cloning HT952 Radio cloning allows you to copy the programmed channel and button setup information from a ‘master’ radio into other unprogrammed radios without the use of a PC. Cloning is performed by connecting two radios together using a HTCL cloning lead. How to clone a radio Connect the HTCL lead to the accessory socket on both radios. Ensure the master radio is powered up before the slave radio. will emit a alert and the LED will alternately flash yellow / red. 2.
Frequency Table HT952 No Frequency 1 2 3 4 5 6 7 8 446.00625 MHz 446.01875 MHz 446.03125 MHz 446.04375 MHz 446.05625 MHz 446.06875 MHz 446.08125 MHz 446.09375 MHz Beeps • •• ••• •••• ••••• •••••• ••••••• •••••••• CTCSS (PL) Tone Table Ref CTCSS (Hz) 0 1 2 3 4 5 6 7 8 9 10 11 12 13 14 15 16 17 18 19 20 21 22 23 24 25 0 62.5 67 69.3 71.9 74.4 77 79.7 82.5 85.4 88.5 91.5 94.8 97.4 100 103.5 107.2 110.9 114.8 118.8 123 127.3 131.8 136.5 141.3 146.
DCS (DPL) Tone Table DCS 52 53 54 55 56 57 58 59 60 61 62 63 64 65 66 67 68 69 70 71 72 73 74 75 76 77 78 79 80 81 82 83 84 85 86 023 025 026 031 032 043 047 051 054 065 071 072 073 074 114 115 116 125 131 132 134 143 152 155 156 162 165 172 174 205 223 226 243 244 245 Beeps ▬ ● 5 5 5 5 5 5 5 5 6 6 6 6 6 6 6 6 6 6 7 7 7 7 7 7 7 7 7 7 8 8 8 8 8 8 8 2 3 4 5 6 7 8 9 0 1 2 3 4 5 6 7 8 9 0 1 2 3 4 5 6 7 8 9 0 1 2 3 4 5 6 Ref DCS 94 95 96 97 98 99 100 101 102 103 104 105 106 107 108 109 110 111 112 113 1
Intentionally Left Blank 17
HT953 All the features of the HT952 (see page 10) plus the following: Standard Features: • LCD Display • Up to 255 programmable channel positions (8 RF channels) • Low battery indication on LCD dispaly • Battery count is displayed at switch on • Multiple channel scan groups HT953 18
Controls & Indicators 7 Dealer programmable button 3 Antenna 5 Dealer programmable button 1 3 Volume control 8 LED indicator 4 Push To Talk (PTT) button 2 Channel / Scan control HT953 6 Dealer programmable button 2 Speaker 1 On / Off Microphone 1 On / Off button. Press to turn radio on, press and hold to turn off. 2 Press up / down buttons to change channel (this can be dealer configured to be volume control). 3 Rotate to select the desired volume.
LCD Indicators Key Bleeps Off • Keypad Locked • Bluetooth device connected • Accessory Connected • VOX Enabled • Scramble Enabled • Battery State • Receive strength RX 20 HT953 •
Programming your HT953 radio The radio’s frequency and tone configuration can be changed in user programming mode. This will allow you to put any of the standard frequencies or tones in to any channel position. When a radio has been configured this information can be quickly and easily cloned into other units using an optional cloning cable. To put radio into user programming mode • To put the radio into user programming mode, press and hold the top side function button and PTT button and turn the radio on.
User Programmable Key Lock The user programmable Key Lock function allows the Key Lock to be assigned to the lower side button and enabled \ disabled via the radio’s controls without the use of a computer. Checking The Status Of The Key Lock To check whether the key lock is currently enabled or disabled: • Put the radio into User Programming Mode (UPM) by pressing and holding the top side function button and the PTT button when you turn the radio on.
Radio Cloning HT953 Radio cloning allows you to copy the programmed channel and button setup information from a ‘master’ radio into other unprogrammed radios without the use of a PC. Cloning is performed by connecting two radios together using a HTCL cloning lead. How to clone a radio Connect the HTCL lead to the accessory socket on both radios. Ensure the master radio is powered up before the slave radio.
Default Channel Configuration The HT95X hand portable radio has been factory programmed with the default frequencies in the table below. This configuration may offer compatibility with other brands of PMR446 radio but can be altered by your dealer to match any existing PMR446 equipment. CTCSS tone 94.8Hz CTCSS tone 88.5Hz CTCSS tone 103.5Hz CTCSS tone 79.7Hz CTCSS tone 118.8Hz CTCSS tone 123Hz CTCSS tone 127.3Hz CTCSS tone 85.4Hz CTCSS tone 67Hz CTCSS tone 71.9Hz CTCSS tone 74.4Hz CTCSS tone 77.
Troubleshooting Guide Common PROBLEM PROBABLE CAUSE SOLUTION Radio will not power on Battery needs charging Battery is exhausted Recharge battery pack Replace the battery pack Radio will not talk with others Radios may be on different channel or tone code Check that all radios in same group are using the same channel and tone Hearing others’ conversations Using same channel and tone as other users Select a different channel and tone Control buttons not functioning Button lock activated Turn b
Certification Certification Certification ATEX approved Intrinsically Safe Sira 10ATEX2066X II 2 G Ex ib IIC T4 Ex ib IIC T4 SAFETY NOTES • HT Series V2 ATEX radios must always be used within the terms of their certification. • Keep the radios away from aggressive substances. If used in a hostile environment, extra protection may be needed. • To prevent ignition of hazardous atmospheres, batteries must only be charged in an area known to be non-hazardous.
Notes Use this page to record important information, such as the serial number of your radio, and channel details.
‘the professional’s AT BE BG CY CZ DK EE FI FR DE GR HU IS IE IT LV LT LU MT NL NO PL PT RO SK SI ES SE CH UK Registered Community Design Application 000810890 U.S. Design Patent Pending No. 23/182,829 Copyright and Unregistered Design Right Entel UK 2009 All rights reserved Headquarters: United Kingdom www.entel.co.uk Copyright Entel UK Ltd.