
Installation guide


Installing Optional GPIMs
3-10
3.3.2 Locking Bar GPIMs
This section describes how to install and remove GPIMs that are equipped with a metal locking
bar.
Refer to Appendix C for cable specifications for the GPIMs.
3.3.2.1 Installing the Locking Bar GPIM
Prepare and install the GPIM into the 5PIM, as follows:
Preparation
Before installing the GPIM, proceed as follows:
1. Attach the antistatic wrist strap (refer to the instructions in the antistatic wrist strap package)
before removing the GPIM from the antistatic packaging.
2. Remove the GPIM from the packaging.
3. If there is a protective dust cover on the port, remove it from the GPIM.
Installation
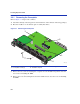
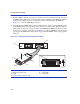
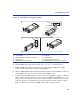
To install the GPIM, refer to Figure 3-5 (Views A, B, and C) and proceed as follows:
1. Hold the GPIM
➀ with the top of the body ➁ facing up, as shown in View A.
CAUTION: This section applies only to GPIMs equipped with a metal locking bar.
Damage can result to the GPIM and 5PIM if the directions in this manual are not
followed carefully.
The GPIM, 5PIM, and module are sensitive to static discharges. Use an antistatic wrist
strap and observe all static precautions during this procedure. Failure to do so could
result in damage to the GPIM, 5PIM, or module. Always leave the GPIM in the antistatic
bag or an equivalent antistatic container when not installed.