
Specifications

Configuring the Switch
2-22
2
we recommend that you define this string in the SNMP Protocol table as well.
(Range: 1-32 characters, case sensitive)
• Trap Version – Indicates if the user is running version 1 or version 2c.
• Enable Authentication Traps – Issues a trap message to specified IP trap
managers whenever authentication of an SNMP request fails. (Default: Enabled)
• Enable Link-up and Link-down Traps – Issues a trap message whenever a port
link is established or broken. (Default: Enabled)
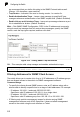
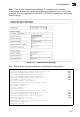
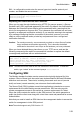
Web – Click SNMP, SNMP Configuration. FillFill in the IP address and community
string for each trap manager that will receive these messages, specify the SNMP
version, mark the trap types required, and then click Add.
Figure 2-16 Setting SNMP Trap Information
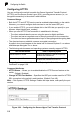
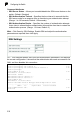
CLI – This example adds a trap manager and enables authentication traps.
Filtering Addresses for SNMP Client Access
The switch allows you to create a list of up to 16 IP addresses or IP address groups
that are allowed access to the switch via SNMP management software.
Command Usage
• To specify the clients allowed SNMP access, enter an IP address along with a
subnet mask to identify a specific host or a range of valid addresses. For example:
- IP address 192.168.1.1 and mask 255.255.255.255 –
Specifies a valid IP address of 192.168.1.1 for a single client.
- IP address 192.168.1.1 and mask 255.255.255.0 –
Specifies a valid IP address group from 192.168.1.0 to 192.168.1.254.
• IP filtering only restricts management access for clients running SNMP
management software such as HP OpenView. It does not affect management
access to the switch using the web interface or Telnet.
Console(config)#snmp-server host 10.1.19.23 batman 3-94
Console(config)#snmp-server enable traps authentication 3-95