
User`s guide
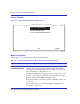
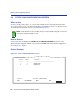

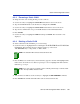


Table Of Contents
- Title
- Notice
- Contents
- Figures
- Tables
- About This Guide
- Introduction
- Local Management Requirements
- Accessing Local Management
- 3.1 Navigating Local Management Screens
- 3.2 Password Screen
- 3.3 Main Menu Screen
- 3.4 Module Selection Screen
- 3.5 Module Menu Screen
- 3.6 Overview of Security Methods
- 3.7 Security Menu Screen
- 3.8 Passwords Screen
- 3.9 Radius Configuration Screen
- 3.10 Name Services Configuration Screen
- 3.11 System Authentication Configuration Screen
- 3.12 EAP (Port) Configuration Screen
- 3.13 EAP Statistics Menu Screen
- 3.14 MAC Port Configuration Screen
- 3.15 MAC Supplicant Configuration Screen
- Chassis Menu Screens
- 4.1 Chassis Menu Screen
- 4.2 Chassis Configuration Screen
- 4.3 SNMP Configuration Menu Screen
- 4.4 SNMP Community Names Configuration Screen
- 4.5 SNMP Traps Configuration Screen
- 4.6 Chassis Environmental Information Screen
- 4.7 Redirect Configuration Menu Screen (Chassis)
- 4.8 Port Redirect Configuration Screen
- 4.9 VLAN Redirect Configuration Screen
- Module Configuration Menu Screens
- 5.1 Module Configuration Menu Screen
- 5.2 General Configuration Screen
- 5.2.1 Setting the IP Address
- 5.2.2 Setting the Subnet Mask
- 5.2.3 Setting the Default Gateway
- 5.2.4 Setting the TFTP Gateway IP Address
- 5.2.5 Setting the Module Name
- 5.2.6 Setting the Module Date
- 5.2.7 Setting the Module Time
- 5.2.8 Entering a New Screen Refresh Time
- 5.2.9 Setting the Screen Lockout Time
- 5.2.10 Configuring the COM Port
- 5.2.11 Clearing NVRAM
- 5.2.12 Enabling/Disabling IP Fragmentation
- 5.3 SNMP Configuration Menu Screen
- 5.4 SNMP Community Names Configuration Screen
- 5.5 SNMP Traps Configuration Screen
- 5.6 Access Control List Screen
- 5.7 System Resources Information Screen
- 5.8 FLASH Download Configuration Screen
- Port Configuration Menu Screens
- 6.1 Port Configuration Menu Screen
- 6.2 Ethernet Interface Configuration Screen
- 6.3 Ethernet Port Configuration Screen
- 6.4 HSIM/VHSIM Configuration Screen
- 6.5 Redirect Configuration Menu Screen
- 6.6 Port Redirect Configuration Screen
- 6.7 VLAN Redirect Configuration Screen
- 6.8 Link Aggregation Screen (802.3ad Main Menu Screen)
- 6.9 Broadcast Suppression Configuration Screen
- 802.1 Configuration Menu Screens
- 802.1Q VLAN Configuration Menu Screens
- 8.1 Summary of VLAN Local Management
- 8.2 802.1Q VLAN Configuration Menu Screen
- 8.3 Static VLAN Configuration Screen
- 8.4 Static VLAN Egress Configuration Screen
- 8.5 Current VLAN Configuration Screen
- 8.6 Current VLAN Egress Configuration Screen
- 8.7 VLAN Port Configuration Screen
- 8.8 VLAN Classification Configuration Screen
- 8.9 Protocol Port Configuration Screen
- 802.1p Configuration Menu Screens
- 9.1 802.1p Configuration Menu Screen
- 9.2 Port Priority Configuration Screen
- 9.3 Traffic Class Information Screen
- 9.4 Traffic Class Configuration Screen
- 9.5 Transmit Queues Configuration Screen
- 9.6 Priority Classification Configuration Screen
- 9.7 Protocol Port Configuration Screen
- 9.8 Rate Limiting Configuration Screen
- Layer 3 Extensions Menu Screens
- Module Statistics Menu Screens
- Network Tools Screens
- VLAN Operation and Network Applications
- 13.1 Defining VLANs
- 13.2 Types of VLANs
- 13.3 Benefits and Restrictions
- 13.4 VLAN Terms
- 13.5 VLAN Operation
- 13.6 Configuration Process
- 13.7 VLAN Switch Operation
- 13.8 VLAN Configuration
- 13.9 Summary of VLAN Local Management
- 13.10 Quick VLAN Walkthrough
- 13.11 Examples
- 13.12 Example 1, Single Switch Operation
- 13.13 Example 2, VLANs Across Multiple Switches
- 13.14 Example 3, Filtering Traffic According to a Layer 4 Classification Rule
- 13.15 Example 4, Securing Sensitive Information According to Subnet
- 13.16 Example 5, Using Dynamic Egress to Control Traffic
- 13.17 Example 6, Locking a MAC Address to a Port Using Classification Rules
- Generic Attribute Registration Protocol (GARP)
- About IGMP
- Index

Static VLAN Configuration Screen
802.1Q VLAN Configuration Menu Screens 8-7
Field Descriptions
Refer to Table 8-2 for a functional description of each screen field. Refer to Section 8.3.1 through
Section 8.3.5 for the application of these fields.
Table 8-2 Static VLAN Configuration Screen Field Descriptions
Use this field… To…
VLAN ID
– top of screen
(Read-Only)
See the assigned VLAN IDs that are configured in the switch module.
Initially, only the Default VLAN (VLAN ID: 1) is listed. Up to ten
VLANs can be displayed in the screen.
If there are more than ten VLANs, the NEXT command appears at the
bottom of the screen to allow stepping to the next screen.
FDB ID
(Read-Only)
See the Filter Database ID (FDB ID) numbers of the associated
VLAN IDs. This value is allocated automatically by the device when
the VLAN is created: either dynamically by GVRP, or when a Static
VLAN is created using this screen.
VLAN Name
– top of screen
(Read-Only)
See the VLAN Name of the associated VLAN ID. If a name has not
been assigned to a VLAN, no name is displayed in the VLAN Name
field.
VLAN ID
– bottom of screen
(Modifiable)
Enter a VLAN ID (VID) number (2 to 4094) for the new VLAN. Up to
1024 VLANs are supported by the switch module.
VLAN Name
– bottom of screen
(Modifiable)
Assign or change names of VLANs. The VLAN Name (with up to 32
characters) is an optional attribute of a VLAN, and is not required for
VLAN operation.
ADD
(Command)
Add the new VLAN to the switch module. If this is successful, the
screen refreshes and the new VLAN is added to the list in the screen.
DEL MARKED
(Command)
Delete the VLANs shown in the screen marked with an asterisk to the
left of the VLAN ID number. The Default VLAN cannot be marked
and deleted.