
User`s guide

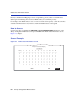
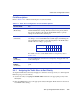

Table Of Contents
- Title
- Notice
- Contents
- Figures
- Tables
- About This Guide
- Introduction
- Local Management Requirements
- Accessing Local Management
- 3.1 Navigating Local Management Screens
- 3.2 Password Screen
- 3.3 Main Menu Screen
- 3.4 Module Selection Screen
- 3.5 Module Menu Screen
- 3.6 Overview of Security Methods
- 3.7 Security Menu Screen
- 3.8 Passwords Screen
- 3.9 Radius Configuration Screen
- 3.10 Name Services Configuration Screen
- 3.11 System Authentication Configuration Screen
- 3.12 EAP (Port) Configuration Screen
- 3.13 EAP Statistics Menu Screen
- 3.14 MAC Port Configuration Screen
- 3.15 MAC Supplicant Configuration Screen
- Chassis Menu Screens
- 4.1 Chassis Menu Screen
- 4.2 Chassis Configuration Screen
- 4.3 SNMP Configuration Menu Screen
- 4.4 SNMP Community Names Configuration Screen
- 4.5 SNMP Traps Configuration Screen
- 4.6 Chassis Environmental Information Screen
- 4.7 Redirect Configuration Menu Screen (Chassis)
- 4.8 Port Redirect Configuration Screen
- 4.9 VLAN Redirect Configuration Screen
- Module Configuration Menu Screens
- 5.1 Module Configuration Menu Screen
- 5.2 General Configuration Screen
- 5.2.1 Setting the IP Address
- 5.2.2 Setting the Subnet Mask
- 5.2.3 Setting the Default Gateway
- 5.2.4 Setting the TFTP Gateway IP Address
- 5.2.5 Setting the Module Name
- 5.2.6 Setting the Module Date
- 5.2.7 Setting the Module Time
- 5.2.8 Entering a New Screen Refresh Time
- 5.2.9 Setting the Screen Lockout Time
- 5.2.10 Configuring the COM Port
- 5.2.11 Clearing NVRAM
- 5.2.12 Enabling/Disabling IP Fragmentation
- 5.3 SNMP Configuration Menu Screen
- 5.4 SNMP Community Names Configuration Screen
- 5.5 SNMP Traps Configuration Screen
- 5.6 Access Control List Screen
- 5.7 System Resources Information Screen
- 5.8 FLASH Download Configuration Screen
- Port Configuration Menu Screens
- 6.1 Port Configuration Menu Screen
- 6.2 Ethernet Interface Configuration Screen
- 6.3 Ethernet Port Configuration Screen
- 6.4 HSIM/VHSIM Configuration Screen
- 6.5 Redirect Configuration Menu Screen
- 6.6 Port Redirect Configuration Screen
- 6.7 VLAN Redirect Configuration Screen
- 6.8 Link Aggregation Screen (802.3ad Main Menu Screen)
- 6.9 Broadcast Suppression Configuration Screen
- 802.1 Configuration Menu Screens
- 802.1Q VLAN Configuration Menu Screens
- 8.1 Summary of VLAN Local Management
- 8.2 802.1Q VLAN Configuration Menu Screen
- 8.3 Static VLAN Configuration Screen
- 8.4 Static VLAN Egress Configuration Screen
- 8.5 Current VLAN Configuration Screen
- 8.6 Current VLAN Egress Configuration Screen
- 8.7 VLAN Port Configuration Screen
- 8.8 VLAN Classification Configuration Screen
- 8.9 Protocol Port Configuration Screen
- 802.1p Configuration Menu Screens
- 9.1 802.1p Configuration Menu Screen
- 9.2 Port Priority Configuration Screen
- 9.3 Traffic Class Information Screen
- 9.4 Traffic Class Configuration Screen
- 9.5 Transmit Queues Configuration Screen
- 9.6 Priority Classification Configuration Screen
- 9.7 Protocol Port Configuration Screen
- 9.8 Rate Limiting Configuration Screen
- Layer 3 Extensions Menu Screens
- Module Statistics Menu Screens
- Network Tools Screens
- VLAN Operation and Network Applications
- 13.1 Defining VLANs
- 13.2 Types of VLANs
- 13.3 Benefits and Restrictions
- 13.4 VLAN Terms
- 13.5 VLAN Operation
- 13.6 Configuration Process
- 13.7 VLAN Switch Operation
- 13.8 VLAN Configuration
- 13.9 Summary of VLAN Local Management
- 13.10 Quick VLAN Walkthrough
- 13.11 Examples
- 13.12 Example 1, Single Switch Operation
- 13.13 Example 2, VLANs Across Multiple Switches
- 13.14 Example 3, Filtering Traffic According to a Layer 4 Classification Rule
- 13.15 Example 4, Securing Sensitive Information According to Subnet
- 13.16 Example 5, Using Dynamic Egress to Control Traffic
- 13.17 Example 6, Locking a MAC Address to a Port Using Classification Rules
- Generic Attribute Registration Protocol (GARP)
- About IGMP
- Index

Traffic Class Information Screen
9-8 802.1p Configuration Menu Screens
Priority-to-Traffic Class Mapping is used to assign 802.1p priority values to a Traffic Class
(0 through 3 with 0 being the lowest level Traffic Class) for each frame priority.
For example, if the Traffic Class is set to 3 for those frames with a priority 7, then those frames
would be transmitted before any frames contained in Traffic Classes 2 through 0.
How to Access
Use the arrow keys to highlight the TRAFFIC CLASS INFORMATION menu item on the
802.1p Configuration Menu screen and press ENTER. The Traffic Class Information screen,
Figure 9-3, displays.
Screen Example
Figure 9-3 Traffic Class Information Screen
3528-88
RETURN
Priority to Traffic Class Mapping
Port Numbers
EXIT
Priority
0
1
2
3
4
5
6
7
1
1
0
0
1
2
2
3
3
2
1
0
0
1
2
2
3
3
3
1
0
0
1
2
2
3
3
4
1
0
0
1
2
2
3
3
5
1
0
0
1
2
2
3
3
6
1
0
0
1
2
2
3
3
7
1
0
0
1
2
2
3
3
8
1
0
0
1
2
2
3
3
9
1
0
0
1
2
2
3
3
10
1
0
0
1
2
2
3
3
11
1
0
0
1
2
2
3
3
12
1
0
0
1
2
2
3
3
NEXT