
User Manual


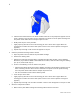
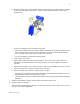

Table Of Contents
- Card production and system maintenance
- Card Production
- 1 Follow instructions for the card creation application to capture, format, and save the card data.
- 1 In the application, select the SmartDriver as the current printer. (Your printer might have a different name.)
- 2 Select the printer settings that correspond to the cards. See Setting up for the card design for details.
- 3 In the application's page setup feature, set the paper size to CR80 Card 2.13" x 3.38" and set the margins to match the driver.
- 4 Format the text to print using TrueType fonts. Text formatted as Black will print using the K (solid black) ribbon panel. All other colors are printed using the color panels (if you use a color print ribbon).
- 5 To encode magnetic stripe data, do one of the following:
- a Type the magnetic stripe data on the front of the card and format the text using one of the following fonts:
- b If your application does not allow you to select fonts, use magnetic stripe escapes to identify data. See Magnetic stripe setup for details.
- Tips for success
- Responding to messages
- 1 When a message is displayed on the PC, follow the suggested action. Click the Help button to see likely causes and possible solutions.
- 2 When the printer status light blinks amber, it is safe to open the printer to fix any problems.
- 3 Fix the problem, then close the printer cover and press to latch it.
- 4 The message box might disappear on its own or you might need to click a button.
- 5 The printer might eject any cards in the printer.
- Message Tips
- Cleaning the Printer
- Cleaning tips
- Cleaning the printer rollers
- 1 Open the Printer Toolbox if needed by double-clicking the printer icon.
- 2 Clean the pick roller:
- a Open the card tray.
- b Remove all cards from the card tray.
- c Remove the cap from the cleaning pen. Hold the end of the cleaning pen against the pick roller.
- d Click the Clean Printer button in the Printer Toolbox. Click OK on the prompt that appears. Do not insert a cleaning card! The driver sends a command to the printer to run the printer cleaning card. The printer moves rollers when it attempt...
- e Slowly move the pen on the pick roller.
- f Lightly wipe any dirt from the end of the cleaning pen onto a clean cloth or paper. Move the cleaning pen to another area of the roller. (Click Cancel on the “Card not picked” message if it appears.)
- g Repeat steps d through f until no more dirt appears on the pen.
- 3 Clean the permanent cleaning rollers if needed:
- a Open the printer cover and remove the print ribbon cartridge.
- b Remove the cleaning roller.
- c Observe the permanent cleaning rollers, especially the lower roller (location 1 in the following illustration). If you observe ribbon or other debris on the rollers, clean the rollers using the cleaning pen. (If not, continue with step 4.)
- d Do one of the following to turn the rollers in the printer.
- e Move the pen on the roller.
- f Lightly wipe any dirt from the end of the cleaning pen onto a clean cloth or paper. Move the cleaning pen to another area of the roller. (Click Cancel on the “Card not picked” message if it appears.)
- g Repeat steps d through f for the rollers at location 1 until no more dirt appears on the pen or cloth.
- 4 Clean the transport area rollers:
- a Make sure the print ribbon cartridge and cleaning rollers have been removed.
- b Place the cleaning pen on top of the first transport roller (location 2 in the illustration). Do not place the pen next to the black transport base. The pen can get pinched between the roller and the transport base.
- c Do one of the following to turn the rollers in the printer.
- d Move the pen on the roller.
- e Lightly wipe any dirt from the end of the cleaning pen onto a clean cloth or paper. Move the cleaning pen to another area of the roller. (Click Cancel on the “Card not picked” message if it appears.)
- f Repeat steps c through e for the roller at location 1 until no more dirt appears on the pen or cloth.
- g Move the cleaning pen to location 3. Repeat steps c through f.
- h Move the cleaning pen to location 4. Repeat steps c through f.
- 5 Replace the print ribbon cartridge, cleaning roller, and close the printer cover.
- 6 Replace cards in the card tray.
- 7 Print a card to verify the quality of printing. You can print a printer test card, a sample card, or a card using your card creation application.
- Cleaning the printhead
- Tips for success
- 1 Power off the printer by disconnecting it from the power source.
- 2 Open the printer cover.
- 3 Open the cleaning pen.
- 4 Using gentle pressure, move the cleaning pen back and forth along the full length of the printhead edge (see the following illustration). Be sure to clean the rounded edge of the printhead completely.
- 5 Close the printer cover. Push firmly on the blue edge to latch the cover.
- 6 Connect the power cable to the power receptacle to power on the printer.
- Tips for success
- Replacing the printhead cartridge
- Remove the printhead cartridge
- Replace the printhead cartridge
- 1 Position the printhead cartridge with the silver label toward you and on top. Place the printhead cable behind the cartridge so the plug is visible through the opening in the printhead cartridge.
- 2 Carefully align the plug with the receptacle on the printhead. Push the plug all the way onto the receptacle (see the following illustration).
- 3 Align the printhead cartridge pins with the printhead cartridge slots on the cover arm (see the following illustration).
- 4 Press in the printhead latch (step 1 in the illustration above) and push up on the printhead cartridge to seat it in the cradle. (step 2 in the illustration above). Release the printhead latch when the printhead cartridge is in place.
- 5 Clean the printhead. Move the cleaning pen back and forth along the length of the printhead edge. Be sure to completely clean the rounded edge of the printhead.
- 6 Close the printer cover, pressing down on the blue edge to latch it.
- 7 Plug in the printer to power on the printer.
- 8 Print a card to verify the quality of printing. You can print a sample card or a card using your card creation application.
- 9 If needed, change the position of printing settings to center the printed image with the new printhead cartridge. See Advanced Setup for steps to follow.
- Maintain the PC
- Tips for Success
- 1 Save all data in your open applications.
- 2 Close all applications, including resource monitors.
- 3 Exit from the Printer Toolbox. (Using the Minimize button on the Printer Toolbox does not have the same effect.)
- 4 Log off any network connections.
- 5 For Windows Me, 98, 2000, and XP, run the Disk Cleanup program:
- 6 For Windows Me and 98, run the ScanDisk program:
- a From the Windows task bar, select Start, Programs, Accessories, System Tools and then ScanDisk.
- b Select the drive to scan, usually C:\.
- c Select Standard test and Automatically fix errors.
- d Select OK. ScanDisk can require 5 minutes or more for a standard scan.
- e When ScanDisk is complete, follow any instructions and close the program.
- 7 Free up additional disk space:
- a From the Windows task bar, select Start, Programs and then Windows Explorer.
- b Open the C:\Temp, C:\Windows\Temp, C:\Winnt\Temp, or C:\Win2K\Temp folder. Delete any files not being used.
- c Open the C:\Windows\Temporary Internet Files, C:\Winnt\Temporary Internet Files folder. Delete any files not being used.
- d Open the Recycle Bin in Explorer. Delete all files from the Recycle Bin.
- e Click the icon for drive C:\. The status line shows the available disk space, such as:
- f Make sure the Disk free space is 40MB or greater.
- g Remove additional files if needed.
- 8 Run the Disk Defragment program if one is installed on the PC:
- 9 With all applications closed, from the Windows task bar, select Start and then Shutdown.
- 10 From the Shut Down Windows box, select Restart the Computer and then Yes.
- 11 If you were printing cards, restart the card creation program (such as Preface or ID Works) and send the card to print again.
- Other PC problems
- Tips for Success
5
SP35 Info Central
Responding to messages
The printer and driver generate a message on the PC when a card cannot be processed. Usually, the
message is displayed on the PC.
1 When a message is displayed on the PC, follow the suggested action. Click the Help button to see
likely causes and possible solutions.
2 When the printer status light blinks amber, it is safe to open the printer to fix any problems.
3 Fix the problem, then close the printer cover and press to latch it.
4 The message box might disappear on its own or you might need to click a button.
Buttons on the message box can be:
Retry: Clears the card. The driver sends the card or cards to the printer again. If the problem is fixed,
normal operation resumes.
Cancel: Clears the card. The driver does not send the card again. If the problem is fixed, normal
operation resumes.
OK: Used for a message that occurs when no card was being printed, a status message, or an
equipment failure message. If the problem is corrected, normal operation resumes. (Power cycle the
printer if operation does not resume.)
5 The printer might eject any cards in the printer.
Message Tips
• If the message box disappears automatically, you might need to return to the card creation
application to send the card to print again.
• If the printer beeps and the status light blinks amber but no message appears on the PC, try:
• If you printed a test card and the printer beeps but no message appears on the PC, use a card
with a magnetic stripe and make sure the stripe is oriented correctly.
• Restart Windows to fix the problem.
• If a message appears repeatedly and you cannot reliably fix it, the printer might need service.
Record the message and message number, the printer serial number, and the driver and
firmware versions (see the Printer Toolbox). Call your service provider.