*** READ AND SAVE THESE INSTRUCTIONS *** MAC 10 Original VE5 FAN FILTER MODULE INSTALLATION AND SERVICE MANUAL R R STANDARD, RSR, RSRE MODELS R R Mac 10 and VE5 are registered Trademarks of the Envirco Corporation, Sanford, North Carolina, U.S.A.
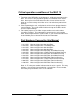
Critical operation conditions of the MAC 10 1. Touching of the HEPA filter could damage it, voiding the warranty on the filter. The screen is only to protect against an accidental ‘touch’ of the filter. Never place a hand or tool on the filter. Never lie filter face flat down on a surface always have filter on its side or back to protect from damage. 2. Prior to powering the unit, verify that the unit has been plugged into the correct voltage.
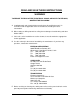
READ AND SAVE THESE INSTRUCTIONS WARNING! TO REDUCE THE RISK OF FIRE, ELECTRICAL SHOCK, OR INJURY TO PERSONS, OBSERVE THE FOLLOWING : A. Installation work and electrical wiring must be done by qualified person(s) in accordance with all applicable codes and standards, including fire-rated construction. B. When cutting or drilling into wall or ceiling, do not damage electrical wiring and other hidden utilities. C.
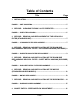
Table of Contents Title 1 Page INSTALLATION............................................................................................ 5 FIGURE 1 – UNIT UNCRATING ............................................................................. 5 2 SERVICE: CLEANING THE MAC 10 VE5 PREFILTER............................. 6 FIGURE 2 – PREFILTER CLEANING ..................................................................... 6 3 SERVICE: REMOVAL AND REPLACEMENT OF THE HEPA/ULPA FILTER (STANDARD UNIT).........
FIGURE 7 – 3 SPEED SWITCH ADJUSTMENT .................................................... 16 FIGURE 8 - SPEED CONTROL ADJUSTMENT .................................................... 16 9 10 TROUBLE SHOOTING: ............................................................................. 17 MAC 10 VE5 WIRING DIAGRAMS ......................................................... 18 FIGURE 9 – WIRING DIAGRAM 3- SPEED ..........................................................
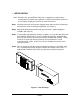
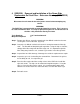
1 INSTALLATION Note: The MAC 10 3- SpeedVE5 Fan Filter Unit is completely assembled at the factory with the exception of the optional ¼” (0.64 cm)-20 eyebolts, which can be used when hanging the unit from an overhead structure. Step 1. Carefully remove the unit from the shipping carton and inspect for any damage that may have occurred during transportation. (See Figure 1) Step 2. Wipe down plastic bag and move unit into clean room. (Double bagging is available upon request.) Step 3.
2 SERVICE: Cleaning the MAC 10 VE5 Prefilter WARNING! Disconnect the unit from the electrical power source before attempting any service. Tools Required: None Note: To keep the filter in top operating condition, washing the foam prefilter is recommended every three to six months. Step 1. To gain access to the prefilter, remove the ceiling panel next to the unit, if applicable. Step 2. Switch the ON-OFF switch to the off position. Step 3. Remove the prefilter from the snap-in frame.
3 SERVICE: Removal and Replacement of the HEPA/ULPA Filter (Standard Unit) WARNING! Disconnect the unit from the electrical power source before attempting any service. WARNING! The Standard Filter is protected with an expanded metal face screen. This is never to be used to handle the filter. It is only for protection against an accidental touch of the filter. Only handle the filter by the frame. Tools Required: Phillips Head Driver Step 1. Remove unit from ceiling. Step 2.
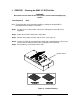
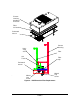
4 SERVICE: Removal and Installation of the Room Side Replaceable Gel Seal Filter – Extrusion Housing (RSR/RSRE) WARNING! Disconnect the unit from the electrical power source before attempting any service. WARNING! The RSR Filter is protected with an expanded metal face screen. This is never to be used to handle the filter. It is only for protection against an accidental touch of the filter. Only handle the filter by the frame. Tools Required: Manpower Required: 5/32” hex head wrench 2 Step 1.
Plenum HousingAnodized Extrusion FilterGel Seal Perforated Screen Plenum Housing Knifeedge Seal Filter Gel Track Filter Clip Perforated Screen .
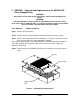
5 SERVICE: Removal and Installation of the Room Side Replaceable Gel Seal Filter – Sheet Metal Housing (RSR/RSRE) WARNING! Disconnect the unit from the electrical power source before attempting any service. WARNING! The RSR Filter is protected with an expanded metal face screen. This is never to be used to handle the filter. It is only for protection against an accidental touch of the filter. Only handle the filter by the frame. Step 1.
Fan Filter Unit RSR Gel Seal Filter Filter Clip and Screw Diffuser Screen Knifeedge Seal Filter Gel Track 2-Piece Plenum Housing Perforated Screen Filter Clip M5x16 Cap Screw ¼ -20 Cap Screw Figure 5 – RSR Sheet Metal Filter Replacement MAC 10 ORIGINAL VE5 SERVICE MANUAL PAGE 11
6 SERVICE: Removal and Installation of the Motor (Standard and RSR models) WARNING! Disconnect the unit from the electrical power source before attempting any service. WARNING! Electrical service should be performed by licensed electricians or authorized ENVIRCO service technicians. Tools Required: Phillips Head Driver 3/8” (10mm) Hex Head Wrench Pliers 5/32”(0.40 cm) Allen wrench Step 1. To gain access to the motor, remove the ceiling panel next to the unit, if applicable. Step 2.
Prefilter Motor Venturi Ring Disconnect motor leads from capacitor, ON/OFF switch, and three-speed switch or speed control.
7 SERVICE: Removal and Installation of the RSRE Motor WARNING! Disconnect the unit from the electrical power source before attempting any service. WARNING! Electrical service should be performed by licensed electricians or authorized ENVIRCO service technicians. Step 1. To gain access to the motor, remove the gel seal filter (see Section III). Step 2. While supporting the baffle assembly from below, remove the four corner screws on the baffle assembly and lower the assembly. (See Figure 7) Step 3.
Electrical connectors located in inner prefilter wall Plenum Grommet Machine Screw and washer Motor/Blower Assy Motor Baffle Assembly Venturi Ring Wellnut Gel Seal Filter Blower Wheel Screen Figure 7 – RSRE Motor Replacement MAC 10 ORIGINAL VE5 SERVICE MANUAL PAGE 15
8 ON/OFF Switch - Speed/Airflow Adjustment All MAC 10 units are equipped with a three-position rotary switch, which is located on the side of the electrical box. (See Figure 8) Recommended fan speed during initial start-up and operation is the “LOW” speed. As airflow eventually decreases due to filter loading, fan speed may be increased by moving the rocker switch to the top or “MEDIUM” position, and finally to the “HIGH” position. Periodic airflow velocity readings (Per I.E.S.
9 Trouble Shooting: Low Air Velocity Step 1. Check prefilter media; replace or clean as necessary. Step 2. Flip switch from “Low” to “Medium” or “Medium” to “High” on units with 3-speed switch. Step 3. Adjust variable speed control (only units with optional Speed Control) for higher blower output. Step 4. Check power supply for proper voltage, amperage and distribution frequency. Step 5. Replace HEPA/ULPA filter if the air velocity remains low. High Air Velocity Step 1.
10 MAC 10 VE5 Wiring Diagrams Mac 10 Original Three Speed Wiring Diagram Figure 10 – Wiring Diagram 3- Speed Mac 10 Original Speed Control Wiring Diagram Figure 11 – Wiring Diagram Speed Control MAC 10 ORIGINAL VE5 SERVICE MANUAL PAGE 18
11 MAC 10 VE5 Replacement Parts List: Description Quantity ENVIRCO Part Number per unit 115V 220V 277V ________________________________60 Hz___50 - 60 Hz______60 Hz_______ Prefilter 1 62981-001 62981-001 62981-001 Motor 1 63764-001 63764-002 63764-003 Capacitor 1 61485 61485 61485 ON/OFF Switch 1 63739 63739 63739 Speed Control (Optional) 1 63011 63015 63016 (CE Marked) 63742 Pressure Switch (Optional) 63415 63415 63415 Transformer (Optional) 63667 63666 63665 Current Sensor (Optional) 24235-001 24235-001
Optional Accessories: Fluorescent lighting Ionizing bar Solid-state speed control on 2x4, and 2x31/2 units - (standard on all other sizes) 12”(30.48 cm) diameter A/C intake collar Gasket Seal Filter (RSR unit only) ULPA Filter (Standard and RSR) Replacement parts are available through your authorized ENVIRCO representative.
12 Warranty LIMITED WARRANTY: Unless otherwise expressly stated in Envirco’s published specifications for the Goods, Envirco warrants that that Goods are free from defects in material and workmanship, except for services which are warranted to be performed in a competent and diligent manner in accordance with any mutually agreed specifications.
Some of the testing procedures performed on the MAC 10 VE5 include PSL challenge of HEPA/ULPA filters to assure specified performance, along with air velocity measurement and adjustment tests. No DOP is used on Mac 10 Filters, unless requested. Recommended Testing All units that are airflow tested at Envirco are tested using a Shortridge Airdata Multimeter 800 series with a Velgrid head.