SHERWOOD INDUSTRIES IS AN ENVIRONMENTALLY RESPONSIBLE COMPANY. THIS MANUAL IS PRINTED ON RECYCLED PAPER. DV42DX PLEASE KEEP THESE INSTRUCTIONS FOR FUTURE REFERENCE BY: SHERWOOD INDUSTRIES LTD OWNER’S MANUAL WHAT TO DO IF YOU SMELL GAS • Open windows/Extinguish any open flame. • Do not try to light any appliance. • Do not touch any electrical switch or use any phone in your building. • Immediately call your gas supplier from a neighbour’s phone. Follow the gas supplier’s instructions.
Safety Precautions FOR SAFE INSTALLATION AND OPERATION OF YOUR “ENVIROGAS” HEATER, PLEASE CAREFULLY READ THE FOLLOWING INFORMATION: • All ENVIRO gas-fired appliances must be installed in accordance with their instructions. Carefully read all the instructions in this manual first. Consult the building authority having jurisdiction to determine the need for a permit prior to commencing the installation.
Table of Contents Safety Precautions...................................................................................................2 Table of Contents.....................................................................................................3 Codes And Approvals................................................................................................4 Specifications.........................................................................................................5 Dimensions.......
Codes And Approvals DIRECT VENT: This type is identified by the prefix DV. This appliance draws all of its air for combustion from outside the dwelling, through a specially designed vent pipe system. ** TOP VENT DV ONLY** Certified for installation from 0-4500 FT (1372 M) This appliance has been tested and approved for installations from 0 ft. to 4500 ft. above sea level. In the USA: The appliance may be installed at higher altitudes.
Specifications INSTALLATION OPTIONS: • • • • Parallel to a wall or placed in a corner With a floor hearth or raised up the wall Ducting to other rooms Vertical or horizontal venting WARNING: Operation of this heater when not connected to a properly installed and maintained venting system can result in carbon monoxide (CO) poisoning and possible death.
Operating Instructions For Your Safety, Read Safety Precautions And Lighting Instructions Before Operating WARNING: IF YOU DO NOT FOLLOW THESE INSTRUCTIONS EXACTLY A FIRE OR EXPLOSION MAY RESULT, CAUSING PROPERTY DAMAGE, PERSONAL INJURY OF LOSS OF LIFE. BEFORE LIGHTING: This appliance is equipped with a pilot, which must be lit by following these instructions exactly: A) BEFORE LIGHTING, smell around the appliance area for gas.
Operating Instructions For Your Safety, Read Safety Precautions And Lighting Instructions Before Operating WARNING: IF YOU DO NOT FOLLOW THESE INSTRUCTIONS EXACTLY A FIRE OR EXPLOSION MAY RESULT, CAUSING PROPERTY DAMAGE, PERSONAL INJURY OF LOSS OF LIFE. BURNER LIGHTING: A) B) C) D) E) Make sure the pilot is lit. Turn gas control knob COUNTER CLOCKWISE to ON. Flip the burner switch to ON. Turn HI/LO knob to the desired flame height. Turn on all electrical power to the unit.
Maintenance And Service ROUTINE MAINTENANCE: At least once a year, run through the following procedures to ensure the system is clean and working properly. Check the burner to see if all the ports are clear and clean. Check the pilot to make sure it is not blocked by anything. The pilot flame should be blue with little or no yellow on the tips. CLEANING THE GLASS: When the fireplace is cool, remove the face of the fireplace along with the glass. See Secondary Installation.
Maintenance And Service FUEL CONVERSION: Warning: A qualified service technician, in accordance with the manufacturer’s instructions as well as all applicable authority having jurisdiction, shall install this conversion kit. If the information in these instructions is not followed exactly, a fire, explosion or CO poisoning, may result. The qualified service agency is responsible for the proper installation of this kit.
Initial Installation QUALIFIED INSTALLERS ONLY INTRODUCTION: This section of the owner’s manual is for the use of qualified technicians only. Fireplace placement, hearths, facings, mantles, and venting terminations will be covered, as well as the gas and electric systems. There are several installation safety guidelines that must be adhered to. Please carefully read the safety precautions at the front of this manual.
Initial Installation QUALIFIED INSTALLERS ONLY CORNER INSTALLATION: The dimensions for installing a fireplace in the corner of a room are given below in Fig 7. Figure 7. Dimensions for a corner installation (inches) RAISED FIREPLACES AND HEARTHS: There are a few options with raised fireplaces: raised with no hearth, raised with a raised hearth, or raised with a floor level hearth. If the fireplace is 3in (7.6cm) or more above the floor, a hearth is not required.
Initial Installation QUALIFIED INSTALLERS ONLY Do not tile higher than this ledge Protector pad, cement board and finishing material. Protector Pad Figure 10. Raised Fireplace with Raised Hearth Cement board Figure 11. Floor Level Hearth Requirements If a hearth is to be installed, the protector pad (sheet metal) is placed directly on the floor or hearth framing, with the cement board on top of it. Tile, or another non-combustible material forms the top layer of the hearth.
Initial Installation QUALIFIED INSTALLERS ONLY MANTLE CLEARANCES: It is not necessary to install a mantle, but if one is desired it is important to follow the guidelines. The Manor face has a different set of clearances than the other faces. 8in mantle 3 1/12in mantle 8in mantle Figure 13. Combustible Mantle Clearances (inches) Figure 14.
Initial Installation QUALIFIED INSTALLERS ONLY vent joint, and Mil-Pac to each inner joint. When planning an installation it will be necessary to select the proper length of vent pipe for the particular requirements. It is important to note that, when passing a pipe through a wall, 11⁄2in clearance on the sideds and bottom, and 2in top clearance to combustibles must be maintained.
Initial Installation QUALIFIED INSTALLERS ONLY VENTING: This fireplace has been tested and certified for use with SIMPSON DURAVENT DIRECT VENT TYPE “GS” PIPE FOR GAS STOVES, SECURITY CHIMNEY’S SECURE VENT DIRECT VENT SYSTEM kits, and MDV SELKIRK METALBESTOS. A 1in (2.5cm) clearance to combustibles must be maintained around any vertical vent pipe. Around a horizontal vent pipe, the clearance to combustibles should be 2in (5cm) above and 1 1/2in (3.75cm) on the sides and bottom.
Initial Installation QUALIFIED INSTALLERS ONLY VENT CONFIGURATIONS AND RESTRICTOR SETTINGS: Fig 18 shows the range of venting options. Any layout that remains within the shaded area of Figure 18 is acceptable. Having the fewest number of elbows is ideal, as they tend to disrupt air movement. Using 45˚ elbows is preferable to using 90˚ elbows. Also, a shorter vent system will perform better than a longer one. The vent restrictor controls the amount of air moving through the vent pipe.
Initial Installation QUALIFIED INSTALLERS ONLY HORIZONTAL TERMINATION: Step 1. Set the fireplace in the desired location. Check to determine if wall studs will be in the way when the venting system is attached. If this is the case, the location of the fireplace may have to be adjusted or the venting may have to be offset. Step 2. Direct vent pipe sections are designed with special twist-lock connections. Dry fit the desired combination of pipe and elbows to the appliance adapter. Step 3.
Initial Installation QUALIFIED INSTALLERS ONLY NOTES: 1. Horizontal pipes must not be level. For every 12in (30cm) of horizontal travel (away from the stove), there should be at least 1/4in (6mm) of vertical travel. Never allow the vent to run downward, as this could cause high temperatures or even present the possibility of a fire. 2. The exterior of the horizontal vent termination must not be blocked or obstructed. 3.
Initial Installation QUALIFIED INSTALLERS ONLY Step 6. Once the pipe sections have been joined and run up through the roof, slip a pipe support strap over the exposed sections. Bend the support straps outwards and push the pipe support strap down to the roof level. Use a level to make sure the pipe is vertical and tighten the clamp around the pipe section. With roofing nails, secure the support straps to the roof and seal the nail heads with non-hardening mastic. Trim the excess length of the straps.
Initial Installation QUALIFIED INSTALLERS ONLY Table 1. Minimum Distance Associated with Roof Pitch ROOF PITCH MIN DISTANCE ft m flat to 7/12 1 0.3 >7/12 to 8/12 1.5 0.46 >8/12 to 9/12 2 0.61 >9/12 to 10/12 2.5 0.76 >10/12 to 11/12 3.25 0.99 >11/12 to 12/12 4 1.22 >12/12 to 14/12 5 1.52 >14/12 to 16/12 6 1.83 >16/12 to 18/12 7 2.13 >18/12 to 20/12 7.5 2.29 >20/12 to 21/12 8 2.
Initial Installation QUALIFIED INSTALLERS ONLY ELECTRICAL SYSTEM: The fireplace must be electrically connected and grounded in accordance with local codes or, in the absence of local codes, with the current CSA C22.1 CANADIAN ELECTRICAL CODE Part 1, SAFETY STANDARDS FOR ELECTRICAL INSTALLATIONS, OR THE NATIONAL ELECTRICAL CODE ANSI / NFPA 70 in the US. WARNING: The electrical grounding instructions must be followed.
Initial Installation QUALIFIED INSTALLERS ONLY GAS LINE CONNECTION: Warning: Only persons licensed to work with gas piping may make the necessary gas connections to this appliance. Gas Line Connection: • This fireplace is equipped with a certified flexible pipe located on the right side of the unit, terminating in a 3/8in male NPT fitting. Consult the local authorities for local codes or use the CAN/CGA B149 (1 or 2) installation code in Canada.
Secondary Installation GLASS REMOVAL: In order to install the log set, and for regular cleaning, the glass door will need to be removed. With the face off, there are two handles on either side of the glass. They rotate 90° until parallel with the floor. The top of the glass will glass move away from the firebox and then the glass door can be lifted off the resting points. To replace the glass door, simply reverse the above procedure.
Secondary Installation LOG SET ASSEMBLY: Figure 29: Shows the back log plus the two small log twigs. Put the large back log in first, making sure the locator pins line up with the cutout sections on the log. There are two pins with ledges and a single ledge on the back log. The back log sits on two supports attached at the rear of the firebox. The two small twigs are placed under the grate and they should be rotated so they cover up the least number of small burner ports.
Secondary Installation Figure 32: The left log rests on the left pin and ledge of the back log and the back of the andiron. Figure 32: Fourth Stage Log Set Installation. Figure 33: The last log, center log, rests on the end of the grate and on the ledge cut-out in the center of the back log. Once the logs are in place the embers can be installed. Bags of ceramic fiber embers and rock wool are provided. The ceramic fiber comes in chunks that are about 2in (5cm) long.
Secondary Installation PILOT LIGHT: 1. Turn off the gas to the fireplace. If not recently done, remove the glass and let the unit air out for at least five (5) minutes to clear out any gas. Turn on gas to the heater. Leak test all joints with soapy water. NEVER USE OPEN FLAME FOR LEAK TESTING. 2. Start the pilot by pressing the gas control knob and turning it to PILOT. While holding the gas control knob in, press the piezo ignitor several times until the pilot light starts.
Trouble Shooting Problem Possible Cause Solution Spark will not light the Defective piezo ignitor pilot after repeatedly pressing the spark ignitor Pilot will not remain lit • Check connections to ignitor. • If ignitor connections are good but no spark, replace ignitor. Broken spark electrode • Check for broken ceramic insulation, replace electrode if broken. Misaligned spark electrode • If spark is not arcing from electrode to pilot, adjust by loosening the screws on the pilot base.
Parts List 28 Part Description Number Part Options Number 50-633 Door, Glass & Gasket 50-534 50-634 Dual bulb door gasket (10ft) The Lodge - Painted Charcoal Face With Plated Brushed Nickel Louvres & Knobs 50-635 Door Handle Set 50-537 The Manor Cast Iron Bay Face - Painted 50-632 Door Latch Mechanism 50-539 50-629 Pan Burner The Manor Cast Iron Bay Face - Diamond Black 50-343 Blank Orifice #73 - All Gas Models 50-541 EC-011 Spark Electrode with Ignitor Cable (Post 10/00) The Chalet
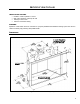
Parts Diagram 29
Index A L Adjusting Air Diverter 7 Fan Speed. See Blower Speed Flame Height 7 Venturi 26 Leaking Gas 1, 6, 22, 26 Log Set Installation/Removal 23–24 B Maintenance 8–9, 23 Mantel Requirements 13 Blower Speed 7 BTU Input/Output 22 O C P Cap.
Warranty Sherwood Industries Ltd. offers a Limited Lifetime Warranty on this gas product. This Limited Lifetime Warranty covers the appliance for a period of seven years from the date of installation. This warranty applies only to the original owner in the original location. Covered under the lifetime warranty are the chassis and the heat exchanger. These steel components are covered against manufacturer’s defects for seven years and the labour for the first year.
Installation Data Sheet The following information must be recorded by the installer for warranty purposes and future reference.