
Specifications


17
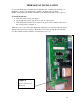
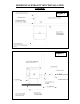
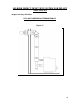
FREESTANDING INTERIOR VERTICAL INSTALLATION
1. Choose the location for your pellet stove, see item 1 of the Horizontal Exhaust
Vent Installation (page 16) for help in determining the correct location.
2. Install the non-combustible hearth pad.
3. Place your pellet stove on the hearth pad and locate the unit in manner that will
leave the exhaust vent with a minimum of 3” (75 mm) clearance to any
combustible wall.
4. If installing the optional air intake, Locate the center of the combustion air intake
pipe at the back of your unit. Line up the center with the same spot on your
exterior wall and cut a hole 2-1/2” (64 mm) in diameter through the wall.
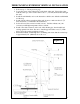
5. Secure all vent joint connections with 3 screws. Seal the exhaust vent joint
connections with high temperature silicone sealant.
6. Install the combustion air intake pipe.
7. Install a tee, with a cleanout, on the exhaust pipe found at the rear of your unit.
8. Install listed vent upward through the ceiling. When you pass through the
combustible framing ensure that the appropriate ceiling is used. You must
maintain a minimum 3” (75 mm) clearance to combustibles and keep any
insulation away from the exhaust vent.
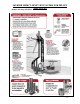
9. Extend the exhaust vent through the roof flashing and ensure that the vertical cap
is approximately 36” (900 mm) above the roof.
Figure 10