
Specifications
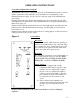


18
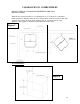
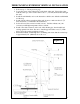
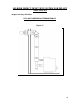
FREESTANDING EXTERIOR VERTICAL INSTALLATION
1. Follow steps 1 – 5 from previous page.
2. Locate the center of the exhaust pipe, at the back of the unit. Line up the center
with the same spot on the exterior wall a cut a 7” (175 mm) diameter hole through
the wall.
3. Install the wall thimble, refer to the instructions which come with the wall thimble
for this step.
4. Install a listed exhaust vent through the wall, be sure to make sure that 3” (75
mm) clearances to combustibles are maintained.
5. Secure all vent joint connections with 3 screws. Seal the exhaust vent joint
connections with high temperature silicone sealant.
6. Install a Tee with a cleanout on the end of the exhaust pipe, then install listed
venting upward from there. Be sure to install support brackets every 5’ (1500
mm) to keep the venting straight and secure.
7. Extend the exhaust vent through the roof flashing and ensure that the vertical cap
is approximately 36” (900 mm) above the roof.
Figure 11