
Owner`s manual


7
Operating Instructions
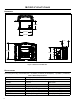
contRoL boaRd FunctionS:
Note: The Control Panel is located underneath the units Cast Hopper Lid which is attached to a safety
switch that will immediatley stop the auger. The switch will stop operation of the stove and display a
#4 ash code if the lid is not closed within two minutes.
1. ON/OFF BUTTON: Used to turn the unit ON and OFF manually.
2. HEAT OUTPUT INDICATOR: Shows the present Heat Level output setting and the Feed Trim while
it is being adjusted.
3. THERMOSTAT SWITCH: Sets the unit’s control mode; AUTO/OFF or HIGH/LOW (when using a
Thermostat or Timer) or MANUAL.
4. FUEL TYPE LIGHTS: Shows the present Fuel Type selected; Premium Pellets are Red, Regular
AUTO/OFF
HIGH/
LOW
MANUAL
Premium Pellets
Regular Pellets
Multi-Fuel
1
2
3
4
5
ON/OFF
HEAT
LEVEL
FEED
TRIM
FUEL
TYPE
COMBUSTION
AIR TRIM
1
6
5
3
4
7
8
2
Pellets are Green, and Multi-fuel is Yellow. The Light ashes during
start-up, and when the Thermostat is in control of the Unit. The
Light stops ashing when the Exhaust Sensor closes.
5. FUEL TYPE BUTTON: Used to switch between three fuel type
modes: Premium Pellets for high grade wood pellets, Regular
pellet for mid or low grade wood pellets, and Multi-Fuel for other
fuel types.
6. COMBUSTION AIR TRIM BUTTON: Increases or Decreases the
Fan voltage by 2.5volts on all feed settings. When pressed all lights
on Heat Level Indicator will come on except the one that is the
set point. Hold Trim Button down and press the UP or DOWN Heat
Level Arrow to adjust setting. #3 Light is the default setting.
Depending on Fuel quality Ignition problems may occur at higher
altitudes, this can be resolved by trimming the Combustion Fan to
a higher setting.
7. FEED TRIM BUTTON: Used in conjunction with the Heat Level
Adjustment Buttons to adjust the Feed Trim. It can be increased
by two (2) feed settings or it can be decreased by two (2) feed
settings. #3 Light is the default setting.
8. HEAT LEVEL ADJUSTMENT BUTTONS: Changes the Heat
Setting of the Unit from LO to HIGH. Press the Arrow Up button to
increase Heat, and Arrow Down to decrease Heat.
automatic SaFety FeatuReS oF youR peLLet Stove:
A. EXHAUST TEMPERATURE SWITCH: The stove will shut off when the
Figure 2: Circuit Board Control
Panel Decal
fire goes out and the exhaust temperature drops below 49°C (120°F). It will display a #3 flash code.
B. HIGH LIMIT SAFETY SWITCH: If the temperature on the hopper reaches 93°C (200°F), the auger will
automatically stop, the stove will shut down, and it will display a #4 flash code. If this happens, call
your local dealer to reset the 93°C (200°F) high limit switch AND DETERMINE THE CAUSE OF THE
OVERHEATING.
C. VACUUM SWITCH: Notifies when the unit has lost vacuum. This can be caused by either a combustion
fan/vent failure, or simply the unit’s ash pan door, pedestal door. It will display a #2 flash code.