
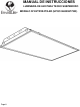
Installation Guide


INSTALLATION & ASSEMBLY:
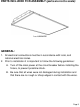
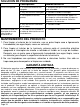
1. Remove fixture from box.
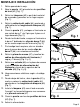
2. Open the door frame (#1) by rotating the two
cam latches (#2) [Fig. 1].
3. Remove the lamps (#3) from the packaging
material and put them in a safe place [Fig. 1].
4. Remove the ballast cover (#4) by squeezing
and releasing it from locking tabs (#5) [Fig.
1].
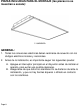
5. Close the door frame (#1) and place the
fixture on a 2 ft by 4 ft T-bar grid in the
desired location [Fig. 2].
6. From above the ceiling, secure troffer to T-
Bar by bending built in T-bar clips (#6) on all
four corners of fixture [Fig. 3].
7. If local code requires, tie a wire to at least two
of the four T-bar clips (#6) to a structural
member of the ceiling.
8. Remove the access plate (#7) and locate
fixture supply wires (1 black & 1 white) [Fig.
3 & 4].
9. Remove one knockout (#8) in access plate
(#7) and pull fixture supply wires through
knockout (#8) opening [Fig. 4 & 5].
10. Make electrical connections according to
local code.
11. From below ceiling, open the door frame (#1)
and replace the wire cover (#4) by
squeezing it into the locking tabs (#5) [Fig.
1].
12. Install lamp (#3) with side labeled “power” on
the lamp holders closest to the access plate
(#7).
13. Close the door frame using the two cam
latches (#2) [Fig. 1].
14. Turn power on.
Page 4
3
Fig. 1
Fig. 3
Fig. 4
Fig. 2