
Installation Guide

DIMMING
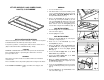
1. Use a 0-10V dimmer only.
2. If the fixture will be connected to a dimmer, punch
out one of the knockouts (A) located at each end
f
th
fi t
d
ll
th
di i
i
t
2FT LED HIGH BAY, 18000 LUMEN, 5000K,
120-277V, 0-10V DIMMING
A
o
f
th
e
fi
x
t
ure an
d
pu
ll
th
e
di
mm
i
ng w
i
res ou
t
through that knockout (A). [Fig. 1]
3. Remove the front plate (B) along the center of
the fixture by removing the screws (C) at each
end of the front plate (B). Bring in the wires from
your dimmer and make the connections inside the
fixture channel. Secure the front
p
late
(
B
)
back
Fig. 1
p
()
onto the fixture using the two screws (C). [Fig. 2]
120V INSTALLATION
1. Hook the hangers into the round holes on the
ends of the fixture. [Fig. 3]
2. Insert the plug into an outlet.
Fig. 2
277V INSTALLATION
1. Remove the access plate (D) by removing the
screw (E) securing it in place.
2. Punch out one of the knockouts (F) on the
access plate (D). [Fig. 4]
INSTALLATION INSTRUCTIONS
Please read carefully and save these instructions. Failure to do so may lead
to electrical shock or fire, which may cause injury or death.
F i bl i i ll h C S i li
Fig. 3
D
3. Remove the plug by cutting the black wire and
the white wire closetotheplug. Unscrew the
ground screw to release the plug’s ground
wire. [Fig. 5]
4. Connect the black supply wire to the black
fixture wires using a wire nut.
F
or quest
i
ons, pro
bl
ems, or m
i
ss
i
ng parts ca
ll
t
h
e
C
ustomer
S
erv
i
ce
li
ne at
(855) 573-6156 from 8 AM to 6 PM EST Monday – Friday.
CAUTION
WARNING – RISK OF FIRE: Turn off the main power at the circuit breaker
before installing the fixture or performing other maintenance in order to
prevent possible shock.
Fi
g
. 4
D
5. Connect the white supply wire to the white
fixture wires using a wire nut.
6. Wrap the supply ground wire around the
ground fixture screw and then tighten the screw
to secure the wire in place.
7. Secure the access
p
late
(
D
)
back onto the fixture
GENERAL
All electrical connections must be in accordance with local, and national
electrical codes.
Prior to installation remove all protective plastic film covering from the fixture.
g
p
()
using the screw (E) that was previously removed.
[Fig. 4]
8. Hook the hangers into the round holes on the
ends of the fixture. [Fig. 3]
Tools needed for installation: Phillips screwdriver, wire strippers, and
pliers.
Fig. 5