Since 1987 PRODUCT AND INSTALLATION MANUAL 5 Stage Reverse Osmosis Systems Model Numbers: RU500T35 w/BP RU500T35 w/BP w/UV ALL FILTRATION PRODUCT PROUDLY MADE & ASSEMBLED IN THE USA EWS, Inc./Environmental Water Systems office. 702.256.8182 Monday - Friday, 8:30 am - 4:30 pm Pacific Standard Time fax. 702.256.3744 www.ewswater.com e-mail. customerservice@ewswater.
A Special Message to Our Customers, EWS, Inc. and Environmental Water Systems would like to thank you for your consideration in selecting from our comprehensive list of residential filtration and conditioning product. We recommend that you take the time to read the information that pertains to your product as you begin to use it. The information in this manual is designed to assist your installer to set-up, install and start-up your system properly.
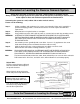
Table of Contents INSTALLATION SUMMARY AND INDEX OF YOUR REVERSE OSMOSIS SYSTEM Dispenser/Faucet Q & A Placement or Locating the Dispenser/Faucet Installation of the Supplied Dispenser/Faucet Dispenser/Faucet with Air Gap Dispenser/Faucet without Air Gap 4 5 6 7 Inlet Supply Water Connection Basic Supplied Connection Preferred Connection for All Applications 8 9 Placement or Locating the System Placement or Locating the Storage Tank Drain Installation and Connection 10 11 12 Connection of Tubing fo
Dispenser/Faucet Q & A - Reverse Osmosis Spout pulls out from faucet body that’s why it swivels. Spout has 2 o-rings at base and is inserted completely into bottom of body to prevent leaking. Handle and tip can also be removed Q: A: I do not want to drill any extra holes or use a separate dispenser/faucet - what can I do? Nothing. Reverse osmosis systems are limited to a separate dispenser.
Placement or Locating Dispenser/Faucet - Reverse Osmosis Step by step instructions to mount and secure the supplied dispenser/faucet Professional Installation is Strongly Recommended Step 1: Locate Faucet Parts Bag Parts Included: faucet body with handle, faucet spout with tip, decorative washer, black rubber washer, white beveled washer, lock washer, hex nut, 1/4” tube insert sleeve, 1/4” plastic compression ferrule, 1/4” compression nut Included Optional Parts: flat white washer (for use under de
Installation of the Supplied Dispenser/Faucet with Air Gap Step by step instructions to mount and secure the supplied dispenser/faucet If using another faucet, please review the instructions included with that product** ***Other Air Gap connections can be found with Drain Installation and Connection and System Interconnection instructions Above the Surface Step 2: Place air gap to bottom of faucet body*** (optional: place flat white washer under decorative washer) Step 3: Place black rubber washer below
Installation of the Supplied Dispenser/Faucet without Air Gap Step by step instructions to mount and secure the supplied dispenser/faucet If using another faucet, please review the instructions included with that product** Above the Surface Step 2: Place decorative washer to bottom of faucet body (optional: place flat white washer under decorative washer) Step 3: Place black rubber washer below decorative washer (or below optional flat white washer) Step 4: Place faucet stem through hole and center Enc
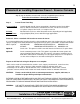
Basic Inlet Supply Water Connection ** Professional Installation Using a Preferred Connection is Strongly Recommended **This unit is supplied with a saddle tapping valve and should be considered a basic connection for copper, steel or brass 3/8” to 1/2” O.D. pipe prior to the angle stop shut-off of the cold water line to the kitchen faucet. This should be considered a “do-it-yourself” connection which is not applicable in many situations and may not meet local codes.
Preferred Inlet Supply Water Connection - All Applications Professional Installation Using a Preferred Connection is Strongly Recommended A qualified plumber should choose to connect the inlet supply water supply by a more preferred connection. *** The Preferred Inlet Supply Water Connection is Applicable in All Applications and Codes Replace the Angle Stop with a Proper 3-Way Fitting: • • • There are a number of options to properly install any one of these drinking water filtration systems.
Placement or Locating the Reverse Osmosis System Simply place the water system on a level floor, cabinet bottom or horizontal surface. Always assume for enough space for the system and the storage tank, and tubing to remove, move and/or adjust for filter and membrane replacement and maintenance. If mounting the system to a wall, cabinet side or other vertical surface, Please see the following; Step 1: Step 2: Step 3: All filter cartridges and membranes for system are preinstalled.
Placement or Locating the Storage Tank Open the box containing the storage tank and plastic base. Place storage tank on the plastic base near the system and allow for room for connections. Locate the Tank Valve in the parts box Tank Valve 1/4” yellow tubing into quick connect fitting valve handle to open or close tank 1/4” male threads at tank top Air Pressure Valve at tank bottom Tank stand strictly for illustration purposes only Storage Tank: The storage tank holds up to 3.
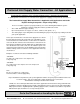
Drain Installation and Connection sink #1 Illustration A WARNING: Never mount off the garbage disposal drain pipes.
Connection of Tubing for Reverse Osmosis Systems Step 1: Before Making the Connections - Remove Colored Vinyl Plugs Correctly This system may have come with sample plugs. Please remove before installation. WARNING: INSPECT: NEVER ATTEMPT TO REMOVE TUBING OR SAMPLE PLUGS BY JUST PULLING. Follow simple instructions illustrated below to remove properly. Inspect the fitting for any damage from shipping, handling and/or delivery.
Connection of Tubing Illustrated Air Gap use: 1/4”MPT x 3/8” quick connect fitting connected to drain saddle Non-Air Gap use: 1/4”MPT x 1/4” quick connect fitting connected to drain saddle Air Gap Tubing Connections: Non-Air Gap Tubing Connection: 1/4” black tubing from unit to 1/4” barb at air gap adaptor 1/4” black tubing from unit to 1/4”MPT x 1/4” quick connect fitting at drain saddle 3/8” black tubing from 3/8” barb at air gap adaptor to 1/4”MPT x 3/8” quick connect fitting at drain saddle A
System Start-Up and Operation Procedures Reverse Osmosis Systems have specific issues with air in system, proper pressure in tank, the proper draining of reject water, and proper connection between various components. Follow these procedures for new installations and all filter/membrane replacements. A proper start-up insures the system is without issues. If anything is discovered, this is the time to discover it and correct any problems or questions that arise.
System Start-Up and Operation Procedures - Continued Continue with the proper start-up of the reverse osmosis system Step 9: Allow system to fill (this may take up 7 hours) and use as normal. If applicable, only open water supply to other devices connected to this unit after storage tank is filled. Step 10: Inspect for leaks at all connections, fittings and/or housings.
Register this Product - It is a Requirement for Warranty Familiarize yourself with the system, its’ replacement filters and maintenance. To Register, take note of the Model # and WQA Serial # found on the unit’s bracket, Understand your system’s capabilities, put the enclosed Spanner Wrench and this Service Guide on top of the unit bracket, See your options in water treatment, for you , your family and your home by EWS, Inc.
Replacement of Filter Cartridges - All RO Units It is recommended that all filters be changed at least annually or more frequently based on usage and local water conditions. The quantity and quality of the water processed effects the life of the filters. Step 1: Upper Open dispenser/faucet. Lock handle in the up and open position and allow water to flow. Housing Water will eventually only drip then almost come to a stop. to Bracket Now go to Step 2. Keep dispenser/faucet open until instructed to close.
Replacement of Membranes - All RO Units Step 1: Open dispenser/faucet. Lock handle in the up and open position and allow water to flow. Water will eventually only drip then almost come to a stop. Now go to Step 2. Keep dispenser/faucet open until instructed to close. Step 2: When water has come to a stop or very slow drip, Close inlet water supply to the system.
R.O. - Cleaning of Empty Housings NOTE: All containers, surfaces and items exposed to water can accumulate a clear or discolored film which may also be slippery or slimey to the touch. This is a bio-film that is non-pathenogenic and usually of no harm. This film is most commonly a nuisance and is readily wiped off. It is this reason we suggest a simple cleaning procedure prior to returning new filters and membranes to the reverse osmosis system.
NOTES What unit(s) do I have? What filters do I need to order? Reminder to Register your Purchase ww.ewswater.com Helpful Hint: Find the enclosed Spanner Wrench that came with the unit and place it on top of the bracket. When finished, roll up this Service Guide and place on top with wrench. This Service Guide and the wrench will come in very handy when it’s time for filter replacement. www.ewswater.com O: 702.256.8182; M-F 8:30am-4:30pm PST E: customerservice@ewswater.
Filter, Membrane and UV Lamp Replacements Model No: PRESED-05 Pre-Sediment Filter (5-micron) 5-Micron Prefilter is a pure polypropylene full-bed depth filter with exceptional dirt holding capability. The removal of any dirt, silt, rust or suspended matter protects the remaining cartridges and extends the performance of other filters and membranes. Meets FDA requirements for food and beverage contact.
Ordering Filters, UV Lamp Replacements, and Parts There are several ways to obtain and order filter replacements for your unit. Contact; ... your builder, plumbing contractor and/or your installer that provided the product..., ... the kitchen & bath showroom, distributor, and/or retailer where you purchased the product..., ... or use the internet in the following manner..., Go to our Corporate Site @ www.ewswater.com or contact EWS Customer Service and we can direct you to someone who may assist you.
Maintenance Guide - Reverse Osmosis Systems INITIAL INSTALLATION Follow the proper procedures for the set-up, installation and start-up of all systems. Problems (short and long-term) occur when the systems are installed incorrectly. If any questions arise after installation, consult the trouble shooting guide for assistance. NOTE; ONCE INSTALLED CORRECTLY, THE MORE CONSISTENTLY THIS PRODUCT IS USED THE BETTER.
Trouble Shooting Guide - Reverse Osmosis Systems Problems with Start-Up &/or Filter Replacements Possible Causes Solution No water after installing the system Improper start-up of the unit upon installation or filter replacement Start with the start-up procedures and follow them as if the unit was just installed No water after replacing filters, in-line filters, &/or membranes It takes hours after a proper install to have a full tank for use Make sure start-up was performed correctly and wait fo
Trouble Shooting Guide - Reverse Osmosis Systems Problem - Leaks Connections & Tubing Possible Causes Solution Any or All Leaks Excessive pressure or pressure surges above 65 PSI Pressure reducing valve (PRV) at main water supply to maintain pressure at or below 65 PSI or the addition of a Pressure Limiting Valve (item# FMP-60) on the inlet tube prior to the point of use unit Leaks at any of the FOUR (4) INSTALLED Tubing Connections: Various causes to inspect See the Following; •Follow instructi
Trouble Shooting Guide - Reverse Osmosis Systems Leaks - Housings Leak at cartridge housing, Leak at membrane housing, or UV housing (if applicable) Water Flow Issues No water Not enough water Water flow is restricted Low flow from unit www.ewswater.
Trouble Shooting Guide - Reverse Osmosis Systems Problem - Water Quality Water Cloudy Possible Causes Solution Air in system System start-up Filter or membrane replacement New installation, changing filters, disinfecting the system Open/close and open of water supply to home or in home Air in the system is a normal occurrence with initial start-up of the RO system. This milky or cloudy look will disappear during normal use within 1-2 weeks.
Trouble Shooting Guide - Reverse Osmosis Systems Problem - Water Quality Possible Causes High Total Dissolved Solids (TDS) in the Product Water TDS “Creep” Tank has never been completely emptied Low Quality Water Taste, Odor Clogged prefilter(s) Low water pressure and/or Tank fills too fast RO membrane is new RO membrane issues RO membrane is expended Low Quality Water Taste, Odor Solution At night before bedtime, open dispenser, close other devices, then empty all the water from the tank.
Trouble Shooting Guide - Reverse Osmosis Systems Drain - Issues Possible Causes Solution No drain water Clogged brine restricter Replace brine restricter Leaking drain assembly Misalignment of hole in drain saddle.
7 5, 6 31 illustrated quick connect fitting and proper tubing connection Five-Stage Reverse Osmosis 18 30 Schematic, Parts: Shown with Booster Pump Option for illustration purposes only 9 12 Optional: UV Disinfection Moduleshown below 8 1 14 92 29 93 13 13 8 95 95 91 94 31 Double Clips not shown with this UV illustration 10 Optional: Booster Pump 9 9 9 28 9 9 28 9 24 32 28 4 Ref. No. Part No.
Warranty Notification Notification: This warranty is referenced by EWS, Inc. in all literature, addressed in General Terms and Standard Conditions of Sale, and is published in its entirety in all EWS, Inc. product manuals, websites, and in all service guides supplied with all product. Limited Warranty: EWS, Inc.
Warranty Information and the Purchaser’s Responsibility Keep a record of the purchase receipt and/or installation receipt. Purchaser is required fill out warranty registration form(s) on applicable product(s) and register all product by either online @ www.ewswater.com, telephone, postal delivery, fax, e-mail (either register@ewswater.com or information provided to customerservice@ewswater.com). Failure to do so voids the warranty unless restricted by state regulations. EWS, Inc.
PRICING POLICY EWS, Inc. has a current, published, and widely distributed, Pricing Guide that contains suggested list prices for certain water filtration and conditioning products ("Products") sold by EWS, Inc. ("Seller"). Seller assumes no obligation to sell to anyone any of the Products listed herein, known or unknown, at any price. This current Pricing Guide has been prepared for the convenience of Seller's distributors and their customers.
www.ewswater.com O: 702.256.8182; M-F 8:30am-4:30pm PST E: customerservice@ewswater.
The EWS, Inc./Environmental Water System Product available through: Authorized Kitchen & Bath Showrooms, Appliance Showrooms, Building & Plumbing Wholesale Supply Locations and their building, plumbing, HVAC and service contractors, and Authorized Online Distributors. Contact Information: EWS, INC. Environmental Water Systems ewswater.com O: E: F: 702.256.8182 (M-F 8:30am-4:30pm PST) customerservice@ewswater.com 702.256.3744 Mailing Address: 9101 W. Sahara Ave., #105-J8, Las Vegas, NV.