User's Manual LCD TV L26W761 Q41T2601673 1A
TABLE OF CONTENTS TABLE OF CONTENTS ……………………………………………….. 1 FOR YOUR SAFETY …………………………………………………... 2 PRCAUTIONS AND REMINDERS ……………………………………. 3 IMPORTANT SAFETY INSTRUCTIONS …………………………….. 5 OPERATING INSTRUCTIONS ………………………………………. 10 TO USE THE FRONT PANEL CONTROL …………………….. 10 TO USE THE REMOTE CONTROL ……………………………. 11 TO USE THE MENUS ……………………………………………. 12 SETUP MENU …………………………………………………….. 12 VIDEO MENU ……………………………………………………... 13 AUDIO MENU ……………………………………………………... 14 FEATURE MENU ………………………………………………….
FOR YOUR SAFETY Before operating the TV please read this manual thoroughly. This manual should be retained for future reference. FCC Class B Radio Frequency Interference Statement WARNING: (FOR FCC CERTIFIED MODELS) English NOTE: This equipment has been tested and found to comply with the limits for a Class B digital device, pursuant to Part 15 of the FCC Rules. These limits are designed to provide reasonable protection against harmful interference in a residential installation.
PRECAUTIONS AND REMINDERS Don't place the TV in confined spaces or in a box when using it. Unplug immediately if is malfunction like no picture, no video/audio,smoke and bad odor from TV. Unplug immediately if other foreign materials are put inside TV box or if the TV fell down. Don't throw any object inside the TV box like metals or other flammable materials. Prohibit/Avoid opening TV cabinet English Place unit on even surfaces.
English Remember to unplug the AC cord from the AC outlet before cleaning. Do not use liquid cleaners or aerosol cleaners to clean the display. Avoid direct sunlight, dusty, high humidity and smoky areas. Make sure to unplug the unit when not in use for a long period of time (days). Call service personnel to clean the internal part of the TV once a year. Do not cover or block any vents and openings. Inadequate ventilation may shorten the life of the display unit and cause overheating.
IMPORTANT SAFETY INSTRUCTIONS Read before operating equipment Read these instructions. Keep these instructions. Heed all warnings. Follow all instructions. Do not use this apparatus near water. Clean only with a dry cloth. Do not block any of the ventilation openings. Install in accordance with the manufacturers instructions. 8. Do not install near any heat sources such as radiators, heat registers, stoves, or other apparatus (including amplifiers) that produce heat. 9.
English 18. Tilt/Stability – All televisions must comply with recommended international global safety standards for tilt and stability properties of its cabinets design. y Do not compromise these design standards by applying excessive pull force to the front, or top, of the cabinet, which could ultimately overturn the product. y Also, do not endanger yourself, or children, by placing electronic equipment/toys on the top of the cabinet.
PREPARATION English Please, make sure to connect the power plug to the wall outlet socket after connecting the TV to the power cord! 1. Install the base stand; place the TV on a solid surface. Ensure that the TV is placed in a position to allow free flow of air. Do not cover the ventilation openings on the back cover. To prevent any unsafe situations, no naked flame sources, such as lighted candles, should be placed on or in the vicinity. Avoid heat, direct sunlight and exposure to rain or water.
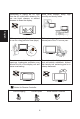
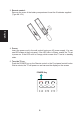
3. Remote control: Remove the cover of the battery compartment. Insert the 2 batteries supplied (Type AA 1.5V). English 4. Power: Insert the power cord in the wall socket having an AC power supply. You can see LED states at the front panel. If the LED color is Green, means the TV set is power on. If the LED color is Orange, which means this TV set is in standby state. 5. Turn the TV on: Push the POWER key on the Remote control or the Front panel control knobs.
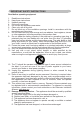
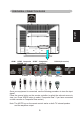
PERIPHERAL CONNECTION GUIDE English AC POWER HDMI HEAD Composite L PHONE Video S-Video R SPDIF Component Audio In Component Pr Pb RS-232 (for service) Line In Y PC L/R VGA 15-pin D-Sub Once your equipment is connected, use the following procedure to view the input signal: Press the source button on the remote controller to select the relevant source to view. (ex: Press VIDEO button to select “Composite Rear” if you have connected a video recorder to Composite Rear socket.
OPERATION INSTRUCTIONS TO USE THE FRONT PANEL CONTROL English 1 VOL▲ VOL ▲ : Press to increase the sound volume level. 2 VOL▼ VOL▼ : Press to decrease the sound volume level. 3 CH ▲ CH ▲ : Press to select the next higher Program number. 4 CH ▼ CH ▼: Press to select the next lower Program number. 5 MENU Menu key: Press to open or exit the OSD menu. 6 INPUT Source key: Press to select the input source. 7 POWER Power key: Press to turn on / off (standby) the TV set.
TO USE THE REMOTE CONTROL POWER Press to power ON/OFF (standby) TV.(Note:1.TV is never completely power off unless physically unplugged. 2.Press to turn on TV after the power on status LED had changed to the amber color and stopped flashing. ) DISPLAY VIDEO PREV CH Press to display the previous TV . Press to show the information about the input source、TV channel、 display resolution and current time. Press repeatedly to choose SVideo/ Composite source mode (Video 1 ~ 2).
TO USE THE MENUS 1. 2. 3. 4. 5. Press the MENU button to display the main menu Use the cursor up/down to select a menu item. Use the cursor left/right to enter a submenu. Press the OK button to enable/disable the function. Press the MENU or EXIT button to exit the menu. English Press the MENU button to enter the main OSD (On Screen Display). Adjust the items including Setup menu, Video menu, Audio menu and Feature menu.
7. Menu Language: Select the menu display language. (English / Espanol / Francais) 8. Aspect Ratio: Select the display aspect ratio. (Normal/Zoom/Wide/Cinema) VIDEO MENU The Video menu in most source modes shows as below. It provides several video adjustment items for user fine tuning the video display. Only in VGA source modes, the Video menu simply provides Contrast, Brightness, Backlight and Settings (Preset) items. 1. Contrast: Video contrast adjustment, the tuning range is 0 ~ 100. 2.
AUDIO MENU The Audio menu in TV mode shows as below. It provides audio adjustment for user to modify the audio setting. Audio language setting is only available with ATSC TV source, the option is disable under other source modes. English 1.Audio Language:Change the audio language setting on ATSC TV programs The number of the supported audio languages depends on the ATSC TV programs. 2. Bass: Bass tone adjustment, the tuning range is 0 ~ 63. (The default state is enabled) 3.
FEATURE MENU English The Feature menu in TV mode shows as below. It provides certain optional control functions such as time set, sleep timer, advanced video menu, Password Set, parental control (V-chip) and Digtal closed caption setting. This menu gives users the most flexibilities to satisfy their generally demands. According to the various requirements in different source modes, certain features should be hidden (disable) on the menu. The details footnotes will be described clearly below. 1.
【Colour Temp】gives three color temperature modes as: Normal、Warm and Cool. The default mode is Warm. 【3D Y/C】provides On / Off switches. The default setting is On. 【 Dynamic Contrast】user can choose 0n or Off. 【Setting】restores the default advanced video option settings. English 4. Password Set: Change the 4-numeral parental control password. Three steps are required for changing the password: Enter Old Password -> Enter New Password -> Confirm New Password.
English 6. Digital Captions: Select the close caption options ( Service 1-6, Text 1-4 and CC 1-4) in digital TV mode. When select service 1 to service 6 you canmodulate parameters in the Digital Close Caption. 7. Digital Close Caption: Provide numerous options for setting the digital close caption style. In the sub-menu. 【Style】item can be set as Automatic or Custom mode. If Custom mode is selected, user can modify the detail styles described below.
English 【Size】: Digital close caption font size, which can be set as Small、Normal or Large. 【Font】: Digital close caption font style, which can be chosen as Default or Font 1 ~ 7. 【Text Color】: Giving Red / Green / Blue/ Yellow / Magenta / Cyan / Black / White Colors. 【Text Opacity】: Giving Transparent / Translucent / Solid / Flashing modes. 【Background Color】: Giving Red / Green / Blue / Yellow / Magenta / Cyan / Black / White Colors.
TIPS Care of the screen Mobile telephone warning To avoid disturbances in picture and sound, malfunctioning of your TV or even damage to the TV, keep away your mobile telephone from the TV. End of life directives We are paying a lot of attention to produce environmentally friendly in green focal areas. Your new receiver contains materials, which can be recycled and reused.
Regulatory Notices – Federal Communications Commission Notice English This equipment has been tested and found to comply with the limits for a Class B digital device, pursuant to part 15 of the FCC Rules. These limits are designed to provide reasonable protection against harmful interference in a residential installation.
PRODUCT SPECIFICATION Television System: NTSC standard ATSC standard (8-VSB, Clear-QAM) HDMI Terminals: HDMI INPUT: Rear HDMI x1 HDCP compliant E-EDID compliant Supported scan rates: 1080i, 720p, 480p, 480i Channel Coverage: VGA Terminals: VHF: 2 through 13 UHF: 14 through 69 Cable TV: Mild band (A-8 through A-1, A through I) Super band (J through W) Hyper band (AA through ZZ, AAA, BBB) Ultra band (65 through 94, 100 through 125) VGA INPUT: Rear VGA (D-SUB 15 Pin) Input x1 E-EDID compliant Supported s
BEFORE CALLING SERVICE Please make these simple checks before calling service. These tips may save you time and money since charges for receiver installation and adjustments of customer controls are not covered under your warranty. Symptoms Items to Check and Actions to follow “Ghost ” or double image *This may be caused by obstruction to the English antenna due to high rise buildings or hills. Using a highly directional antenna may inprove the picture.
GLOSSARY Audio / Video Inputs Menu An on-screen listing of features shown on the TV screen is made available for user adjustments. MPAA Motion Picture Association of America Multichannel Television sound (MTS) The broadcasting standard, which allows stereo sounds to be transmitted with the TV picture. Programming The procedure of adding or deleting channel numbers into the TV’s memory.
APPENDIX English Use of Wall Mount Bracket 1. Remove the M6 screws from the base. 2. Fasten M6 screws to secure the wall mount bracket.
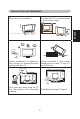
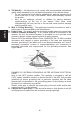
MOUNTING THE TV BASE English The TV base will be separated with the TV unit. You should Install the base before you use the TV unit. 1. Place the TV on its face on a soft blanket. 2. Install the base stand with three screws. 3. Place the TV on the table.