User's Manual LCD TV L37W698
Content FOR YOUR SAFETY ......................................................................................................... 1 PRECAUTIONS AND REMINDERS .................................................................................. 2 IMPORTANT SAFETY INSTRUCTIONS ........................................................................... 3 Wall-mount instruction ....................................................................................................... 4 ACCESSORIES.....................
FOR YOUR SAFETY Before operating the TV please read this manual thoroughly. This manual should be retained for future reference. FCC Class B Radio Frequency Interference Statement WARNING: (FOR FCC CERTIFIED MODELS) NOTE: This equipment has been tested and found to comply with the limits for a Class B digital device, pursuant to Part 15 of the FCC Rules. These limits are designed to provide reasonable protection against harmful interference in a residential installation.
PRECAUTIONS AND REMINDERS Place unit on even surfaces. Don't place the TV in confined spaces or in a box when using it. Unplug immediately if is malfunction like no picture, no video/audio,smoke and bad odor from TV. Unplug immediately if other foreign materials are put inside TV box or if the TV fell down. Don't throw any object inside the TV box like metals or other flammable materials.
Remember to unplug the AC cord from the AC outlet before cleaning. Do not use liquid cleaners or aerosol cleaners to clean the display. Avoid direct sunlight, dusty, high humidity and smoky areas. Make sure to unplug the unit when not in use for a long period of time (days). Call service personnel to clean the internal part of the TV once a year. Do not cover or block any vents and openings. Inadequate ventilation may shorten the life of the display unit and cause overheating.
IMPORTANT SAFETY INSTRUCTIONS Read before operating equipment 1. 2. 3. 4. 5. 6. 7. Read these instructions. Keep these instructions. Heed all warnings. Follow all instructions. Do not use this apparatus near water. Clean only with a dry cloth. Do not block any of the ventilation openings. Install in accordance with the manufacturers instructions. 8. Do not install near any heat sources such as radiators, heat registers, stoves, or other apparatus (including amplifiers) that produce heat. 9.
18. Tilt/Stability – All televisions must comply with recommended international global safety standards for tilt and stability properties of its cabinets design. Do not compromise these design standards by applying excessive pull force to the front, or top, of the cabinet, which could ultimately overturn the product. Also, do not endanger yourself, or children, by placing electronic equipment/toys on the top of the cabinet.
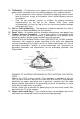
Wall-mount instruction Preparing To Install The Optional Wall Mount Arm (not included) This TV can be attached to a wall mounting arm you can purchase separately. Turn the power OFF then disconnect the cables from the TV before performing the procedure below. 1. Lay the TV face down on a soft surface. 2. Remove the 4 screws attached to the stand base. 3.Remove the stand base.
Attaching The Optional Wall Mount Arm (not supplied) Follow these steps to finish installing the wall mounting arm: 1. Place the wall mounting arm onto the back of the TV. Line up the holes of the arm with the holes in the back of the monitor. 2. Insert the 6 screws into the holes and tighten. 3. Reconnect the cables. Refer to the user’s manual that came with the optional wall mounting arm for instructions on attaching it to the wall. NOTE 200mmx400mm VESA high hole (n=6), M6 X 10 mm, pitch =1.
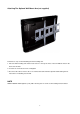
ACCESSORIES Thank you for purchasing this LCD-TV.
FRONT PANEL BUTTONS Volume Down ❾ Volume Up On Screen Display Menu On/Off CH Down CH Up Enter Power ON/OFF button Remote Control Receiver Power LED Indicator Manufactured under license from Dolby Laboratories. Dolby and the double-D symbol are trademarks of Dolby Laboratories. (Only for DTV source in this model.
BACK PANEL BUTTONS A B C D E F G HI J K LM N O P A Power (AC input) B Composite Video input C Headphone Jack D HDMI-2/ DVI-2 Input Terminal E HDMI-1/ DVI-1 Input Terminal F VGA signal input G VGA/ DVI-1 Audio input H DVI-2 signal Audio input (left/right) I YPbPr-2 signal input J YPbPr-1 signal input K S-Video input L YPbPr-2 signal Audio input (left/right) M YPbPr-1 signal Audio input (left/right) N AV/ S-Video signal Audio input (left/right) O Audio output (left/right)
REMOTE CONTROL 9
Remote control button function as follows: 1 POWER Power On/Off 2 MTS Select Mono, Stereo or SAP sound 3 INFO Display current information 4 SOUND Select Sound modes 5 SLEEP Set timer to turn off TV 6 FREEZE “Freeze-Frame” the current screen 7 ZOOM Adjust window size 8 0~9, - number Directly channel select 9 VOL + and VOL - Adjust volume UP/DOWN 10 GUIDE Select electronic program guide (EPG) 11 FAV.
INSTALLATION Connecting RF antenna and Cable TV Make sure the power is OFF before installing your LCD TV. 1) AIR TV: Connect the LCD TV to TV antenna with 75-ohm coaxial cable. Preset the air TV channels into memory with AUTO SCAN function when using an antenna TV system. This air input jack both support TV and DTV systems. Besides, the TV system (NTSC) and DTV system (ATSC) can be found by the scanning of “AIR” in the AUTO SCAN function. See page 15.
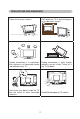
2) With S-Video cable: S-Video Cable (not supplied) Audio in Cable (not supplied) VCD or DVD Player 3) With YPbPr cable: YPbPr Cable (not supplied) Audio in Cable (not supplied) VCD or DVD Player 4) With HDMI 1 or HDMI 2 cable: VCD or DVD Player (DVD Player should have the HDMI output terminal) HDMI Cable (not supplied) 12
5) With DVI cable (HDMI 1) [for AV device]: VCD or DVD Player (DVD Player should have the HDMI output terminal) Audio Cable (not supplied) HDMI-DVI Cable (not supplied) 6) With DVI cable (HDMI 2) [for AV device]: VCD or DVD Player (DVD Player should have the HDMI output terminal) Audio Cable (not supplied) HDMI-DVI Cable (not supplied) Connecting to External Stereo System to Listen to LCD TV Sound Connect the audio output terminal of the LCD TV to audio in terminal of the stereo system (stereo system s
Connecting to the Headphone Connect the headphone to the headphone output terminal of the LCD TV. (Headphone sold separately). Headphone (not supplied) Connecting to a Computer 1) With VGA Cable: Connect the VGA cable from VGA output of the computer to the VGA terminal input of your LCD TV. Also, connect the Audio In cable (green) from the audio output of your computer to the audio input terminal (green) of the LCD TV.
Connecting to A/V Device with SPDIF input Connect SPDIF optical cable from A/V device into the SPDIF output connector of LCD TV. Audio Cable (not supplied) A/V Device SPDIF Optical Cable (not supplied) Stereo System Connecting with the power cord Connect the power cord to the AC inlet on the back of your LCD TV, after all connections have been completed, and plug the other end of the power cord into a correctly grounded electrical outlet.
BASIC OPERATION To operate your LCD TV, you may use the TV remote control or top panel buttons to select input source, change channels, or adjust volume. Turning on the LCD TV Before using the LCD TV: 1. Connect external equipment properly. 2. Insert the power plug and the power LED indicator will light red. Power On/Off To turn the LCD TV on/off : Press POWER button under the LCD TV, or press the POWER button on your remote control to turn on/off the TV.
Electronic Program Guide (EPG) Press the GUIDE button on the remote control and the program information for the channel you are watching will be displayed on the screen with the live program content in a small window in the lower left corner of the panel. Press the ◄ or ► button to scroll up or down the channels. Each time you pause at a channel, the program list will update with the program schedule for that channel and the window will show the live program for that channel.
Using the OSD function You can use the OSD menus and options to adjust various settings by using the remote control. The basic operation is as following: Press MENU to display OSD menu. Press ▲▼ to select your desired top Menu, and press ENTER or ◄► to enter it. Use ▲▼ to select the control you want to adjust. When selecting the control with II►, press ENTER to enable the function. Press ◄► to adjust or select the settings. Press MENU to exit from the OSD menu.
Tint: To adjust tint level. (right: greenish tone, left: reddish tone.) Sharpness: To adjust picture sharpness. (right: sharper, left: softer.) Color Temperature: Press ENTER to select color temperature from User, Cool, Normal, and Warm. (When Color Temperature is selected to User, the R, G, B Gain level can be adjusted separately.) Auto Adjust: Press ENTER to auto adjust picture’s horizontal position, vertical position, fine tune and H-Size. VGA: Press ENTER to adjust VGA setting. H.
In AV, S-Video, YPbPr 1, YPbPr 2, HDMI 1, HDMI 2, VGA source: Balance: To adjust left and right audio balance. Bass: To adjust bass. Treble: To adjust the treble. Surround: To enjoy a concert hall effect, select “On” when stereo is playing. Reverb: To enjoy the reverb sound effect of Concert, Living Room, Hall, Bathroom, Cave, Arena, or Church. Equalizer: To select equalizer modes from Rock, POP, Live, Dance, Techno, Classic, Soft. SPDIF Type: To select SPDIF Type from Dolby Digital, PCM, or Off.
Channel Skip: Press ENTER to skip the channel. To restore the channel, press ENTER again. MTS: To select audio mode from Mono, Stereo, or SAP when available. Audio Language: To select audio language from English, Spanish, or French. Setup Menu —To set up OSD window In TV, AV, S-Video, YPbPr 1, YPbPr 2, HDMI 1, HDMI 2 source: (When in AV, S-Video, YPbPr 1, YPbPr 2, HDMI 1 or HDMI 2, the TV option on the left does not appear.
Blue Mute: To set the background color to blue when there is no signal. Time Setup: To set Time Zone, Time, Sleep Timer, and Auto Sleep. Time Zone: To select the time zone appropriate to your location. Time: To set the current time. ‧ Auto Synchronization: When “Auto Synchronization” is enabled, the date and time will be automatically synchronized according to the program content. ‧ Timer: To set power-on and power-off time. Sleep Timer: To set the off timer from 10~120 minutes.
‧ Font Size: To select a font size from Large, Small, or Medium. ‧ Font Color: To select a font color from Black, White, Green, Blue, Red, Cyan, Yellow, or Magenta. ‧ Font Opacity: To select font opacity from Solid, Translucent, or Transparent. ‧ Background Color: To select background color. ‧ Background Opacity: To select background opacity. ‧ Window Color: To select window color. ‧ Window Opacity: To select window opacity. Memory Recall: To restore the factory default settings.
Channel Block: To block channels. Use ▲▼ to select the channel you want to block, and then press ENTER to block or unblock it. Program Block: To set TV and Movie Ratings. Rating Enable: Choose “On” to enable the below settings. U.S. TV Ratings: To adjust TV blocking level in the US. You can select between TV-Y, TV-Y7, TV-G, TV-PG, TV-14, or TV-MA. The TV Ratings in the US are defined as following.
U.S. Movie Ratings: To adjust movie blocking level in the US. You can select between G, PG, PG-13, R, NC-17, or X. The Movie Ratings in the US are defined as following. G General audience R Restricted PG Parental guidance suggested NC-17 No one 17 and under limited PG-13 Parents strongly cautioned X Adult audience only Use ENTER button to block or unblock the ratings, and use MENU to exit. Canadian English Ratings: To adjust blocking level in English-speaking region of Canada.
E 13 and + Not appropriate for children of less than 13 years G 16 and + Not appropriate for children of less than 16 years 8 and + Children eight years and older 18 and + Reserved to adults Use ENTER button to block or unblock the ratings, and use MENU to exit. Block Unrated: To block unrated movie or TV programs. Input Block: To set the input source to be blocked. Users will not be able to watch the content coming from the blocked input source.
TECHNICAL SPECIFICATION LCD Type 37.02” TFT Active Matrix 0.6 (H) x 0.6 (V) mm pixel pitch Input signal Color Filter RGB vertical stripe Glass surface Anti-Glare RGB RGB analog (0.7/1.
CARE AND MAINTENANCE Care Avoid exposing your LCD TV directly to sunlight or other heat source. Place your LCD TV away from the sun to reduce glare. Put your LCD TV in a well ventilated area. Do not place anything heavy on top of your LCD TV. Make certain your LCD TV is installed in a clean and moisture-free area. Keep your LCD TV away from magnets, motors, transformers, speakers, and TV sets.